Whirlpool WRT111SFAB Installation Guide
Whirlpool WRT111SFAB Manual
 |
View all Whirlpool WRT111SFAB manuals
Add to My Manuals
Save this manual to your list of manuals |
Whirlpool WRT111SFAB manual content summary:
- Whirlpool WRT111SFAB | Installation Guide - Page 1
Doors 5 Adjust the Doors 8 REFRIGERATOR FEATURES 8 Refrigerator Shelves 8 Meat Drawer 8 Crisper 9 Utility or Egg Bin 9 FREEZER FEATURES 9 Freezer Shelf 9 DOOR FEATURES 10 Door Rails or Trivets 10 Can Racks and Door Bins 10 Vacation and Moving Care 10 PROBLEM SOLVER 11 W10475403A - Whirlpool WRT111SFAB | Installation Guide - Page 2
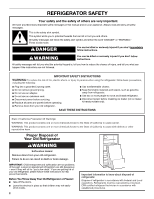
power before servicing. ■ Replace all parts and panels before operating. ■ Remove doors from your old refrigerator. ■ refrigerator. ■ Use two or more people to move and install refrigerator. ■ Disconnect power before installing ice maker (on ice maker kit ready models only). SAVE THESE INSTRUCTIONS - Whirlpool WRT111SFAB | Installation Guide - Page 3
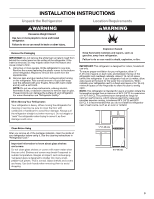
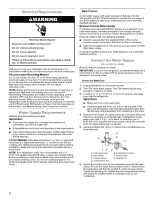
use only. To ensure proper ventilation for your refrigerator, allow ¹⁄₂" (1.25 cm) of space on each side, and between the top of the refrigerator and overhead cabinets. Allow 2" (5 cm) of space behind the refrigerator. If your refrigerator has an ice maker, allow extra space at the back for the - Whirlpool WRT111SFAB | Installation Guide - Page 4
(Thermostat, Refrigerator or Freezer Control depending on the model) to the desired setting. See "Using the Controls." Water Supply Requirements Read all directions before you begin. IMPORTANT: ■ If you turn the refrigerator on before the water line is connected, turn the ice maker OFF. ■ All - Whirlpool WRT111SFAB | Installation Guide - Page 5
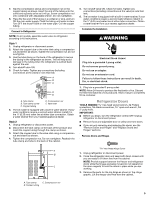
leak. 6. The ice maker is equipped with support between the freezer and refrigerator doors while the hinges are being moved. Do not depend on C the door magnets to hold the doors in place while you are working. 3. Remove the parts for the top hinge as shown in Top Hinge graphic. Lift the freezer - Whirlpool WRT111SFAB | Installation Guide - Page 6
refrigerator and install it on the opposite side. 4. Move the parts of the top hinge, center hinge and bottom hinge to the opposite side. Doors 1. Remove door hinge hole plug from top of freezer use an extension cord. Failure to follow these instructions can result in death, fire, or electrical shock - Whirlpool WRT111SFAB | Installation Guide - Page 7
& Replacement Top Hinge A B C A. 5/16" Hex-Head Hinge Screws B. Top Hinge C. Spacer Center Hinge A B A. Center Hinge B. 5/16" Hex-Head Hinge Screws Bottom Hinge A B C A. Bottom Hinge B. 5/16" Hex-Head Hinge Screws C. Leveler Door Swing Reversal (optional) 1-1 A A. 5/16" Hex-Head Hinge Screws and - Whirlpool WRT111SFAB | Installation Guide - Page 8
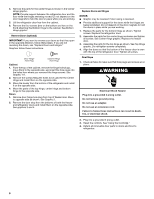
many small, pebble-size pieces. This is normal. Glass shelves and covers are heavy. Use both hands when removing them to avoid dropping. Refrigerator Shelves (Glass shelves on some models) The shelves in your refrigerator are adjustable to match your individual storage needs. Storing similar food - Whirlpool WRT111SFAB | Installation Guide - Page 9
Meat Storage Guide Store most meat in covers are heavy. Use both hands when removing them to avoid dropping. Freezer Shelf (on some models) To remove and replace the freezer shelf: 1. Remove items from the shelf. 2. Lift back of shelf over stop and slide shelf straight out. 3. Replace the shelf - Whirlpool WRT111SFAB | Installation Guide - Page 10
to the household water supply, turn off the water supply to the refrigerator. Property damage can occur if the water supply is not turned off. 3. If you have an automatic ice maker, turn off the ice maker. NOTE: Depending on your model, raise the wire shutoff arm to OFF (up) position, or press the - Whirlpool WRT111SFAB | Installation Guide - Page 11
" section for preparation instructions. Also, if your refrigerator has an automatic ice maker, remember to reconnect the water supply to the refrigerator. PROBLEM SOLVER First try the solutions suggested here or visit our website to possibly avoid the cost of a service call. WARNING WARNING - Whirlpool WRT111SFAB | Installation Guide - Page 12
occurs as ice is being ejected from the ice maker mold. The door will not ■ The door is blocked open - Move food packages away from door. Push bin or shelf back into the correct close completely position. Make sure the crisper cover is fully pushed in, so that the back rests on the supports. The
-
 1
1 -
 2
2 -
 3
3 -
 4
4 -
 5
5 -
 6
6 -
 7
7 -
8
-
9
-
10
-
11
-
12
 |
 |

Do Not Throw Away — additional important safety information included.
INSTALLATION INSTRUCTIONS AND
OWNER’S MANUAL
TOP MOUNT REFRIGERATOR
Table of Contents
REFRIGERATOR SAFETY
.....................................................................
2
Proper Disposal of Your Old Refrigerator
...........................................
2
INSTALLATION INSTRUCTIONS
.........................................................
3
Unpack the Refrigerator
......................................................................
3
Location Requirements
.......................................................................
3
Electrical Requirements
......................................................................
4
Water Supply Requirements
...............................................................
4
Connect the Water Supply
..................................................................
4
Refrigerator Doors
...............................................................................
5
Adjust the Doors
.................................................................................
8
REFRIGERATOR FEATURES
...............................................................
8
Refrigerator Shelves
............................................................................
8
Meat Drawer
........................................................................................
8
Crisper
.................................................................................................
9
Utility or Egg Bin
.................................................................................
9
FREEZER FEATURES
...........................................................................
9
Freezer Shelf
.......................................................................................
9
DOOR FEATURES
...............................................................................
10
Door Rails or Trivets
..........................................................................
10
Can Racks and Door Bins
................................................................
10
Vacation and Moving Care
...............................................................
10
PROBLEM SOLVER
.............................................................................
11
W10475403A