Whirlpool WRT138FFD Owners Manual - Page 7
Reverse Doors and Hinges optional, Reverse Center Hinge, Reverse Freezer Door
 |
View all Whirlpool WRT138FFD manuals
Add to My Manuals
Save this manual to your list of manuals |
Page 7 highlights
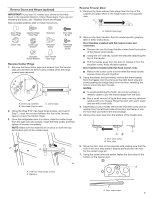
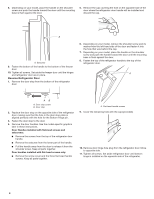
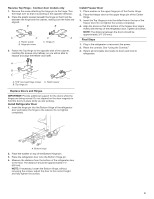
Reverse Doors and Hinges (optional) IMPORTANT: If you want to reverse your doors so that they open in the opposite direction, follow these steps. If you are not reversing the doors, see "Replace Doors and Hinges." See complete graphics later in these instructions. Reverse Freezer Door 1. Remove the three cabinet hole plugs from the top of the cabinet and place them in the hinge holes on the opposite side. A Door Hinge Hole Plug Cabinet Hinge Hole Plug Setscrew Door Stop Screw Dome Cap Dome Cap Washer Shoulder Screw Flat-Head Handle Screw Shoulder Screw Washer Door Handle Hole Cap Reverse Center Hinge 1. Remove the three dome caps and screws from the handle side and use them to fill the holes created when the hinge screws were removed. A B C A. Dome cap washers C. Dome caps B. Hex-head hinge screws 2. Using the three 5⁄16" hex-head hinge screws, removed in Step 1, insert two screws halfway into the holes, leaving space to insert the Center Hinge. 3. Once the refrigerator door is in place, slide the center hinge from the right onto the screws, insert the third screw, and then tighten all screws completely. NOTE: Make sure the washers are in place on both the top and bottom pins of the center hinge. A B A. Cabinet hole plugs 2. Remove the door handles. See the model specific graphics later in these instructions. Door Handles installed with flat-head screws and setscrews: ■■ Remove the two flat-head handle screws from the bottom of the freezer door handle. ■■ Using the 1/8" hex key, loosen the setscrew attaching the top of the handle. ■■ Pull the handle away from the door to release it from the shoulder screw. Keep all parts together. Door handles installed with flat-head screws only: ■■ Remove the screw cover and the three flat-head handle screws. Keep all parts together. 3. Using the plastic tool (provided), remove the brand badge from the freezer door by prying up the right-hand side and slowly peeling the badge away from the door, revealing the hole to mount the door handle. NOTES: ■■ To avoid scratching the finish, do not use a sharp or metallic object to pry the brand badge from the door. ■■ Rub a small amount of liquid dish soap over any adhesive residue with your fingers. Rinse the door with warm water and dry with a soft cloth. 4. Depending on your model, remove the shoulder screw and its washer from the left-hand side of the door and fasten it into the hole that was behind the brand badge. 5. Remove the door stop from the bottom of the freezer door. AB A. Door stop screw B. Door stop 6. Move the door stop to the opposite side making sure that the hole in the door stop plate is aligned perfectly with the hole for the center hinge pin. 7. Using the screw removed earlier, fasten the door stop to the bottom of the freezer door. A A A. 5⁄16" hex-head hinge screws B. Washers A. Door stop screw 7
-
 1
1 -
 2
2 -
 3
3 -
 4
4 -
 5
5 -
 6
6 -
 7
7 -
 8
8 -
 9
9 -
 10
10 -
 11
11 -
 12
12 -
13
-
14
-
15
-
16
-
17
-
18
-
19
-
20
-
21
-
22
-
23
-
24
-
25
-
26
-
27
-
28
-
29
-
30
-
31
-
32
-
33
-
34
-
35
-
36
-
37
-
38
-
39
-
40
-
41
-
42
-
43
-
44
-
45
 |
 |
