Whirlpool WTW5057LW Owners Manual - Page 9
Level Washer, Clear water lines, Connect inlet hoses to washer, Check for leaks, Secure drain hose
 |
View all Whirlpool WTW5057LW manuals
Add to My Manuals
Save this manual to your list of manuals |
Page 9 highlights
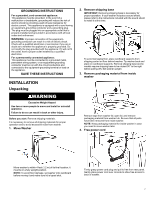
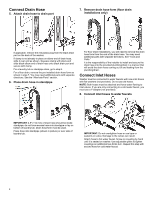
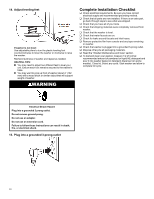
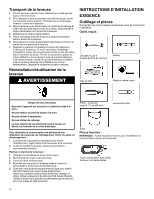
9. Clear water lines 12. Secure drain hose Run water for a few seconds through hoses into a laundry tub, drainpipe, or bucket to prevent clogs. Water should run until clear. Make note of which hose is connected to hot water to help in attaching hoses to washer correctly. 10. Connect inlet hoses to washer Secure drain hose to laundry tub leg, drain standpipe, or inlet hoses for wall standpipe with cable tie. It is the responsibility of the installer to install and secure the drain hose into the provided plumbing/drain in a manner that will avoid the drain hose coming out of or leaking from the plumbing/drain. Level Washer NOTE: Level washer properly to reduce excess noise and vibration. 13. Check levelness of washer IMPORTANT: To reduce risk of hose failure, replace the hoses every 5 years. Record hose installation or replacement dates for future reference. � Do not overtighten hose or use tape or sealants on valve. Damage to the valves can result. � Periodically inspect and replace hoses if bulges, kinks, cuts, wear, or leaks are found. Attach hot water hose to red hot water inlet valve. Screw coupling by hand until it is snug. Use pliers to tighten couplings an additional two-thirds turn. Repeat with cold water inlet valve. 11. Check for leaks Move the washer to its final location. Place a level on top edges of washer. Use side seam as a guide to check levelness of sides. Check levelness of front using lid, as shown. Rock washer back and forth to make sure all four feet make solid contact with floor. If washer is level, skip to step 15. Turn on water faucets to check for leaks. A small amount of water may enter washer. It will drain later. 9
-
 1
1 -
2
-
3
-
 4
4 -
 5
5 -
 6
6 -
 7
7 -
 8
8 -
 9
9 -
 10
10 -
 11
11 -
 12
12 -
 13
13 -
 14
14 -
15
-
16
-
17
-
18
-
19
-
20
-
21
 |
 |
