Whirlpool WUW55X24HS Owners Manual - Page 12
Troubleshooting
 |
View all Whirlpool WUW55X24HS manuals
Add to My Manuals
Save this manual to your list of manuals |
Page 12 highlights
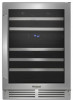
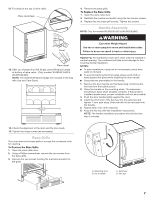
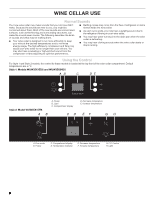
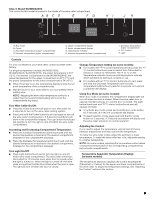
4. Wash stainless steel and painted metal exteriors with a clean sponge or soft cloth and a mild detergent in warm water. Do not use abrasive or harsh cleaners or cleaners containing chlorine. These can scratch or damage materials. Dry thoroughly with a soft cloth. NOTE: To keep your stainless steel wine cellar looking like new and to remove minor scuffs or marks, it is suggested that you use the manufacturer's approved Stainless Steel Cleaner and Polish. To order the cleaner, see "Accessories." IMPORTANT: This cleaner is for stainless steel parts only. Do not allow the Stainless Steel Cleaner and Polish to come into contact with any plastic parts such as the trim pieces, dispenser covers, or door gaskets. If unintentional contact does occur, clean plastic part with a sponge and mild detergent in warm water. Dry thoroughly with a soft cloth. 5. Replace the racks. 6. Clean the condenser coils regularly. They are located behind the base grille. Coils may need to be cleaned as often as every other month. This may help save energy. ■ Remove the base grille. See "Base Grille." ■ Use a vacuum cleaner with an extended attachment to clean the condenser coils when they are dusty or dirty. ■ Replace the base grille. 7. Plug in wine cellar or reconnect power. Vacation and Moving Care Vacations If you choose to turn the wine cellar off before you leave, follow these steps. 1. Remove all wine bottles from the wine cellar. 2. Unplug the wine cellar. 3. Clean the wine cellar. See "Cleaning." 4. Tape a rubber or wood block to the top of the door to prop it open far enough for air to get in. This stops odor and mold from building up. Moving When you are moving your wine cellar to a new home, follow these steps to prepare it for the move. 1. Remove all wine bottles from the wine cellar. 2. Unplug the wine cellar. 3. Clean, wipe, and dry it thoroughly. 4. Take out all removable parts, wrap them well, and tape them together so they don't shift and rattle during the move. 5. Tape the doors shut and tape the power cord to the wine cellar. When you get to your new home, put everything back and refer to the "Installation Instructions" section for preparation instructions. TROUBLESHOOTING Try the solutions suggested here first in order to avoid the cost of an unnecessary service call. Your wine cellar will not operate WARNING Electrical Shock Hazard Plug into a grounded 3 prong outlet. Do not remove ground prong. Do not use an adapter. Do not use an extension cord. Failure to follow these instructions can result in death, fire, or electrical shock. ■ Is the power supply cord unplugged? Plug into a grounded 3 prong outlet. ■ Has a household fuse blown or has a circuit breaker tripped? Replace the fuse or reset the circuit. ■ Is the Wine Cellar Control turned to the Off position? See "Using the Control." The lights do not work ■ Is the power supply cord unplugged? Plug into a grounded 3 prong outlet. ■ Your wine cellar is equipped with LED lighting which does not need to be replaced. If there is power to the wine cellar and the lights do not illuminate when the door is opened, call for service or assistance. The motor seems to run too much ■ Is the temperature outside hotter than normal? Expect the motor to run longer under warm conditions. At normal temperatures, expect your motor to run about 40% to 80% of the time. Under warmer conditions, expect it to run even more of the time. ■ Is the door opened often? Expect the motor to run longer when this occurs. In order to conserve energy, try to get everything you need out of the wine cellar at once, keep wine bottles positioned label side up so that they are easy to find, and close the door as soon as the wine is removed. ■ Is the control set correctly for the surrounding conditions? See "Using the Control." ■ Is the door closed completely? Push the door firmly shut. If it will not shut all the way, see "The door will not close completely" later in this section. ■ Are the condenser coils dirty? This obstructs air transfer and makes the motor work harder. Clean the condenser coils. See "Cleaning." 12
-
 1
1 -
2
-
3
-
4
-
5
-
6
-
 7
7 -
 8
8 -
 9
9 -
 10
10 -
 11
11 -
 12
12 -
 13
13 -
 14
14 -
 15
15 -
 16
16 -
 17
17 -
18
-
19
-
20
-
21
-
22
-
23
-
24
-
25
-
26
-
27
-
28
-
29
-
30
-
31
-
32
-
33
-
34
-
35
-
36
-
37
-
38
-
39
-
40
-
41
-
42
-
43
-
44
 |
 |
