Xerox 2218 Quick Reference Guide
Xerox 2218 - FaxCentre B/W Laser Manual
 |
UPC - 095205233940
View all Xerox 2218 manuals
Add to My Manuals
Save this manual to your list of manuals |
Xerox 2218 manual content summary:
- Xerox 2218 | Quick Reference Guide - Page 1
is empty ¾ Red light - an error has occurred Paper Jam Bypass Tray 1 Tray 2 Enter Paper Supply Document Feeder Control Panel Output Tray Paper Tray 1 Stop Start Document Input Tray Bypass Tray FAX SETUP Phone Book Setup 1. Press Machine Status, select Fax Setup using the navigation keys and
-
 1
1
 |
 |
FaxCentre 2218
Quick Reference
English
FAX SETUP
FAX SETUP
ADVANCED FAX FEATURES
ADVANCED FAX FEATURES
OVERVIEW
OVERVIEW
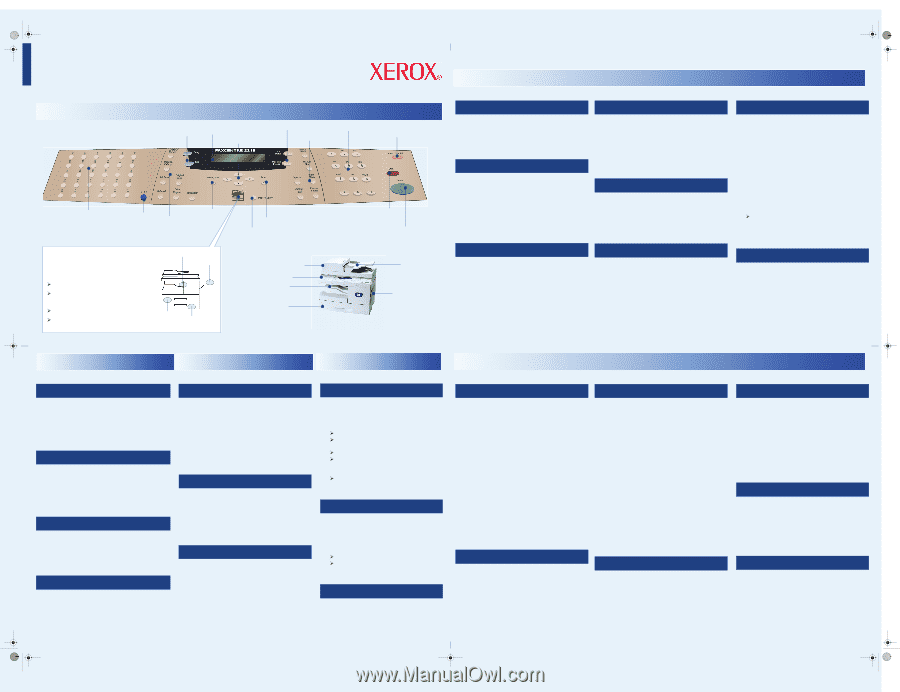
F
AX
C
ENTRE
2218 C
ONTROL
P
ANEL
Part No. 700N00150 Rev B
GENERAL SETUP
GENERAL SETUP
COPY
COPY
BASIC FAX
BASIC FAX
Keypad
Start
Clear / Clear All
Display
Paper Supply
Navigation keys
Enter
Status keys
Copy/Fax keys
Feature
keys
Fax Function keys
Menu/Exit
Document Feeder
Control Panel
Paper Tray 1
Bypass
Tray
Document
Input Tray
Output Tray
Stop
Status Map
Used to identify the status of the paper trays
and if an error has occurred.
Green light
- indicates selected tray
Multiple lights
- switches to a different
tray if the current tray runs out
Flashing light
- tray is empty
Red light
- an error has occurred
Paper Jam
Bypass
Tray 2
Tray 1
One-Touch
keys (1-60)
Enable
One-Touch
keys 31-60
Phone Book Setup
1.
Press
Machine Status
, select
Fax Setup
using the
navigation keys and press
Enter
.
2.
Select
Phone Book Setup
and press
Enter
.
Speed Dials
1.
Select
Speed Dials
and press
Enter
.
2.
Select
New
and press
Enter
. Enter a Speed Dial
number between 1 and 400 using the keypad and
press
Enter
.
3.
Enter the fax number to store and press
Enter
. Assign
a name if required and press
Enter
.
4.
Repeat for each Speed Dial required.
Group Dials
1.
Select
Group Dials
and press
Enter
.
2.
Select
New
and press
Enter
. Enter a Group number
between 1 and 400 using the keypad and press
Enter
.
3.
Enter a Speed Dial or One-Touch number to add to the
Group and press
Enter
twice
.
4.
Continue entering numbers to the Group, then press
Menu/Exit
.
5.
Assign a name if required and press
Enter
.
Setting the Paper Size
1.
Press
Machine Status
, select
Machine Setup
using
the navigation keys and press
Enter
.
2.
Select
Tray 1 Size
and press
Enter
.
3.
Select the size of paper loaded in Tray 1 and press
Enter
.
4.
Repeat for Tray 2 (optional) and the Bypass Tray.
Setting Power Save Mode
1.
Press
Machine Status
, select
Machine Setup
using
the navigation keys and press
Enter
.
2.
Select
Power Save
and press
Enter
.
3.
Select On and press
Enter
. Select the period of time the
machine waits before entering Power Save mode, either
15, 30, 60
or
120
minutes. Press
Enter
.
Help List
The Help List contains information about the features and
settings available on the machine.
1.
Press
Menu/Exit
.
2.
Select
Help List
using the navigation keys and press
Enter
.
Setting Machine Timeout
1.
Press
Machine Status
, select
Machine Setup
and
press
Enter
.
2.
Select
Machine Timeout
and press
Enter
.
3.
Select the period of time the machine waits before
returning to default state - either
15, 30, 60, 180
seconds or
Off.
Press
Enter
.
Basic Copying
1.
Press
Copy
to enter Copy Mode.
2.
Load originals using the Document Glass or Document
Feeder (optional).
3.
Select the basic copy features required using the
Control Panel.
4.
Select the required settings for each chosen feature
using the navigation keys and press
Enter
.
5.
Enter the quantity and press
Start
.
Selecting Paper
1.
Press
Paper Supply
until the tray required is lit on the
Status Map.
2.
If Bypass Tray is selected the Paper Type option
displays. Use the navigation keys to select the Paper
Type being used and press
Enter
.
ID Card Copy
ID Card Copy
1.
Load originals.
2.
Press
Menu/Exit
, select
Copy Features
and press
Enter
.
3.
Select
ID Card Copy
and press
Enter
. Press S.1
displays.
4.
Place slide 1 of the identity card facedown on the
Document Glass and press
Start
. Press Start S.2
displays.
5.
Repeat for Side 2 of the identity card and press
Start
.
Sending a Fax
1.
Load originals.
2.
Select the Basic Fax features required using the
Control Panel.
3.
Enter the destination fax number using one of the
following methods:
Enter the fax number using the keypad.
Press
Manual Dial
. The dial tone is audible.
Dial the fax number using the keypad.
Press the desired One-Touch key.
Press
Phone Book
and use the navigation keys
to select the desired number.
4.
Press
Start
to send the fax.
Enter a Speed/Group Dial via keypad,
holding
the last location digit for 2 seconds.
Cancelling a Fax
During Scanning:
1.
Press the
Stop
key.
After Job is Scanned:
1.
Press
Job Status.
2.
Select job to delete and press
Enter
.
3.
Follow instructions on the display:
Device displays ‘Cancel Job?’ - press
Enter
.
Device displays ‘Stop=Cancel Job’ - press
Stop
.
Using Redial
1.
Load originals.
2.
Press
Pause/Redial
. The last number is dialed.
3.
To access the last 10 dialed numbers, press
Pause/Redia
l
for 2 seconds
. Use the navigation
keys to select the number required and press
Enter
.
One-Touch Keys
1.
Select
One-Touch
and press
Enter
.
2.
Select
New
and press
Enter
. Enter a One-Touch
number using navigation or One-Touch keys.
3.
Enter the fax number to store and press
Enter
. Assign
a name if required and press
Enter
.
4.
Repeat for each One-Touch required.
Quick One-Touch Key Setup
1.
Press desired One-Touch key location on hard panel
and
hold for 2 seconds
.
2.
Enter phone number and press
Enter
.
3.
Enter ID (optional) and press
Enter
.
Fax Duplex Printing
1.
Press
Machine Status
, select
Fax Setup
using the
navigation keys and press
Enter
2.
Select
Fax Duplex
using the navigation keys and press
Enter
.
3.
Select
Long Edge
or
Short Edge
to print all incoming
fax jobs duplex or
Off
to print all incoming fax jobs
simplex.
4.
Press
Enter
.
Creating a Mailbox
1.
Press
Machine Status
2.
Select
System Admin Tools
using the navigation keys
and press
Enter
. If required, enter the passcode and
press
Enter
.
3.
Select
Mailbox Setup
and press
Enter
.
4.
Select
Create
and press
Enter
.
5.
Select
Set_Conf_MBX
(confidential) or
Set_Bull_MBX
(bulletin) and press
Enter
.
6.
Enter the Mailbox Number using the keypad and press
Enter
.
7.
To passcode protect the mailbox, select
Security Yes
and press
Enter
.
8.
Enter the passcode required using the keypad and
press
Enter
.
9.
Enter the Mailbox ID using the keypad and press
Enter
.
To setup another mailbox, select
Another Yes
and
press
Enter
.
Fax Confirmation Page
1.
Press
Machine Status
, select
Fax Setup
using the
navigation keys and press
Enter
.
2.
Select
MSG Confirm
and press
Enter
.
3.
Select
On
to print a confirmation page after each
transmission or
On-Err
to print a confirmation page
only if an error occurs or
Off
to never print a
confirmation page. Press
Enter
.
Secure Receive
If Secure Receive is enabled, a passcode is required to
print all received faxes.
Enabling
1.
Press
Machine Status
, select
Fax Setup
using the
navigation keys and press
Enter
.
2.
Select
Secure Receive
and press
Enter
.
3.
To enable Secure Receive all the time, select
On
and
press
Enter
.
Enter and confirm the required passcode
using the keypad and press
Enter
after each entry.
4.
To enable Secure Receive for specific days and/or
times, select
Time Secure Rx
and press
Enter
.
Enter
and confirm the required passcode using the keypad
and press
Enter
after each entry.
Select
Set Default
and enter the start and end time Secure Receive will be
enabled and press
Enter
.
Select
Set Time
to change
the default time for a specific day and press
Enter
.
Using
1.
Press
Menu/Exit
, select
Fax Features
and press
Enter
.
2.
Select
Secure Receive
and press
Enter
.
3.
Select
Print
and press
Enter
.
4.
Enter the passcode and press
Enter
.
Charge Code
1.
Enter a phone number using one of the dialing options
(e.g. keypad, Manual Dial, etc.).
2.
Press
Charge Code
.
3.
Enter the passcode required to send the fax.
4.
Press
Start
.
Phone Book Search
Alpha Search
1.
Press
Phone Book
, select
Alpha Search
and press
Enter
.
2.
Enter the first letter of the desired name using the
numeric keyboard and press
Enter
.
3.
Select the desired fax recipient using the navigation
keys and press
Enter
.
Speed/Group Dial Search
1.
Press
Phone Book
, select
Speed/Group Dials
and
press
Enter
.
2.
Enter the desired Speed/Group Dial number and press
Enter
.
3.
Select the highlighted Speed/Group Dial number by
pressing
Enter
or use the navigation keys to locate the
desired recipient and press
Enter
.
One-Touch Key Search
1.
Press
Phone Book
, select
One-Touch Keys
and
press
Enter
.
2.
Enter the desired One-Touch Key number and press
Enter
.
3.
Select the highlighted One-Touch Key by pressing
Enter
or use the navigation keys to locate the desired
recipient and press
Enter
.
Priority Fax
1.
Load originals.
2.
Press
Menu/Exit
, select
Fax Features
and press
Enter
.
3.
Select
Priority Fax
and press
Enter
.
4.
Enter the fax number and press
Enter
. Repeat as
required.
5.
Enter a name if required and press
Enter
.
The fax job will be sent ahead of other queued fax jobs.
Sending to a Mailbox
1.
Load Originals.
2.
Press
Menu/Exit
.
3.
Select
Mailbox
and press
Enter
.
4.
Select
Send
and press
Enter
.
5.
Enter the Box Number for the remote mailbox and
press
Enter
. If required, enter the Passcode and press
Enter
.
6.
Enter the remote fax number and press
Enter
. The
display shows the current time.
7.
Enter a Start Time and press
Enter
. The originals are
sent to the mailbox at the specified time.
Printing or Deleting Mailbox Documents
1.
Press
Menu/Exit
.
2.
Select
Mailbox
and press
Enter
.
3.
Select
Delete
or
Print
and press
Enter
.
4.
Enter the Box Number for the mailbox and press
Enter
.
If required, enter the Passcode and press
Enter
.
The contents of the mailbox are deleted or printed and
deleted.
Delay Fax
1.
Load Originals.
2.
Press
Menu/Exit
, select
Fax Features
and press
Enter
.
3.
Select
Delay Fax
and press
Enter
.
4.
Enter fax number and press
Enter
. Repeat as required.
5.
Enter a name if required and press
Enter
.
6.
Enter the desired fax send time and press
Enter
. The
job will be sent at the defined time.
chatham_poster_English.fm
Page 1
Friday, March 2, 2007
12:01 PM