Xerox C2424 User Guide Section 7: Troubleshooting
Xerox C2424 - WorkCentre Color Solid Ink Manual
 |
UPC - 095205676532
View all Xerox C2424 manuals
Add to My Manuals
Save this manual to your list of manuals |
Xerox C2424 manual content summary:
- Xerox C2424 | User Guide Section 7: Troubleshooting - Page 1
WorkCentre® C2424 Copier-Printer Troubleshooting This chapter includes: ■ "Automatic Diagnostic Tools" on page 7-2 ■ "Paper Jams" on page 7-4 ■ "Output Quality Problems" on page 7-26 ■ "Maintenance" on page 7-31 ■ "Moving and Repacking the System" on page 7-51 ■ "Web Links" on page 7-57 Copyright © - Xerox C2424 | User Guide Section 7: Troubleshooting - Page 2
assists you in opening a Service Request with Xerox Customer Support. To access PhaserSMART Technical Support: 1. Open your browser and go to www.phaserSMART.com. 2. Enter your system's IP address in the browser window. 3. Follow the instructions on the screen. WorkCentre® C2424 Copier-Printer 7-2 - Xerox C2424 | User Guide Section 7: Troubleshooting - Page 3
displays a message on your computer screen to let you know that the printer needs attention. The message also explains how to fix the problem. Note PrintingScout is available from the Windows printer driver for printer connected to the network via TCP/IP. WorkCentre® C2424 Copier-Printer 7-3 - Xerox C2424 | User Guide Section 7: Troubleshooting - Page 4
CD-ROM. Videos are available with instructions for clearing paper jams. Videos are located on the User Documentation CD-ROM and at www.xerox.com/office/ c2424support. Jam at the Exit Cover Follow these steps to clear the jam. 1. Lift the control panel. 2424-189 WorkCentre® C2424 Copier-Printer 7-4 - Xerox C2424 | User Guide Section 7: Troubleshooting - Page 5
2. Remove paper from the output tray. Paper Jams 3. Open the exit cover. 2424-018 2424-019 WorkCentre® C2424 Copier-Printer 7-5 - Xerox C2424 | User Guide Section 7: Troubleshooting - Page 6
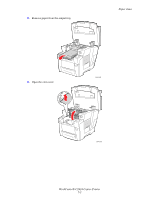
Paper Jams 4. Pull the jammed paper slowly out of the system. Verify that any torn pieces of paper are removed. 2424-020 5. If you did not find paper in Steps 1-4, lift up the green paper guides. 6. Remove jammed paper. 2424-044 2424-021 WorkCentre® C2424 Copier-Printer 7-6 - Xerox C2424 | User Guide Section 7: Troubleshooting - Page 7
7. Close the exit cover. Paper Jams 8. Close the control panel. 2424-022 2424-016 WorkCentre® C2424 Copier-Printer 7-7 - Xerox C2424 | User Guide Section 7: Troubleshooting - Page 8
you did not find paper in Steps 1-8, follow these steps. a. Pull up the latch on the front of the system to open the front cover. Paper Jams 2424-023 b. Pull the jammed paper slowly out of the system. Verify that any torn pieces of paper are removed. 2424-025 WorkCentre® C2424 Copier-Printer 7-8 - Xerox C2424 | User Guide Section 7: Troubleshooting - Page 9
c. Close the front cover. Paper Jams 2424-026 For additional information, go to www.phaserSMART.com. Jam at the Exit Path Follow these steps to clear the jam. 1. Lift the control panel. 2424-189 WorkCentre® C2424 Copier-Printer 7-9 - Xerox C2424 | User Guide Section 7: Troubleshooting - Page 10
2. Remove paper from the output tray. Paper Jams 2424-018 3. Pull the jammed paper slowly out of the system. Verify that any torn pieces of paper are removed. 2424-053 WorkCentre® C2424 Copier-Printer 7-10 - Xerox C2424 | User Guide Section 7: Troubleshooting - Page 11
Jams 5. Adjust the output tray for short or long media. 2424-016 2424-186 2424-056 For media shorter than 190 mm (7.5 in.), flip up the paper stop. For media longer than 297 mm (11.7 in.), extend the output tray. For additional information, go to www.phaserSMART.com. WorkCentre® C2424 Copier - Xerox C2424 | User Guide Section 7: Troubleshooting - Page 12
Jam at the Front Cover Follow these steps to clear the jam. 1. Pull up the latch on the front of the system to open the front cover. Paper Jams 2424-023 2. Pull the jammed paper slowly out of the system. Verify that any torn pieces of paper are removed. 2424-025 WorkCentre® C2424 Copier-Printer - Xerox C2424 | User Guide Section 7: Troubleshooting - Page 13
3. Close the front cover. Paper Jams 4. If you did not find paper in Step 2, follow these steps. a. Lift the control panel. 2424-026 2424-189 WorkCentre® C2424 Copier-Printer 7-13 - Xerox C2424 | User Guide Section 7: Troubleshooting - Page 14
b. Remove paper from the output tray. Paper Jams c. Open the exit cover. 2424-018 2424-019 WorkCentre® C2424 Copier-Printer 7-14 - Xerox C2424 | User Guide Section 7: Troubleshooting - Page 15
Paper Jams d. Pull the jammed paper slowly out of the system. Verify that any torn pieces of paper are removed. e. Lift up the green paper guides. 2424-020 f. Remove jammed paper. 2424-044 2424-021 WorkCentre® C2424 Copier-Printer 7-15 - Xerox C2424 | User Guide Section 7: Troubleshooting - Page 16
g. Close the exit cover. Paper Jams h. Close the control panel. 2424-022 2424-016 WorkCentre® C2424 Copier-Printer 7-16 - Xerox C2424 | User Guide Section 7: Troubleshooting - Page 17
. 2424-028 c. Replace all trays and push each one completely to the back of the system. Note Use only the approved paper type, weight, and size for the tray. Custom size paper can be used in Tray 1 only. For additional information, go to www.phaserSMART.com. WorkCentre® C2424 Copier-Printer 7-17 - Xerox C2424 | User Guide Section 7: Troubleshooting - Page 18
-043 2424-027 3. Verify that the paper is loaded correctly in the tray. Adjust the length and side paper guides. a. Press the sides of the length guide and slide the guide until the arrow on the guide matches the appropriate paper size and clicks into place. WorkCentre® C2424 Copier-Printer 7-18 - Xerox C2424 | User Guide Section 7: Troubleshooting - Page 19
the guides click into place. 2424-003 Note When the paper guides are adjusted correctly, there may be a small space between the paper and the guides. 4. Remove jammed paper inside the system tray slot. Verify that any torn pieces of paper are removed. 2424-028 WorkCentre® C2424 Copier-Printer 7-19 - Xerox C2424 | User Guide Section 7: Troubleshooting - Page 20
Paper Jams 5. Insert the tray into the tray slot and push it completely to the back of the system. 2424-004 6. If you did not find jammed paper in Step 4, follow these steps. a. Pull up the latch on the front of the system to open the front cover. 2424-023 WorkCentre® C2424 Copier-Printer 7-20 - Xerox C2424 | User Guide Section 7: Troubleshooting - Page 21
that any torn pieces of paper are removed. c. Close the front cover. 2424-025 2424-026 Note Use only the approved paper type, weight, and size for the tray. Custom size paper can be used in Tray 1 only. For additional information, go to www.phaserSMART.com. WorkCentre® C2424 Copier-Printer 7-21 - Xerox C2424 | User Guide Section 7: Troubleshooting - Page 22
Jam at the Document Feeder Follow these steps to clear the jam. 1. Remove the originals from the document feeder and catch tray. Paper Jams 2. Open the jam access cover on the document feeder. 2424-054 2424-045 WorkCentre® C2424 Copier-Printer 7-22 - Xerox C2424 | User Guide Section 7: Troubleshooting - Page 23
3. Remove jammed paper from the document feeder. Paper Jams 2424-046 4. Close the jam access cover on the document feeder. 2424-047 WorkCentre® C2424 Copier-Printer 7-23 - Xerox C2424 | User Guide Section 7: Troubleshooting - Page 24
5. Open the document feeder. Paper Jams 2424-048 6. Remove jammed paper from under the document feeder or from the document glass, if any. 2424-049 WorkCentre® C2424 Copier-Printer 7-24 - Xerox C2424 | User Guide Section 7: Troubleshooting - Page 25
7. Close the document feeder. Paper Jams 8. Reinsert paper in the document feeder. 2424-187 2424-051 For additional information, go to www.phaserSMART.com. WorkCentre® C2424 Copier-Printer 7-25 - Xerox C2424 | User Guide Section 7: Troubleshooting - Page 26
representative for details. For information on supported paper types and weights, see the "Supported Papers" section in the Loading Media chapter of this guide. For more information, go to the infoSMART Knowledge Base at www.xerox.com/office/ c2424infoSMART. WorkCentre® C2424 Copier-Printer 7-26 - Xerox C2424 | User Guide Section 7: Troubleshooting - Page 27
door on the right panel. b. Remove the orange maintenance kit. c. Wipe the clear plastic wiper blade with a lintfree cloth. d. Replace the maintenance kit. e. Close the side door. For more information, see "Cleaning the Maintenance Kit Wiper Blade" on page 45. WorkCentre® C2424 Copier-Printer 7-27 - Xerox C2424 | User Guide Section 7: Troubleshooting - Page 28
clear plastic wiper blade with a lint- free cloth. d. Replace the maintenance kit. e. Close the side door. For more information, see "Cleaning the Maintenance Kit Wiper Blade" on page 45. 6. If the problem continues, follow the steps for Random Light Stripes. WorkCentre® C2424 Copier-Printer 7-28 - Xerox C2424 | User Guide Section 7: Troubleshooting - Page 29
feeder. c. Wipe the feeding roller and inside the document feeder with the cloth or cotton swab. d. Close the jam access door. e. Lift the document feeder. f. Wipe the underside of the document feeder with the cloth or cotton swab. g. Close the document feeder. WorkCentre® C2424 Copier-Printer - Xerox C2424 | User Guide Section 7: Troubleshooting - Page 30
or Down Arrow button to scroll to a whole number from Lowest (-3) to Highest (+3) contrast, then press the Enter button. 4. Copy the page again. If copy problems continue, repeat these steps. WorkCentre® C2424 Copier-Printer 7-30 - Xerox C2424 | User Guide Section 7: Troubleshooting - Page 31
. 3. Select Supplies Info, then press the Enter button. 4. Select Maintenance Kit Life, then press the Enter button. For information about supplies, go to www.xerox.com/office/c2424supplies. Each supply includes installation instructions with the packaging. WorkCentre® C2424 Copier-Printer 7-31 - Xerox C2424 | User Guide Section 7: Troubleshooting - Page 32
ink sticks into the ink-loading bins. Caution Use of other than Genuine Xerox WorkCentre C2424 Solid Ink may affect print quality and system reliability. It is the only ink designed and manufactured under strict quality controls by Xerox for specific use with this system. The Xerox Warranty, Service - Xerox C2424 | User Guide Section 7: Troubleshooting - Page 33
steps to load ink. 1. Lift the control panel. Maintenance 2. Open the ink cover. 2424-012 2424-013 3. Determine which ink-loading bin appears low. A label above each bin indicates the color of ink in that bin. 4. Remove the ink stick from its packaging. WorkCentre® C2424 Copier-Printer 7-33 - Xerox C2424 | User Guide Section 7: Troubleshooting - Page 34
Maintenance 5. Place the ink stick into the opening of the appropriate ink-loading bin. Each ink stick is uniquely shaped to fit into the correct ink-loading bin. Do not force the ink stick into the ink-loading bin. 1 2 3 4 6. Close the ink cover. 2424-014 2424-015 WorkCentre® C2424 Copier- - Xerox C2424 | User Guide Section 7: Troubleshooting - Page 35
7. Close the control panel. Maintenance 2424-016 To order ink, contact your local reseller or visit the Xerox web site at www.xerox.com/office/c2424supplies. Instructions are included on the package. WorkCentre® C2424 Copier-Printer 7-35 - Xerox C2424 | User Guide Section 7: Troubleshooting - Page 36
are available with instructions for emptying the waste tray. Videos are located on the User Documentation CD-ROM and at www.xerox.com/office/ c2424support. Caution The system's interior may be hot. Do not touch the hot surfaces! 1. Open the side door. 2424-035 WorkCentre® C2424 Copier-Printer 7-36 - Xerox C2424 | User Guide Section 7: Troubleshooting - Page 37
2. Pull the green waste tray (labeled B) completely out of the system. Caution The waste tray may be hot; handle it carefully! Maintenance 2424-036 3. Empty the waste tray into a waste container. Waste ink can be discarded as normal office waste. 2424-037 WorkCentre® C2424 Copier-Printer 7-37 - Xerox C2424 | User Guide Section 7: Troubleshooting - Page 38
continue to receive a Empty Waste Tray message on the control panel. 5. Close the side door. 2424-039 Caution Do not attempt to reuse the waste ink in the printer; it may damage the printer. This damage is not covered under the printer warranty. WorkCentre® C2424 Copier-Printer 7-38 - Xerox C2424 | User Guide Section 7: Troubleshooting - Page 39
the new maintenance kit. Caution The system's interior may be hot. Do not touch the hot surfaces! The system stops printing and displays an error message when the maintenance kit needs replacement. To replace the maintenance kit: 1. Open the side door. 2424-035 WorkCentre® C2424 Copier-Printer 7-39 - Xerox C2424 | User Guide Section 7: Troubleshooting - Page 40
Maintenance 2. Pull the orange maintenance kit (labeled A) completely out of the system. 3. Insert a new maintenance kit. 2424-033 2424-034 WorkCentre® C2424 Copier-Printer 7-40 - Xerox C2424 | User Guide Section 7: Troubleshooting - Page 41
4. Close the side door. Maintenance 2424-039 Cleaning the Paper Release Blade 1. Lift the control panel. 2424-189 WorkCentre® C2424 Copier-Printer 7-41 - Xerox C2424 | User Guide Section 7: Troubleshooting - Page 42
2. Remove paper from the output tray. Maintenance 3. Open the exit cover. 2424-018 2424-019 WorkCentre® C2424 Copier-Printer 7-42 - Xerox C2424 | User Guide Section 7: Troubleshooting - Page 43
white plastic paper release blade on the green paper guide by wiping it with a pre-soaked alcohol cloth (using 90 percent isopropyl alcohol). 2424-156 6. After the paper release blade is clean, put the green paper guide back in its original position. 2424-159 WorkCentre® C2424 Copier-Printer 7-43 - Xerox C2424 | User Guide Section 7: Troubleshooting - Page 44
7. Close the exit cover. Maintenance 8. Close the control panel. 2424-022 2424-016 WorkCentre® C2424 Copier-Printer 7-44 - Xerox C2424 | User Guide Section 7: Troubleshooting - Page 45
Open the side door. Maintenance 2424-035 2. Pull the orange maintenance kit (labeled A) completely out of the system. 2424-033 3. Use a lint-free cloth to clean the top and upper edges of the flexible plastic wiper blade located next to the roller. 2424-160 WorkCentre® C2424 Copier-Printer 7-45 - Xerox C2424 | User Guide Section 7: Troubleshooting - Page 46
4. Reinstall the maintenance kit. Maintenance 5. Close the side door. 2424-034 2424-039 WorkCentre® C2424 Copier-Printer 7-46 - Xerox C2424 | User Guide Section 7: Troubleshooting - Page 47
remove debris or paper residue, which may affect the quality of your copies and scanned images. To clean the document glass: 1. Lift the document feeder. 2424-048 2. Dampen a soft cloth or cotton swab with isopropyl alcohol (using 90 percent isopropyl alcohol). WorkCentre® C2424 Copier-Printer 7-47 - Xerox C2424 | User Guide Section 7: Troubleshooting - Page 48
3. Wipe the document glass with the cloth or cotton swab. Maintenance 4. Close the document feeder. 2424-050 WorkCentre® C2424 Copier-Printer 7-48 - Xerox C2424 | User Guide Section 7: Troubleshooting - Page 49
feeder: 1. Dampen a soft cloth or cotton swab with isopropyl alcohol (using 90 percent isopropyl alcohol). 2. Open the jam access door on the document feeder. 2424-045 3. Wipe the feeding roller and inside the document feeder with the cloth or cotton swab. 2424-161 WorkCentre® C2424 Copier-Printer - Xerox C2424 | User Guide Section 7: Troubleshooting - Page 50
4. Close the jam access door. Maintenance 2424-047 5. Lift the document feeder. 6. Wipe the underside of the document feeder with the cloth or cotton swab. 7. Close the document feeder. 2424-162 WorkCentre® C2424 Copier-Printer 7-50 - Xerox C2424 | User Guide Section 7: Troubleshooting - Page 51
instructions for repacking the scanner unit and for repacking the document feeder. Videos are located on the User Documentation CD-ROM and at www.xerox.com/office/c2424support. Follow these guidelines to move the system within the office or to prepare it for shipment. Caution Parts of the system - Xerox C2424 | User Guide Section 7: Troubleshooting - Page 52
Each person should have: ■ One hand grasp the hand hold on the side of the system. ■ The other hand grasp the hand hold on the back of the system as shown. Caution If the system has optional trays 3 or 4, lift the system off the trays. 42 kg 93 lbs. 2424-109 WorkCentre® C2424 Copier-Printer 7-52 - Xerox C2424 | User Guide Section 7: Troubleshooting - Page 53
shipping. c. Remove the green waste tray, empty the waste, then place the tray in a plastic bag for shipping. Maintenance Kit 2424-033 Waste Tray 2424-036 Caution Shipping the system with the maintenance kit and waste tray installed can damage the system. WorkCentre® C2424 Copier-Printer 7-53 - Xerox C2424 | User Guide Section 7: Troubleshooting - Page 54
the WorkCentre C2424 Copier-Printer Shut-Down Procedure" on page 7-51. 4. Close the system's door and covers. 5. Remove the document feeder and package it separately from the rest of the system. a. Disconnect the cable between the document feeder and the scanner. b. Raise the document feeder. 2424 - Xerox C2424 | User Guide Section 7: Troubleshooting - Page 55
cable between the scanner and the rest of the system. b. Using a pen, slide both of the scanner latches to the unlocked position, then slide the scanner back and lift it away from the system. 7. Fold the stabilizers in toward the system. 2424-116 2424-187 WorkCentre® C2424 Copier-Printer 7-55 - Xerox C2424 | User Guide Section 7: Troubleshooting - Page 56
is not covered by the Xerox warranty, service agreement, or Total Satisfaction Guarantee. The Total Satisfaction Guarantee is available in the United States and Canada. Coverage may vary outside these areas; please contact your local representative for details. WorkCentre® C2424 Copier-Printer 7-56 - Xerox C2424 | User Guide Section 7: Troubleshooting - Page 57
such as error codes, print quality, paper jams, software installation, networking, and more: To view technical support information for your WorkCentre C2424 system, including access to PhaserSMART Technical Support, Technical Support via email, driver downloads, documentation, videos, tutorials
-
 1
1 -
 2
2 -
 3
3 -
 4
4 -
 5
5 -
 6
6 -
 7
7 -
8
-
9
-
10
-
11
-
12
-
13
-
14
-
15
-
16
-
17
-
18
-
19
-
20
-
21
-
22
-
23
-
24
-
25
-
26
-
27
-
28
-
29
-
30
-
31
-
32
-
33
-
34
-
35
-
36
-
37
-
38
-
39
-
40
-
41
-
42
-
43
-
44
-
45
-
46
-
47
-
48
-
49
-
50
-
51
-
52
-
53
-
54
-
55
-
56
-
57
 |
 |

WorkCentre® C2424 Copier-Printer
Copyright © 2005 Xerox Corporation. All Rights Reserved.
7-1
This chapter includes:
■
"Automatic Diagnostic Tools" on page 7-2
■
"Paper Jams" on page 7-4
■
"Output Quality Problems" on page 7-26
■
"Maintenance" on page 7-31
■
"Moving and Repacking the System" on page 7-51
■
"Web Links" on page 7-57
Troubleshooting