Yamaha CX-2 Owner's Manual - Page 6
Connecting To S Video Terminals, For Cx-2 Only, About The Accessory Components On The Rear Panel - cx 2 remote
 |
View all Yamaha CX-2 manuals
Add to My Manuals
Save this manual to your list of manuals |
Page 6 highlights
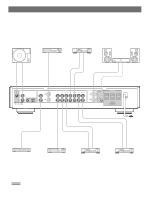
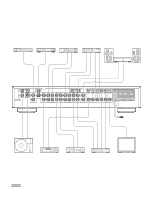
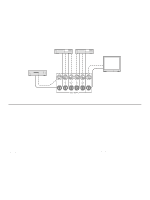
CONNECTING TO S VIDEO TERMINALS If your video cassette recorder, LD player, etc. and your monitor are equipped with "S" (high-resolution) video terminals, connect them to this unit's S video terminals, and connect this unit's S MON OUT terminal to the "S" video input of your monitor. Otherwise, connect the composite video terminals from your video cassette recorder, LD player, etc. to the composite video terminals of this unit, and connect this unit's composite MON OUT terminal to the composite video input of your monitor. Note If video signals are sent to both S video input and composite video input terminals, the signals will be sent to their respective output terminals independently. Video cassette recorder 1 Video cassette recorder 2 Monitor TV VIDEO OUT S VIDEO OUT VIDEO IN S VIDEO IN S VIDEO OUT VIDEO OUT S VIDEO IN VIDEO IN LD Player VIDEO OUT S VIDEO OUT S VIDEO IN VIDEO IN IN VCR 1 VCR 2 MON OUT S video terminals IN OUT IN OUT VIDEO SIGNAL Composite video terminals ABOUT THE ACCESSORY COMPONENTS ON THE REAR PANEL AC OUTLETS (SWITCHED) (U.S.A., Canada, Europe and General models 3 SWITCHED OUTLETS (Australia and U.K. models 1 SWITCHED OUTLET Use these to connect the power cords from your components (except a power amplifier, integrated amplifier and receiver) to this unit. The maximum power (total power consumption of components) that can be connected to the SWITCHED AC OUTLETS is 200 watts. Strictly be careful not to exceed this value. The power to the SWITCHED outlets is controlled by this unit's POWER switch or the provided remote control transmitter's POWER key. These outlets will supply power to any component whenever this unit is turned on. PHONO switch Select either MM or MC position depending on your PHONO cartridge, Moving Magnet or Moving Coil type. However, if you use a high output MC cartridge, select MM position. CARTRIDGE LOAD switch Set to either impedance position (220Ω or 1 kΩ) proper for the PHONO MC cartridge being used by your turntable. GND terminal (For turntable use) Connecting the ground wire of the turntable to this terminal will normally minimize hum, but in some cases better results may be obtained with the ground wire disconnected. REMOTE CONTROL (POWER AMP) connector If you have the YAMAHA power amplifier MX-1 or MX-2, connect this connector to the REMOTE CONTROL (PRE AMP) connector of the power amplifier by using the provided cable. By this connection, the power of the power amplifier is controlled by this unit's POWER switch or the provided remote control transmitter's POWER key. After the connection is completed, keep the POWER switch of the power amplifier pressed inward (to the ON position). Note If you will not connect the REMOTE CONTROL connectors of this unit and the power amplifier, do not connect the cable to either connector. 6
-
 1
1 -
 2
2 -
 3
3 -
 4
4 -
 5
5 -
 6
6 -
 7
7 -
 8
8 -
 9
9 -
 10
10 -
 11
11 -
 12
12 -
13
-
14
-
15
-
16
-
17
-
18
-
19
 |
 |
