Yamaha DGC1B Disklavier Mark III Series DGC1B Basic Operation Manual
Yamaha DGC1B Manual
 |
View all Yamaha DGC1B manuals
Add to My Manuals
Save this manual to your list of manuals |
Yamaha DGC1B manual content summary:
- Yamaha DGC1B | Disklavier Mark III Series DGC1B Basic Operation Manual - Page 1
- Yamaha DGC1B | Disklavier Mark III Series DGC1B Basic Operation Manual - Page 2
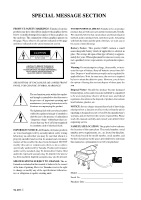
instructions found in the users manual problem Service Division, 6600 Orangethorpe Ave, Buena Park, CA 90620 The above statements apply ONLY to those products distributed by Yamaha Corporation of America or its subsidiaries. IMPORTANT NOTICE FOR THE UNITED KINGDOM Apply for Grand Pianos the CD drive - Yamaha DGC1B | Disklavier Mark III Series DGC1B Basic Operation Manual - Page 3
to the presence of important operating and maintainance (servicing) instructions in the literature accompanying the product. The be affected. SPECIFICATIONS SUBJECT TO CHANGE: The information contained in this manual is believed to be correct at the time of printing. However, Yamaha reserves the - Yamaha DGC1B | Disklavier Mark III Series DGC1B Basic Operation Manual - Page 4
into the outlet, turn the plug over and try again. If the problem persists, contact an electrician to have the obsolete outlet replaced. DO NOT defeat the safety purpose of the plug. 4. DANGER- Grounding Instructions: Disklavier Grand must be grounded and therefore has been equipped with a three pin - Yamaha DGC1B | Disklavier Mark III Series DGC1B Basic Operation Manual - Page 5
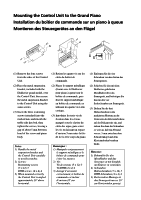
horizontal. (1) Retirer les quatre vis sur les côtés du boîtier de commande. (2) Placer le support métallique (fourni avec le Disklavier pour piano à queue) sur le boîtier de commande, puis fixer le support métallique au boîtier de commande en utilisant les quatre vis à tête conique. (3) Introduire - Yamaha DGC1B | Disklavier Mark III Series DGC1B Basic Operation Manual - Page 6
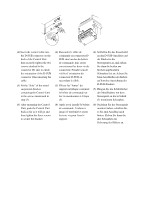
CD CONTROL L R AUDIO/ANALOG MIDI IN TO CFOONRTRPOIALNOCABLE HOST TO HOST installé le boîtier de commande, l'enfoncer jusqu'à l'extrémité et serrer les trois vis pour fixer le support. (4) Schließen Sie das Steuerkabel an den D-SUB-Anschluss auf der Rückseite des Steuergerätes an, und ziehen - Yamaha DGC1B | Disklavier Mark III Series DGC1B Basic Operation Manual - Page 7
English Mark III Series DGC1B (A) Basic Operation Manual - Yamaha DGC1B | Disklavier Mark III Series DGC1B Basic Operation Manual - Page 8
and long-term value that have long made Yamaha pianos the world's finest. Before using your Disklavier piano, please read this manual thoroughly and retain it for future reference. Trademarks & Copyright Yamaha, Disklavier, Silent, PianoSoft, PianoSoft.Plus, PianoSoft.PlusAudio, PianoSmart, and - Yamaha DGC1B | Disklavier Mark III Series DGC1B Basic Operation Manual - Page 9
service technicians. • Do not place liquid containers such as vases, potted plants, glasses, cosmetic bottles, medicines, etc., on top of the Disklavier. • Do not try to modify the Disklavier audio devices when connecting to the Disklavier. Refer to the user's guide for each device. Use the correct - Yamaha DGC1B | Disklavier Mark III Series DGC1B Basic Operation Manual - Page 10
a stain, carefully use a soft damp cloth to remove it. Interference • The Disklavier uses high-frequency digital circuits that may cause interference to radios and TVs placed close in accordance with the applicable regulations and ordinances. Please keep this manual for future reference. ii - Yamaha DGC1B | Disklavier Mark III Series DGC1B Basic Operation Manual - Page 11
Disklavier Turning On the Disklavier 12 Turning Off the Disklavier Review 22 Fast Forward & Reverse 23 Adjusting the Volume 24 Adjusting the Tone 25 Balancing the Ensemble Volume (TG Master Balance 25 Balancing the CD Volume (CD Learning Piano Canceling the Left-Hand or Right-Hand Piano Part - Yamaha DGC1B | Disklavier Mark III Series DGC1B Basic Operation Manual - Page 12
Generator 40 Displaying Ensemble Voices 41 Selecting Tracks for the Piano Parts 41 Chapter 11 Using the AUX Connectors AUX OUT 43 AUX IN 44 Chapter 12 Using the SmartKeyTM Feature SmartKeyTM Software 45 CueTIMETM Software 47 Guide Control 48 Playback Considerations 51 Chapter 13 Using the - Yamaha DGC1B | Disklavier Mark III Series DGC1B Basic Operation Manual - Page 13
Control Unit when the Disklavier is installed. If, however, it is not, carefully connect the control cable to the Control Unit's TO CONTROL CABLE FOR PIANO connector on the rear panel. See step (4) in "Mounting the Control Unit to the Grand Piano" at the beginning of this manual. It is recommended - Yamaha DGC1B | Disklavier Mark III Series DGC1B Basic Operation Manual - Page 14
Connectors." ☛ To connect MIDI equipment, tone generator, or a synthesizer to the Disklavier, see Chapter 10 "The Disklavier & MIDI" in the Advanced Operation Manual. ☛ To connect a personal computer to the Disklavier, see Chapter 11 "The Disklavier & Personal Computers" in the Advanced Operation - Yamaha DGC1B | Disklavier Mark III Series DGC1B Basic Operation Manual - Page 15
contain prerecorded Ensemble songs featuring instrumental accompaniment that can be played back on the Disklavier. See your Disklavier dealer for a piano study disks for the CD software made by Yamaha containing audio and MIDI signals for playing back on the Disklavier. Software made by Yamaha - Yamaha DGC1B | Disklavier Mark III Series DGC1B Basic Operation Manual - Page 16
is being consumed, as the MAINS switch is still on and the Disklavier is still connected to the AC power receptacle. 2 Remote control sensor CD, and Memory Disks (0 ~ 9 and A ~ F). 6 CD drive Insert a PianoSoft.PlusAudio or other audio or audio/MIDI CD here. 7 CD eject button Used to open the CD - Yamaha DGC1B | Disklavier Mark III Series DGC1B Basic Operation Manual - Page 17
mode: Used to fast preview and review. In Pause mode: Used to piano. u [] cursor buttons Used to move the cursor in the display. i [FUNC.] button Used to access various Disklavier utility functions. o [METRONOME] button Used to access the metronome. p Selector button Used to select the feature - Yamaha DGC1B | Disklavier Mark III Series DGC1B Basic Operation Manual - Page 18
PC2 MAC TO CONTROL CABLE FOR PIANO OUT MIDI IN 3 4 5 6 7 1 CD CONTROL Used to connect the line from the piano. 2 AUDIO/ANALOG MIDI IN Used to connect audio equipment such as an external CD changer. 3 TO HOST (serial port) Used to connect the Disklavier with a personal computer. 4 HOST SELECT - Yamaha DGC1B | Disklavier Mark III Series DGC1B Basic Operation Manual - Page 19
the AC power cable here. 2 MAINS (ON/OFF) switch Press to switch on/off the Disklavier. 3 AUX OUT L/L+R, R Used to connect external audio equipment. 4 AUX IN L/L+R, R in speakers. 8 Foot Controller connector Connect the optional Yamaha FC-4, FC-5 or FC-7 foot controller here. 9 Amplified speakers Amplified speakers - Yamaha DGC1B | Disklavier Mark III Series DGC1B Basic Operation Manual - Page 20
RND. 4 [A-B] button* Used to enter A and B points for Segments A~B and A~ Repeat modes. 5 [REV.FWD] buttons In Play mode: Used to fast preview and review. In Pause mode: Used to fast forward and reverse. 6 [SONG SELECT] buttons Used to select songs. 7 [PLAY] button Used to start playback. 8 [PAUSE - Yamaha DGC1B | Disklavier Mark III Series DGC1B Basic Operation Manual - Page 21
English Chapter 3: Disks Used with the Disklavier Chapter 3 Disks Used with the Disklavier Three types of disks are used with the Disklavier: floppy disks, CDs, and internal Memory Disks. Floppy Disks Besides PianoSoft and PianoSoft.Plus song disks, the Disklavier can play back songs stored on 3. - Yamaha DGC1B | Disklavier Mark III Series DGC1B Basic Operation Manual - Page 22
Discs You can enjoy listening to PianoSoft.PlusAudioTM -Yamaha's audio/MIDI CD made especially for use with the Disklavier. Besides PianoSoft.PlusAudio, the Disklavier can also play back standard audio CDs sold on the market as well as audio/MIDI CDs of other companies. Note: PianoSoft.PlusAudio may - Yamaha DGC1B | Disklavier Mark III Series DGC1B Basic Operation Manual - Page 23
in until it clicks into place. Memory Disks Besides floppy disks and CDs, the Disklavier has 64 megabytes (4 megabytes × 16 Memory Disks) of internal flash features. (See Chapter 2 "Chain Play - Playing Back Memory Disks in a Group" and Chapter 3 "Timer Play" in the Advanced Operation Manual - Yamaha DGC1B | Disklavier Mark III Series DGC1B Basic Operation Manual - Page 24
L R ENTER VOICE FUN The following message appears on the display. Your Disklavier is now ready for use. 2 Set the MAINS switch to OFF. Setting MAINS switch only needs to be switched off when you are not going to use the Disklavier for a long period of time. For daily use, only the [STANDBY / ON - Yamaha DGC1B | Disklavier Mark III Series DGC1B Basic Operation Manual - Page 25
to 12/31/2084 23:59:59. Set the calendar accurately so that the Disklavier displays the correct current time during Stop mode. Setting the correct time is controlled programs (see Chapter 3 "Timer Play" in the Advanced Operation Manual for details). Time is displayed in 24-hour format. A display - Yamaha DGC1B | Disklavier Mark III Series DGC1B Basic Operation Manual - Page 26
format or counter type have been edited. 1 Prepare destination 2DD (720 kilobyte) or 2HD (1.44 megabyte) floppy disks and insert one into the Disklavier disk drive. 2 Press the [SELECT] buttons to specify a Memory Disk that contains the desired demo songs. 3 Press [FUNC.]. The FUNC. indicator lights - Yamaha DGC1B | Disklavier Mark III Series DGC1B Basic Operation Manual - Page 27
or Memory Disk for playback, the title of the selected disk scrolls across the display. Note: CDs have no disk title. Song Title The title of a song appears during song playback. Time Display When the Disklavier is not playing, the current time is displayed in hours and minutes. The separator colon - Yamaha DGC1B | Disklavier Mark III Series DGC1B Basic Operation Manual - Page 28
Counter Display" on page 7 in the Advanced Operation Manual. Song Format There are a couple of general CD Software The Disklavier can play back CDs such as Yamaha PianoSoft.PlusAudio CDs, audio/MIDI CDs of other companies, and standard audio CDs. When you select a CD for playback, the type of CD - Yamaha DGC1B | Disklavier Mark III Series DGC1B Basic Operation Manual - Page 29
English Chapter 5: Display (LCD) and DRIVE Indicator Previous/Next Display Indications The arrows that appear on the far right of a display indicate that there is a relevant display before or after the current one. You can go to the previous or next display using the [] buttons. Next display - Yamaha DGC1B | Disklavier Mark III Series DGC1B Basic Operation Manual - Page 30
are output from the built-in speakers. The Disklavier will faithfully reproduce the audio sounds of the CD as a stereo system would, but with the additional feature of a live piano performance. PianoSoft.PlusAudio Disklavier Piano Parts Keyboard (Analog MIDI channel) Vocals, bass, drums - Yamaha DGC1B | Disklavier Mark III Series DGC1B Basic Operation Manual - Page 31
IN connector on the control unit (rear panel) and play back multiple audio CDs on the Disklavier. Specifying a Disk When you want to play back songs, you need to first specify which disk you want to play back, as the Disklavier has a total of 17 disks (1 floppy disk and 16 Memory Disks). Press - Yamaha DGC1B | Disklavier Mark III Series DGC1B Basic Operation Manual - Page 32
Playback Pausing Playback 1 Specify a disk. 2 Press [PLAY/PAUSE]. PLAY/PAUSE The PLAY/PAUSE indicator lights and song No.1 starts playing. The Disklavier plays the piano parts, actually moving the keys up and down, and the internal XG tone generator plays the instrumental parts. The time display - Yamaha DGC1B | Disklavier Mark III Series DGC1B Basic Operation Manual - Page 33
English Chapter 6: Basic Playback Selecting Songs with the Control Unit Selecting Songs with the Remote Control Press [SONG SELECT the next song. Press [SONG SELECT the previous song. ] to select ] to select SONG SELECT/REV FWD To select other songs on the disk, press and hold down [SONG - Yamaha DGC1B | Disklavier Mark III Series DGC1B Basic Operation Manual - Page 34
search through a song while listening to the sound. This is useful for locating a desired position within a song. Note: No sound is produced by the piano when fastpreviewing or reviewing PianoSoft.PlusAudio CDs. 1 To preview, press [SONG SELECT ]. SONG SELECT/REV¥FWD REV•FWD Remote Control To - Yamaha DGC1B | Disklavier Mark III Series DGC1B Basic Operation Manual - Page 35
Pause mode, fast forward and reverse allow you to quickly locate a desired position in a song. Fast Forward and Reverse search faster than preview and review and the piano does not play. Reverse can also be used to return a song to the beginning, ready to play again. 1 To fast forward a song that - Yamaha DGC1B | Disklavier Mark III Series DGC1B Basic Operation Manual - Page 36
PianoSoft.PlusAudio, you should first balance the volume of the MIDI piano and Audio parts. ☛ See "Balancing the CD Volume (CD Master Balance)" on page 26. The LED volume level indicators show or selected, or when the Disklavier is turned off. Note: This setting does not affect manual playing. 24 - Yamaha DGC1B | Disklavier Mark III Series DGC1B Basic Operation Manual - Page 37
Ensemble voices. In other words, the volume of the XG tone generator should not be too loud or too quiet compared to the piano played by the Disklavier. Once you adjust the volume using the Tone Generator Master Balance function, you can use the [VOLUME] buttons on the remote control to conveniently - Yamaha DGC1B | Disklavier Mark III Series DGC1B Basic Operation Manual - Page 38
are balanced with the volume of the Disklavier piano. 4 Press the Selector until the VOLUME indicator lights. VOLUME TEMPO TRANSPOSE BALANCE stored in the Control Unit, and are saved when the Disklavier is turned off. 1 Play back a CD. 2 Press the Selector until the BALANCE indicator lights. VOLUME - Yamaha DGC1B | Disklavier Mark III Series DGC1B Basic Operation Manual - Page 39
disk is ejected, or the Disklavier is turned off. Note: You cannot change the playback tempo of songs on CDs. ☛ Tempo changes to songs that you have recorded yourself can be made permanent. See "Changing the Default Song Tempo" on page 26 in the Advanced Operation Manual - Yamaha DGC1B | Disklavier Mark III Series DGC1B Basic Operation Manual - Page 40
A display similar to the following appears. Adjusting the Pitch of Audio CDs You can temporarily adjust the pitch of an audio CD for your listening pleasure. Pitch adjustments are effective until the CD is ejected or the Disklavier is turned off. Note: This function cannot be used to adjust the - Yamaha DGC1B | Disklavier Mark III Series DGC1B Basic Operation Manual - Page 41
entertainment and study purposes. You can repeatedly play back songs or specific passages within a song. Note: All Repeat Playback functions are Play - Playing Back Memory Disks in a Group" in the Advanced Operation Manual for details on Memory Disk groups. Group selected Group not selected (OFF) - Yamaha DGC1B | Disklavier Mark III Series DGC1B Basic Operation Manual - Page 42
useful when practicing or memorizing a difficult section of a song. Once specified, points A and B are saved until the disk is ejected or the Disklavier is turned off. 1 To set point A, play back a song and press [A-B] at the desired point. PLAY A - B Remote Control Remote Control Point A is - Yamaha DGC1B | Disklavier Mark III Series DGC1B Basic Operation Manual - Page 43
English Chapter 7: Repeat Playback Segment A~ (Return & Pause) Repeat In Segment A~ Repeat, playback can be repeatedly restarted from a specified point in a song. This is similar to Segment A~B Repeat except that only point A is specified. Like Segment A~B Repeat, this function is useful for - Yamaha DGC1B | Disklavier Mark III Series DGC1B Basic Operation Manual - Page 44
time value has been entered, it is saved until the disk is ejected or the Disklavier is turned off. If you want to search for the same point again, just will continue from the new point when the search is complete. If the Disklavier was not playing, Pause mode is engaged when the search is complete. - Yamaha DGC1B | Disklavier Mark III Series DGC1B Basic Operation Manual - Page 45
English Chapter 8: Useful Functions for Learning Piano Chapter 8 Useful Functions for Learning Piano This chapter describes useful functions for piano study, such as practicing one hand while the Disklavier plays the other, operating the pedals, and using the built-in metronome. Canceling the - Yamaha DGC1B | Disklavier Mark III Series DGC1B Basic Operation Manual - Page 46
pedals are turned on again. 2 To turn the pedals back on, hold down [PART L] and [PART R] until "PD on" appears on the display. PART L R The Disklavier's built-in metronome can be used for practice playing, playback, and recording. You do not need to play back a song to use this function. With - Yamaha DGC1B | Disklavier Mark III Series DGC1B Basic Operation Manual - Page 47
English Chapter 8: Useful Functions for Learning Piano The following table shows the metronome parameters that can be set. Parameter Range Default Notes 1 Click ON/OFF ON If set to off, the volume - Yamaha DGC1B | Disklavier Mark III Series DGC1B Basic Operation Manual - Page 48
Using an Optional Foot Switch or Foot Controller An optional Yamaha foot switch or foot controller can be used to operate various Disklavier functions. Using a Foot Controller to Control the Tempo By connecting an optional Yamaha FC-7 controller pedal, playback tempo can also be controlled. The - Yamaha DGC1B | Disklavier Mark III Series DGC1B Basic Operation Manual - Page 49
generator to accompany the piano while you play. You will hear in unison the piano sound coming from the Disklavier and an Ensemble voice Voice List" on pages 11 and 12 in the Appendix section in the Advanced Operation Manual for a full listing of available voices. 4 To adjust the volume, press [>] - Yamaha DGC1B | Disklavier Mark III Series DGC1B Basic Operation Manual - Page 50
Note: In Voice mode, the volume of the parts you play on the keyboard is set by the Vol parameter and is not affected by the TG Master Balance function. 5 To cancel this function, press [VOICE] again. VOICE 38 - Yamaha DGC1B | Disklavier Mark III Series DGC1B Basic Operation Manual - Page 51
Generator (TG Master Tune) The TG Master Tune function allows you to tune the internal XG tone generator to match the Disklavier's acoustic piano. It also automatically adjusts the sound of PianoSoft.PlusAudio CDs. This is helpful when playing Ensemble songs. Tuning settings are saved even when the - Yamaha DGC1B | Disklavier Mark III Series DGC1B Basic Operation Manual - Page 52
played by the internal XG tone generator or a MIDI instrument connected to the MIDI OUT connector. You can use this to double up the Disklavier piano parts with a different voice, say strings or vibes. This technique is sometimes referred to as voice layering or unison. 4 Press [>] until the cursor - Yamaha DGC1B | Disklavier Mark III Series DGC1B Basic Operation Manual - Page 53
can be played by the piano. These assignments remain active throughout the song. However, when another PianoSoft or Disklavier song is played back, the piano will play tracks 1 and 2 "Editing Tracks" in the Advanced Operation Manual. 3 Use the [-/NO] and [+/YES] buttons to choose a different track. -/ - Yamaha DGC1B | Disklavier Mark III Series DGC1B Basic Operation Manual - Page 54
the smallest track that contains a piano group voice. Prg(all) The piano plays all tracks that contain a piano group voice. The number of the chosen track appears next to L= or R=, and the symbol moves across the display, to indicate which track the Disklavier will play. Note: Changes made - Yamaha DGC1B | Disklavier Mark III Series DGC1B Basic Operation Manual - Page 55
devices, such as speakers, a tape recorder or a CD player. AUX OUT You can output sound through external devices connected to the AUX OUT connectors on the Amplifier mounted to the underside of the piano. For example, this allows you to hook up the Disklavier to your home audio system and bring - Yamaha DGC1B | Disklavier Mark III Series DGC1B Basic Operation Manual - Page 56
external device to which you want to connect to the AUX IN connectors on the Amplifier. 2 Turn on the external device, then turn on the Disklavier. 3 Gradually turn up the volume on the external device until a desirable volume is obtained. Note: The volume of the Amplifier is linked with the AUX - Yamaha DGC1B | Disklavier Mark III Series DGC1B Basic Operation Manual - Page 57
Feature English Chapter 12: Using the SmartKeyTM Feature The SmartKey feature of your Disklavier is a unique application of Yamaha's patented "Guide functions that together make up SmartKey technology. Specifically, this software turns on the "Guide", "Key Prompt" and "Prompt Repeat" functions - Yamaha DGC1B | Disklavier Mark III Series DGC1B Basic Operation Manual - Page 58
) PART indicator turns orange, indicating that the "Guide" function has been automatically activated. The "Guide" function is the feature that actually makes the Disklavier stop and wait at particular points in a song. 3 Press [PLAY/PAUSE]. 4 Watch the piano keyboard for the first key prompt. Key - Yamaha DGC1B | Disklavier Mark III Series DGC1B Basic Operation Manual - Page 59
features of your Disklavier. CueTIME software consists of a disk and a music book, that contain beautifully arranged piano Disklavier. 2 Press the [SONG SELECT ] buttons to specify the song you wish to play. Note that the "R" (right hand) PART indicator turns orange, indicating that the "Guide - Yamaha DGC1B | Disklavier Mark III Series DGC1B Basic Operation Manual - Page 60
may be able to use special SmartKey functions such as the "Guide" function included in your Disklavier. The "Guide" function allows you to practice at your own pace when used with some disk software. With this feature, the Disklavier pauses playback of the accompaniment until you play the same notes - Yamaha DGC1B | Disklavier Mark III Series DGC1B Basic Operation Manual - Page 61
"Prompt Repeat Function" on page 50 for more information. If you prefer to turn off key prompts for guided notes and use the screen prompt exclusively, you need to turn this feature off manually as follows. The Disklavier will now pause at each note you miss in the track that you have chosen to - Yamaha DGC1B | Disklavier Mark III Series DGC1B Basic Operation Manual - Page 62
Repeat" again, simply play the cue key. If you would prefer to turn off "Prompt Repeat" for guided notes and use the screen prompt exclusively, you will have to turn this feature "off" manually as follows. Turning off the "Prompt Repeat" option With the disk already in the disk drive and a song - Yamaha DGC1B | Disklavier Mark III Series DGC1B Basic Operation Manual - Page 63
of the note you missed. Playback Considerations Whenever the "Guide" mode is activated (orange indicator is illuminated for a [PART] button), "Chain Play" and "Timer Play" are deactivated. In other words, at the end of a piece, the Disklavier simply stops playing, and does not proceed automatically - Yamaha DGC1B | Disklavier Mark III Series DGC1B Basic Operation Manual - Page 64
Chapter 13 Using the PianoSmart Feature A special-purpose floppy disk (Smart PianoSoft) that supports CDs available on the market and a CD can be played back simultaneously. PianoSmart Simply insert a commercial CD into the Disklavier's CD drive and a PianoSmart floppy disk into the floppy disk - Yamaha DGC1B | Disklavier Mark III Series DGC1B Basic Operation Manual - Page 65
playback of the CD and MIDI songs starts. The Disklavier plays the piano parts, actually moving the keys up and down. The CD sound is heard operation fails to return to normal, proceed with the adjustments in the manual mode which is described later. Playback stops and the PLAY/PAUSE indicator - Yamaha DGC1B | Disklavier Mark III Series DGC1B Basic Operation Manual - Page 66
automatically adjusted to the pitch of the live piano, and the CD playback is heard as monaural sound. ☛ See "Tuning the Tone Generator (TG Master Tune)" on page 39. PianoSmart Manual Adjustment Compensation can be performed manually in the case of CDs for which automatic adjustment is not performed - Yamaha DGC1B | Disklavier Mark III Series DGC1B Basic Operation Manual - Page 67
Feature 5 Start playback, and check the timing. Top: This indicates the amount by which the synchronization shift at the beginning of the song is to be adjusted. A change of +1 increases the speed of the MIDI (piano a Song 1 Specify the SPS disk and target CD, and check that "PS@" appears on the - Yamaha DGC1B | Disklavier Mark III Series DGC1B Basic Operation Manual - Page 68
must be formatted before use with the Disklavier. See "Formatting Disks" on page 17 in the Advanced Operation Manual. If an E-SEQ type disk is the Same Song on the Same CD 1 Specify the CD that is to be recorded. When you insert CD into the CD drive, the letter "Cd" automatically appear on the left - Yamaha DGC1B | Disklavier Mark III Series DGC1B Basic Operation Manual - Page 69
PianoSmart Feature ☛ Unformatted disks must be formatted before use with the Disklavier. See "Formatting Disks" on page 17 in the Advanced Operation Manual. 2b be No.7. 4 Use the [SONG SELECT] buttons to select the song on the CD to be played back so that it will be rerecorded. ☛ See "Recording the - Yamaha DGC1B | Disklavier Mark III Series DGC1B Basic Operation Manual - Page 70
must be formatted before use with the Disklavier. See "Formatting Disks" on page 17 in the Advanced Operation Manual. 2b Use the [SELECT] buttons to the [-/NO] and [+/YES] buttons to select the number of the song on the CD to be played. The following display appears. 4c To end now, press [STOP], and - Yamaha DGC1B | Disklavier Mark III Series DGC1B Basic Operation Manual - Page 71
13: Using the PianoSmart Feature When Re-recording Using Another CD ☛ See Step 1 to 3 on pages 57 and 58. 4a Press [REC] until the CD song recording setting screen appears. "##" indicating that no setting has been made appears as the CD song number, and the "Different CD!" display indicating that - Yamaha DGC1B | Disklavier Mark III Series DGC1B Basic Operation Manual - Page 72
. ☛ For a complete listing of available voices, see the Appendix in the Advanced Operation Manual. Internal XG Tone Generator Basic Voice List Voice # Display Name Piano 001 GrandPno 002 BritePno 003 E.Grand 004 HnkyTonk 005 E.Piano1 006 E.Piano2 007 Harpsi. 008 Clavi. Chromatic Percussion 009 - Yamaha DGC1B | Disklavier Mark III Series DGC1B Basic Operation Manual - Page 73
Kit Brush Kit Classic Kit SFX Kit1 SFX Kit2 ☛ See "XG Drum Voice List" on page 15 in the Appendix section in the Advanced Operation Manual for a full listing of drum voices. 61 - Yamaha DGC1B | Disklavier Mark III Series DGC1B Basic Operation Manual - Page 74
-
 1
1 -
 2
2 -
 3
3 -
 4
4 -
 5
5 -
 6
6 -
 7
7 -
8
-
9
-
10
-
11
-
12
-
13
-
14
-
15
-
16
-
17
-
18
-
19
-
20
-
21
-
22
-
23
-
24
-
25
-
26
-
27
-
28
-
29
-
30
-
31
-
32
-
33
-
34
-
35
-
36
-
37
-
38
-
39
-
40
-
41
-
42
-
43
-
44
-
45
-
46
-
47
-
48
-
49
-
50
-
51
-
52
-
53
-
54
-
55
-
56
-
57
-
58
-
59
-
60
-
61
-
62
-
63
-
64
-
65
-
66
-
67
-
68
-
69
-
70
-
71
-
72
-
73
-
74
 |
 |
