Yamaha EL-100 Owner's Manual - Page 126
Mount the Sideboards onto the Pedalboard unit., Mount the Speaker Unit onto the Sideboards.
 |
View all Yamaha EL-100 manuals
Add to My Manuals
Save this manual to your list of manuals |
Page 126 highlights
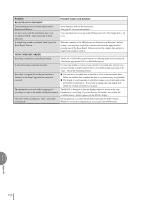
3. Mount the Sideboards onto the Pedalboard unit. Be sure not to confuse the Right and Left Sideboards. 3-1 Raise the Pedalboard as shown in the illustration below. 3-2 Position each screw hole on both the Pedalboard and Sideboards as shown in the illustration and mount the Sideboards onto the Pedalboard using the 4 Short/ black screws (2 screws on each Sideboard). while pushing the Sideboard toward the Pedalboard... 3 Short/black screws 3-3 Stand the Pedalboard after securing the screws. 4. Mount the Speaker Unit onto the Sideboards. 4-1 Remove the Grill Net from the Speaker Unit. 4-2 While holding the Sideboard(s) to the Speaker unit, screw the 4 Short/black screws, from the rear side, to fasten it to the Sideboards. Cover 4 screw holes on the rear side with the 4 screw caps. 4-3 Also, use the 4 Long/yellow screws to secure it. while pushing the Sideboard toward the Speaker unit... 2 Long/yellow screws 3 Short/black screws Screw caps Screw caps while pushing the Sideboard toward the Speaker unit... 3 Short/black screws 5. Mount the Main Unit. 5-1 As shown in the illustration, hold the Main unit horizontally (by 2 people), and place it on the rear side of the Speaker unit, then slide it to the front side. 4-2 Hold the Speaker unit horizontally (by 2 people) and slide it, from the rear side, in place along the brackets. Appendix 11 Hook the guide screw, protruding from the bottom of the Main unit, here. Make sure to center the main unit to produce equal clearance on the left and right sides. Take care not to drop the Main unit or to pinch your finger(s) between the Speaker unit and Main unit. Take care not to drop the Speaker unit or to pinch your finger(s) between the Speaker unit and Sideboard. 126
-
 1
1 -
2
-
3
-
4
-
5
-
6
-
7
-
8
-
9
-
10
-
11
-
12
-
13
-
14
-
15
-
16
-
17
-
18
-
19
-
20
-
21
-
22
-
23
-
24
-
25
-
26
-
27
-
28
-
29
-
30
-
31
-
32
-
33
-
34
-
35
-
36
-
37
-
38
-
39
-
40
-
41
-
42
-
43
-
44
-
45
-
46
-
47
-
48
-
49
-
50
-
51
-
52
-
53
-
54
-
55
-
56
-
57
-
58
-
59
-
60
-
61
-
62
-
63
-
64
-
65
-
66
-
67
-
68
-
69
-
70
-
71
-
72
-
73
-
74
-
75
-
76
-
77
-
78
-
79
-
80
-
81
-
82
-
83
-
84
-
85
-
86
-
87
-
88
-
89
-
90
-
91
-
92
-
93
-
94
-
95
-
96
-
97
-
98
-
99
-
100
-
101
-
102
-
103
-
104
-
105
-
106
-
107
-
108
-
109
-
110
-
111
-
112
-
113
-
114
-
115
-
116
-
117
-
118
-
119
-
120
-
 121
121 -
 122
122 -
 123
123 -
 124
124 -
 125
125 -
 126
126 -
 127
127 -
 128
128 -
 129
129 -
 130
130 -
 131
131 -
132
-
133
-
134
-
135
-
136
 |
 |
