Yamaha ELS-02 Owner's Manual - Page 142
Basic settings for the rhythm pattern, the rhythm.
 |
View all Yamaha ELS-02 manuals
Add to My Manuals
Save this manual to your list of manuals |
Page 142 highlights
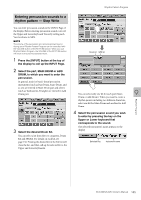
Rhythm Pattern Program Case 2: Creating your own rhythm by assembling parts from other different rhythms Preset Rhythm Intro 1 2 3 Ending 1 2 3 Main A B C D Fill In A B C D Break Preset Rhythm Intro 1' 2' 3' Ending 1' 2' 3' Main A' B' C' D' Fill In A' B' C' D' Break' Save as a User Rhythm Assemble some sections or parts User Rhythm Intro 1 2 3' Ending 1 2 3 Main A B C' D' Fill in A B C' D' Break' Case 3: Creating your own rhythm from scratch Blank Rhythm Intro 1 2 3 Ending 1 2 3 Main A B C D Fill In A B C D Break Save as a User Rhythm Entering percussion sounds into each section User Rhythm Intro 1 2 3 Ending 1 2 3 Main A B C D Fill In A B C D Break These are blank sections (no percussion sounds); if you press the ENDING [2] or [3] button, no sound is played. Basic settings for the rhythm pattern In the SETTING Page of the display, set the conditions of the rhythm, such as time signature, measure length, and so on. You can also customize the part settings in this SETTING Page - deleting any part or copying a part from another rhythm to the currently selected rhythm. 1 Press the [SETTING] button in the display to call up the SETTING Page. 2 Determines the time signature used for the rhythm. You can select the time signature with the BEAT buttons. If you start the Rhythm Pattern Program from a preset rhythm, pressing a BEAT button that is not the same as the currently selected rhythm calls up the following message. 142 ELS-02/ELS-02C Owner's Manual
-
 1
1 -
2
-
3
-
4
-
5
-
6
-
7
-
8
-
9
-
10
-
11
-
12
-
13
-
14
-
15
-
16
-
17
-
18
-
19
-
20
-
21
-
22
-
23
-
24
-
25
-
26
-
27
-
28
-
29
-
30
-
31
-
32
-
33
-
34
-
35
-
36
-
37
-
38
-
39
-
40
-
41
-
42
-
43
-
44
-
45
-
46
-
47
-
48
-
49
-
50
-
51
-
52
-
53
-
54
-
55
-
56
-
57
-
58
-
59
-
60
-
61
-
62
-
63
-
64
-
65
-
66
-
67
-
68
-
69
-
70
-
71
-
72
-
73
-
74
-
75
-
76
-
77
-
78
-
79
-
80
-
81
-
82
-
83
-
84
-
85
-
86
-
87
-
88
-
89
-
90
-
91
-
92
-
93
-
94
-
95
-
96
-
97
-
98
-
99
-
100
-
101
-
102
-
103
-
104
-
105
-
106
-
107
-
108
-
109
-
110
-
111
-
112
-
113
-
114
-
115
-
116
-
117
-
118
-
119
-
120
-
121
-
122
-
123
-
124
-
125
-
126
-
127
-
128
-
129
-
130
-
131
-
132
-
133
-
134
-
135
-
136
-
 137
137 -
 138
138 -
 139
139 -
 140
140 -
 141
141 -
 142
142 -
 143
143 -
 144
144 -
 145
145 -
 146
146 -
 147
147 -
148
-
149
-
150
-
151
-
152
-
153
-
154
-
155
-
156
-
157
-
158
-
159
-
160
-
161
-
162
-
163
-
164
-
165
-
166
-
167
-
168
-
169
-
170
-
171
-
172
-
173
-
174
-
175
-
176
-
177
-
178
-
179
-
180
-
181
-
182
-
183
-
184
-
185
-
186
-
187
-
188
-
189
-
190
-
191
-
192
-
193
-
194
-
195
-
196
-
197
-
198
-
199
-
200
-
201
-
202
-
203
-
204
-
205
-
206
 |
 |
