Yamaha EMX3000 Owner's Manual - Page 12
Rear panel, Two-channel connection
 |
View all Yamaha EMX3000 manuals
Add to My Manuals
Save this manual to your list of manuals |
Page 12 highlights
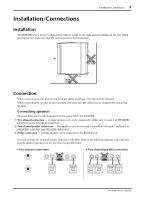
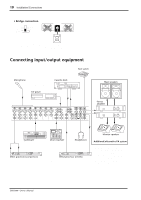
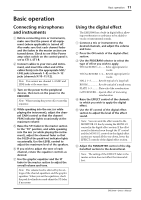
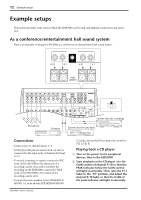
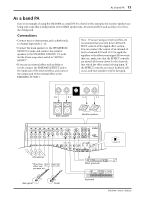
8 Front and rear panel Rear panel 1 R/MONO 2 1 SPEAKERS L/MONI 1 2 1 AC IN BRIDGE POWER ON OFF 3 2 1 SPEAKERS (speaker output) jacks Speakers can be connected to these jacks. The type of signals output, the number of speakers you can connect, and acceptable impedance differ depending on the setting of the Power amp select switch (control panel V). s When the Power amp select switch is set to ST1 L-ST1 R or MONI 1-MONO: • Two-channel connection You can connect one or two speakers to each of the L/MONI1 and R/MONO jacks. When the Power amp select switch is set to ST1 L-ST1 R, the speakers connected to the L/MONI1 and R/MONO jacks will output the ST1 L and ST1 R bus signals. When the switch is set to MONI 1-MONO, the speakers will output the MONITOR 1 signal and the MONO signal respectively. Whichever way the switch is set to, connect 4~8Ω speakers if you use one speaker per channel. The maximum output is 300W+300W with two 4Ω speakers. • Two-channel parallel connection If you wish to use two speakers per channel, use 8~16Ω speakers. The maximum output is 300W+300W with 8Ω impedance. s When the Power amp select switch is set to MONO (BRIDGE): • Bridge connection If you are connecting a single speaker to the BRIDGE jack, use a 8~16Ω speaker. The speaker outputs the MONO bus signal, and the maximum output is 600W with 8Ω impedance. Caution: When using a two-channel connection or two-channel parallel connection, do not connect a speaker to the BRIDGE jack. When using a bridge connection, do not connect a speaker to either the L/MONI1 or R/ MONO jacks. The BRIDGE jack is covered by a protective cap to prevent you from accidentally connecting a speaker it when using a two-channel or two-channel parallel connection. Remove this cap if you are using a bridge connection. If you wish to input the signal from the P.AMP IN jack, input it from the P.AMP IN L jack. 2 POWER switch This switch turns on/off the power to the EMX3000. Note: Before you turn the power of the EMX3000 on or off, the faders and controls in the master section of the control panel must be lowered to the minimum position. 3 AC inlet Connect the socket end of the included AC cable to this inlet. Connect the plug end of the cable to an AC outlet of the voltage printed below the inlet. EMX3000-Owner's Manual
-
 1
1 -
2
-
3
-
4
-
5
-
6
-
 7
7 -
 8
8 -
 9
9 -
 10
10 -
 11
11 -
 12
12 -
 13
13 -
 14
14 -
 15
15 -
 16
16 -
 17
17 -
18
-
19
-
20
-
21
-
22
-
23
-
24
 |
 |
