Yamaha EV-205 Owner's Manual
Yamaha EV-205 Manual
 |
View all Yamaha EV-205 manuals
Add to My Manuals
Save this manual to your list of manuals |
Yamaha EV-205 manual content summary:
- Yamaha EV-205 | Owner's Manual - Page 1
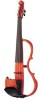
English ELECTRIC VIOLIN EV-204/EV-205 Owner's Manual Congratulations! Thank you for purchasing the Yamaha Electric Violin. In order to obtain the maximum performance and enjoyment from your Electric Violin, we urge you to read this Owner's Manual thoroughly before using the instrument. Please keep - Yamaha EV-205 | Owner's Manual - Page 2
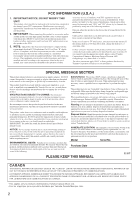
in the spaces provided below and retain this manual as a responsibility. Please study this manual carefully and consult your dealer permanent record of your purchase. before requesting service. Model Serial No. ENVIRONMENTAL ISSUES: Yamaha strives to produce products that are both user - Yamaha EV-205 | Owner's Manual - Page 3
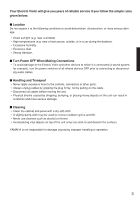
Your Electric Violin will give you years of reliable service if you follow the simple rules given below: ■ Location Do not expose it to the vinyl objects on top of the unit (vinyl can stick to and discolor the surface). YAMAHA is not responsible for damage caused by improper handling or operation. 3 - Yamaha EV-205 | Owner's Manual - Page 4
Main Body/Accessories After opening the packaging, please check that all the parts listed below are included. • Violin • 6F22 (S-006P) 9V battery x 1 • Owner's Manual * The EV-205 is the illustration. 4 - Yamaha EV-205 | Owner's Manual - Page 5
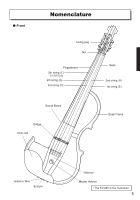
● Front Nomenclature Tuning peg Nut Fingerboard 5th string (C) * EV-205 Only 4th string (G) 3rd string (D) Neck 2nd string (A) 1st string (E) Sound Board Bridge Chin rest Body Frame Tailpiece Wire End pin Tailpiece Master Volume * The EV-205 is the illustration. 5 - Yamaha EV-205 | Owner's Manual - Page 6
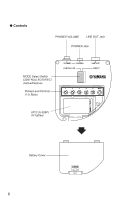
● Controls PHONES VOLUME LINE OUT Jack PHONES Jack MODE Select Switch CONTROLLED/DIRECT (Active/Passive) Pickup Level Controls (1-5, Main) VOLUME PHONES CONTROLLED LINE OUT DIRECT MAIN 6F22 (S-006P) 9V battery Battery Cover 6 OPEN - Yamaha EV-205 | Owner's Manual - Page 7
its corresponding notch in the bridge. * Playing the violin with a bridge that leans may result in damage to the bridge or a deterioration in sound quality. [EV-204] G DA E 4th string Slit 1st string [EV-205] G C D A E 5th string Slit 1st string Correct Bad Bad Vertical [Looking - Yamaha EV-205 | Owner's Manual - Page 8
-align the bridge using both hands. [EV-204] [EV-205] 2nd string (A) 1st string (E) 3rd string (D) 4th string (G) 2nd string (A) 1st string (E) 3rd string (D) 4th string (G) 5th string (C) ■ The Shoulder Rest Most standard size (4/4) violin rests can be attached to the body of the Electric Violin - Yamaha EV-205 | Owner's Manual - Page 9
are getting old. When changing strings, use Yamaha strings designed especially for the instrument. These strings are specially designed to eliminate electric noise. Always change the strings one at a time, even if all strings must be changed. • The end of the strings are sharp and can cut fingers - Yamaha EV-205 | Owner's Manual - Page 10
not cause noise and remains out of the way. 1st string (E) protective tube. 3rd (D), 4th (G) and 5th (C) strings [EV-204] 3rd string (D) 4th string (G) Rotate the tuning peg as shown [EV-205] 3rd string (D) 4th string (G) 5th string (C) 3 Use a piano, tuning fork, tuner, etc., and adjust the pitch - Yamaha EV-205 | Owner's Manual - Page 11
Control Section's LINE OUT and PHONES jacks are disconnected. * The Electric Violin operates without power in the Direct Mode. 1 Open the battery case that case, please take careful note of the following precautions and replace the battery. For information average battery life, refer to the - Yamaha EV-205 | Owner's Manual - Page 12
found on the back of the violin to select the mode. DIRECT (Passive) Mode In this mode, the signal produced by the pickup is sent, directly to the LINE Controllers 1-5 w correspond to the 1st through 5th strings. * Control #5 does not operate on the EV-204. * The MAIN control e is used for adjusting - Yamaha EV-205 | Owner's Manual - Page 13
in both Direct and Controlled modes. u • Before connecting the Electric Violin to any external devices, make sure that the power of all external devices is turned OFF. Set the volume level of the Electric Violin and any external audio sources to the minimum level before connecting - Yamaha EV-205 | Owner's Manual - Page 14
Example Connections * Both the LINE OUT and PHONES jacks are monaural type. Electric Violin Stereo Earphones Guitar Amp Electronic Tuner Guitar Preamp, etc. Powered Speaker P.A. Mixer, Recording Device When connecting the instrument to external audio equipment, check the jack - Yamaha EV-205 | Owner's Manual - Page 15
Ebony Single Unit with Pickup Maple Maple Ebony EV-204 : Ebony (4 hole type) EV-205 : Ebony (5 hole type) Gear Type YAMAHA strings for Electric Violin EV4S (strings for 4-string models)/EV5S (strings for 5string models) EVS-1E (1st)/EVS-2A (2nd)/EVS-3D (3rd)/EVS-4G (4th)/EVS-5C (5th) Individual high
-
 1
1 -
 2
2 -
 3
3 -
 4
4 -
 5
5 -
 6
6 -
 7
7 -
8
-
9
-
10
-
11
-
12
-
13
-
14
-
15
 |
 |

1
Thank you for purchasing the Yamaha Electric Violin. In or-
der to obtain the maximum performance and enjoyment from
your Electric Violin, we urge you to read this Owner’s Manual
thoroughly before using the instrument. Please keep this
Owner’s Manual in a safe place for later reference.
Congratulations!
EV-204/EV-205
Owner’s Manual
Contents
English
ELECTRIC
VIOLIN
Precautions
....................................................................
3
Main Body/Accessories
................................................
4
Nomenclature
................................................................
5
Setup
..............................................................................
7
■
Installing the Bridge
....................................................................
7
■
Tuning
.........................................................................................
8
■
The Shoulder Rest
......................................................................
8
■
Changing Strings
........................................................................
9
Power Supply
...............................................................
11
Using the Controls
......................................................
12
■
About the Controlled Mode
.......................................................
12
■
Using Headphones
...................................................................
13
■
Controlling the Output Volume (Master Volume)
......................
13
Example Connections
.................................................
14
Specifications
..............................................................
15