Yamaha EV-205 Owner's Manual - Page 10
st E and 2nd A, 3rd D, 4th G and 5th, C strings - ev 205 k
 |
View all Yamaha EV-205 manuals
Add to My Manuals
Save this manual to your list of manuals |
Page 10 highlights
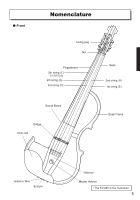
2 Insert the string into the hole on the peg and wind the string onto the peg. • Wind the 1st (E) and 2nd (A) strings to the left of the hole as shown in the illustration on the right. • Wind the 3rd (D), 4th (G) and 5th- (C) strings to the right. Caution • The string wrapped two or three times around the peg makes the most suitable condition for tuning the violin.Too many or too few wraps may result in inaccurate tuning or noise while playing. Make sure that the strings do not pull on the bridge causing it to over toward the fingerboard. Also, make sure that the strings pass over their corresponding notch in the top of the bridge. (Make sure that the tailpiece side of the bridge is standing vertical in relation to the violin body.) If the 1st (E) string has a protective tube on it, slide this tube down onto the thicker, ball end of the string (wound with thread) so it does not cause noise and remains out of the way. 1st string (E) protective tube. 3rd (D), 4th (G) and 5th (C) strings [EV-204] 3rd string (D) 4th string (G) Rotate the tuning peg as shown [EV-205] 3rd string (D) 4th string (G) 5th string (C) 3 Use a piano, tuning fork, tuner, etc., and adjust the pitch of each string using the tuning pegs. Rotate the tuning peg as shown 1st (E) and 2nd (A) strings 2nd string (A) 1st string (E) Rotate the tuning peg as shown 2nd string (A) 1st string (E) Rotate the tuning peg as shown • When the instrument is not going to be used for an extended period of time, loosen the strings until the pitch drops a whole tone. 10
-
 1
1 -
2
-
3
-
4
-
 5
5 -
 6
6 -
 7
7 -
 8
8 -
 9
9 -
 10
10 -
 11
11 -
 12
12 -
 13
13 -
 14
14 -
 15
15
 |
 |
