Yamaha Flutes Owner's Manual - Page 8
Preparing to Play - instrument
 |
View all Yamaha Flutes manuals
Add to My Manuals
Save this manual to your list of manuals |
Page 8 highlights
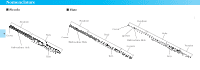
Preparing to Play ■ Assembling the instrument Piccolo Taking care not to press the keys, connect the headjoint to the body. * Use the markings on the headjoint and body as a guide for aligning the two sections. 22 * If you experience difficulty attaching the joint sections, apply a thin coat of cork grease to the cork and try again. Body Flute Headjoint Taking care not to press the keys, attach the headjoint to the body. * Take care not grasp the lip plate on the headjoint, and do not apply pressure to the keys on the body or footjoint. * Use a gauze to wipe off any dirt or foreign matter from the joint sections before assembling. Marks Body Marks Footjoint Headjoint Body
-
 1
1 -
2
-
 3
3 -
 4
4 -
 5
5 -
 6
6 -
 7
7 -
 8
8 -
 9
9 -
 10
10 -
 11
11 -
 12
12 -
 13
13 -
14
-
15
-
16
-
17
-
18
 |
 |

22
Flute
Taking care not to press the keys, attach the
headjoint to the body.
*
Take care not grasp the lip plate on the headjoint,
and do not apply pressure to the keys on the
body or footjoint.
*
Use a gauze to wipe off any dirt or foreign matter
from the joint sections before assembling.
Headjoint
Body
■
Assembling the instrument
Piccolo
Headjoint
Body
Marks
Preparing to Play
Footjoint
Body
Marks
Taking care not to press the keys, connect the
headjoint to the body.
*
Use the markings on the headjoint and body as
a guide for aligning the two sections.
*
If you experience difficulty attaching the joint
sections, apply a thin coat of cork grease to the
cork and try again.