Yamaha ISX-800 ISX-800 Owners Manual - Page 7
Front panel display, Rear panel, ALARM TYPE
 |
View all Yamaha ISX-800 manuals
Add to My Manuals
Save this manual to your list of manuals |
Page 7 highlights
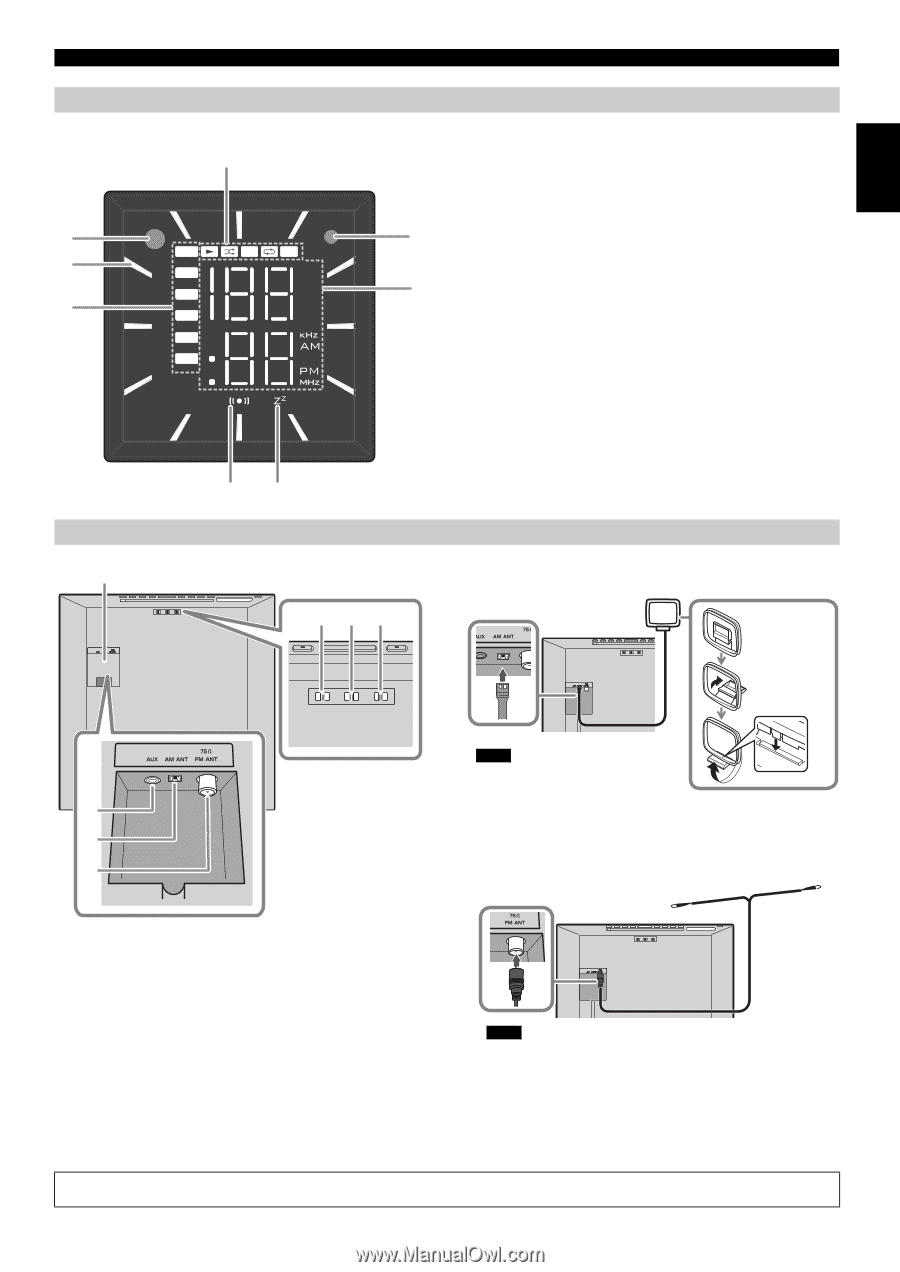
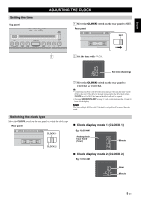
English Front panel display 1 2 8 3 4 iPod CD USB AUX 1 ALL 7 FM AM Rear panel 7 56 1 23 NAMES OF PARTS AND THEIR FUNCTIONS 1 Play/shuffle/repeat indicator Displays the playback mode (P. 6, 9). b Remote control signal receiver c Clock indicator Shows the clock hour hand (P. 5). d Source indicator Shows selected source. e Alarm indicator Turns on if the alarm has been set (P. 12). f Sleep indicator Turns on if the sleep timer has been set (P. 15). g Multi-function indicator Displays various information, including the clock time, track number being played or FM/AM station. h Illumination sensor Detects ambient lighting. Do not cover this sensor. e AM antenna terminal Connects the supplied AM antenna. AM antenna Assembling AM antenna Note • Place the antenna in a location with good signal reception. 4 • Signal reception may be inadvertently affected if a digital device is located near the antenna. 5 f FM antenna terminal 6 Connects the supplied FM antenna or outdoor antenna. a ALARM TYPE Switches the alarm type (P. 13). b CLOCK Switches the type of clock display or allows the time to be set (P. 5). c DIMMER Adjust the brightness of the front panel display (P. 15). d AUX Connects an external device. Supplied FM antenna Note • The antenna should be stretched out. If radio reception is poor, change the height, direction, or placement of the antenna. • If you use an outdoor antenna instead of the supplied FM antenna, reception will be better. g Terminal cover Remove the terminal cover before connecting external devices to AUX, and/or connecting the FM/AM antenna to antenna terminal. If you pass the outdoor antenna cable and/or external device cable through the pole of the stand, read the separate Assembly Guide. 3 En
-
 1
1 -
 2
2 -
 3
3 -
 4
4 -
 5
5 -
 6
6 -
 7
7 -
 8
8 -
 9
9 -
 10
10 -
 11
11 -
 12
12 -
13
-
14
-
15
-
16
-
17
-
18
-
19
-
20
-
21
-
22
-
23
-
24
-
25
-
26
-
27
-
28
-
29
-
30
-
31
-
32
-
33
-
34
-
35
-
36
-
37
-
38
-
39
-
40
-
41
-
42
-
43
-
44
-
45
-
46
-
47
-
48
-
49
-
50
-
51
-
52
-
53
-
54
-
55
-
56
-
57
-
58
-
59
-
60
-
61
-
62
-
63
-
64
-
65
-
66
-
67
-
68
 |
 |