Yamaha M7CL M7cl V3 Upgrade Guide - Page 3
Updating the M7CL firmware, holding down the SCENE MEMORY [STORE] key - v3 firmware
 |
View all Yamaha M7CL manuals
Add to My Manuals
Save this manual to your list of manuals |
Page 3 highlights
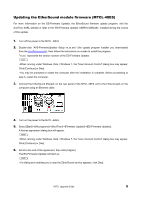
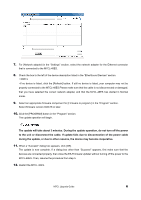
Updating the M7CL firmware IMPORTANT: If you intend on downgrading the M7CL-32/48 firmware V3 to V1 or V2, make sure to back up the internal data, then initialize the internal memory before updating. If you perform the update without initializing, operation of the M7CL may halt while a "Starting System" message is flashing on the lower-right of the screen, due to the difference in memory structures. In this case, turn off the power, then turn on the power again while holding down the SCENE MEMORY [STORE] key and [▲] key. The internal memory will be forcibly initialized and the M7CL will start up in normal mode in around one minute. Updating the firmware V1 or V2 to V3, or V3.0x to V3.5x 1. Turn off the power to the M7CL. 2. Connect the USB storage device to the M7CL USB connector, then turn on the power to the M7CL. A "Start Loading ?" message will be displayed. 3. Click the OK button to start loading the firmware. CAUTION: A "Loading..." message will appear during loading the firmware. The indication "......" will be displayed during the loading progress. Do not disconnect the USB storage device or power-off the M7CL while accessing the USB storage device. 4. When the firmware has been loaded, the M7CL automatically restarts and a "Starting System..." message flashes. While this message is flashing, do not turn off the power because the internal memory will be initialized in around one minute. If you have accidentally turned off the power, turn on the power again to resume the initialization. 5. When a "Since M7CL was upgraded, Initialize all memories" popup window appears, press the CLOSE button to close it. 6. Press the EXIT button on the lower right of the startup menu screen to start up in normal mode. 7. Remove the USB storage device after confirming the ACCESS indicator has disappeared in the function access area. 8. If necessary, confirm the firmware was correctly updated in the version field in the SETUP screen. Also, if necessary, adjust the detection point of the touch screen (Calibration function) on the startup menu screen. For details, refer to the M7CL Owner's Manual. This completes the update procedure of the M7CL firmware. If you have backed up the necessary data, load it using the M7CL SAVE/LOAD function or the M7CL Editor (compatible with the updated firmware version). If a password has been set for Administrator, set the M7CL Upgrade Guide 3
-
 1
1 -
 2
2 -
 3
3 -
 4
4 -
 5
5 -
 6
6 -
 7
7
 |
 |
