Yamaha MLA-200 MLA-200 Installation Guide - Page 7
Setting up MLA-200s, With nothing connected, open the DIP switch cover on the rear panel.
 |
View all Yamaha MLA-200 manuals
Add to My Manuals
Save this manual to your list of manuals |
Page 7 highlights
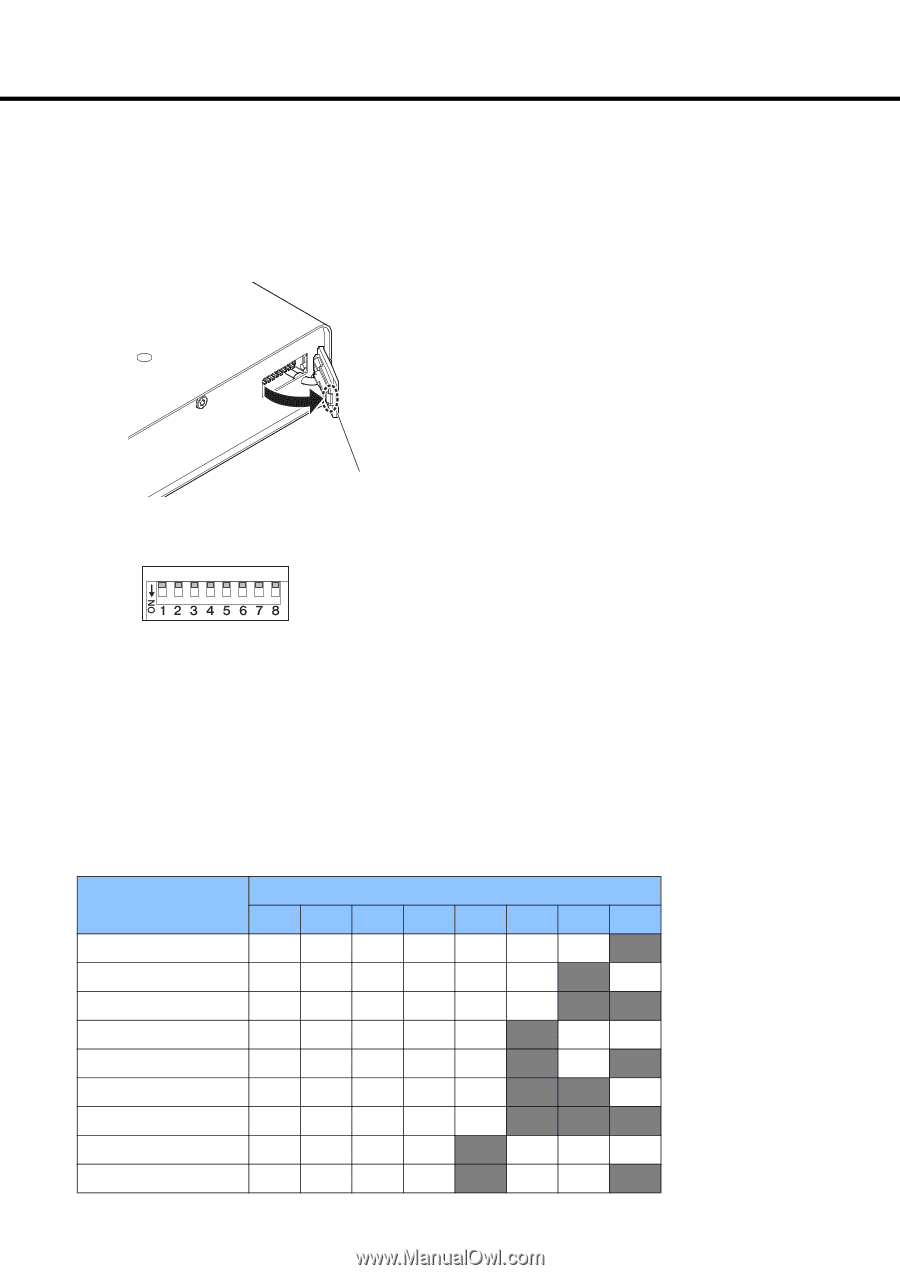
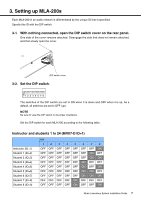
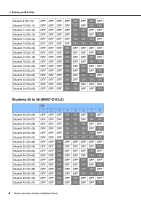
3. Setting up MLA-200s Each MLA-200 in an audio network is differentiated by the unique ID that is specified. Specify this ID with the DIP switch. 3-1. With nothing connected, open the DIP switch cover on the rear panel. One side of the cover remains attached. Disengage the side that does not remain attached, and then slowly open the cover. DIP switch cover 3-2. Set the DIP switch. The switches of the DIP switch are set to ON when it is down and OFF when it is up. As a default, all switches are set to OFF (up). NOTE Be sure to view the DIP switch in its proper orientation. Set the DIP switch for each MLA-200 according to the following table. Instructor and students 1 to 24 (MRX7-D ID=1) Instructor (ID=1) Student 1 (ID=2) Student 2 (ID=3) Student 3 (ID=4) Student 4 (ID=5) Student 5 (ID=6) Student 6 (ID=7) Student 7 (ID=8) Student 8 (ID=9) SW 12345678 OFF OFF OFF OFF OFF OFF OFF ON OFF OFF OFF OFF OFF OFF ON OFF OFF OFF OFF OFF OFF OFF ON ON OFF OFF OFF OFF OFF ON OFF OFF OFF OFF OFF OFF OFF ON OFF ON OFF OFF OFF OFF OFF ON ON OFF OFF OFF OFF OFF OFF ON ON ON OFF OFF OFF OFF ON OFF OFF OFF OFF OFF OFF OFF ON OFF OFF ON Music Laboratory System Installation Guide 7
-
 1
1 -
 2
2 -
 3
3 -
 4
4 -
 5
5 -
 6
6 -
 7
7 -
 8
8 -
 9
9 -
 10
10 -
 11
11 -
 12
12 -
13
-
14
-
15
-
16
-
17
-
18
-
19
-
20
-
21
-
22
-
23
-
24
-
25
-
26
-
27
-
28
 |
 |