Yamaha MOXF6 Owner's Manual - Page 47
Creating an original Pattern, Listening to the Demo Patterns, Creating a Pattern A
 |
View all Yamaha MOXF6 manuals
Add to My Manuals
Save this manual to your list of manuals |
Page 47 highlights
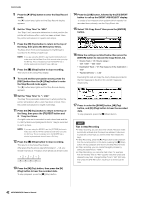
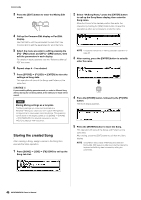
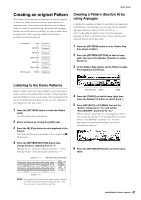
Quick Guide Creating an original Pattern The Pattern mode also lets you record your rhythm patterns or riffs to the different Sections as you wish-and as the inspiration hits-then combine the Sections into a Pattern Chain to create a complete Song. Along with the Arpeggio feature and Performance recording, you have a wide range of easy-to-use tools to quickly create fully arranged, professional sounding Songs. 1st measure Intro Section A Melody A Section B Melody B Section C Main theme Section D Melody B Section E Main theme Section F 120th measure Ending Section G Creating a Pattern (Section A) by using Arpeggio In addition to creating a Pattern by recording your keyboard performance conventionally, you can also use the powerful Arpeggio playback features of this instrument. Here, create data for Section A by recording Arpeggio playback to Track 1 as the drum part, Track 2 as the guitar part and Track 3 as the bass part. 1 Press the [PATTERN] button to enter Pattern Play then select a Pattern. 2 Press the [PATTERN SECTION] so that its lamp lights then press the Number [1] button to select Section A. 3 On the Pattern Play display, set the Pattern Length, Time Signature and Tempo. Listening to the Demo Patterns Before creating your own original pattern, you should give a listen to some of the preset Demo Patterns. These specially recorded Patterns cover a wide range of musical genres and are full of great hints and ideas on how you can create and use Patterns in your own music. 1 Press the [PATTERN] button to enter the Pattern mode. The Pattern Play display will appear. 2 Select a Pattern by turning the [DATA] dial. 3 Press the [F] (Play) button to start playback of the Pattern. The Pattern will play back repeatedly until you press the [J] (Stop) button. 4 Press the [PATTERN SECTION] button then change Sections, selecting from A - P. Pressing the [1] - [8] buttons calls up Sections A - H and pressing the [9] - [16] buttons calls up Sections I - P. Section A - H [PATTERN SECTION] button Time Signature Tempo Length 4 Press the [TRACK] so that its lamp lights then press the Number [1] button to select Track 1. 5 Press ARP [EDIT] [F3] MAIN, then set the "Switch" parameter to "on" and set the "VoiceWithARP" parameter to "on." With the "Switch" parameter "on," the Arpeggio of Track 1 can be played back. When the Arpeggio Type is selected with the "VoiceWithARP" parameter "on," the Voice appropriate for the selected Arpeggio Type will be automatically called up. 6 Press the ARP [ON/OFF] button so that its lamp lights. Section I - P NOTE By changing the Sections, you can create rhythmic variations, and easily improvise arrangements (such as intro, verse, chorus, verse, chorus, ending) in real time. 47 MOXF6/MOXF8 Owner's Manual
-
 1
1 -
2
-
3
-
4
-
5
-
6
-
7
-
8
-
9
-
10
-
11
-
12
-
13
-
14
-
15
-
16
-
17
-
18
-
19
-
20
-
21
-
22
-
23
-
24
-
25
-
26
-
27
-
28
-
29
-
30
-
31
-
32
-
33
-
34
-
35
-
36
-
37
-
38
-
39
-
40
-
41
-
 42
42 -
 43
43 -
 44
44 -
 45
45 -
 46
46 -
 47
47 -
 48
48 -
 49
49 -
 50
50 -
 51
51 -
 52
52 -
53
-
54
-
55
-
56
-
57
-
58
-
59
-
60
-
61
-
62
-
63
-
64
-
65
-
66
-
67
-
68
-
69
-
70
-
71
-
72
-
73
-
74
-
75
-
76
-
77
-
78
-
79
-
80
 |
 |
