Yamaha NS-AW392BL User Guide - Page 1
Yamaha NS-AW392BL Manual
 |
View all Yamaha NS-AW392BL manuals
Add to My Manuals
Save this manual to your list of manuals |
Page 1 highlights
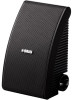
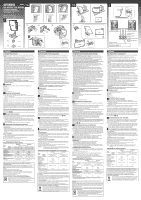
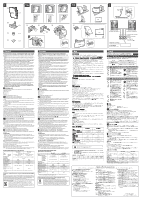
UCTGJ NS-AW592 / NS-AW392 OUTDOOR SPEAKER ENCEINTE D'EXTERIEUR 2A ©2009 Yamaha Corporation All right reserved. Printed in Indonesia WS39200 1" × 2 " # $ 2B " 3 " 10 mm (3/8˝) # % +-$ +- +- # × 2 a $ × 4 % × 2 NS-AW592 / NS-AW392 (R) NS-AW592 / NS-AW392 (L) Speaker output terminals Bornes de sortie enceinte Lautsprecherausgangskl emmen % # Morsetti di uscita degli speaker Amplifier or receiver Amplificateur ou récepteur Verstärker oder Receiver Amplificatore o ricevitore English CONSUMER PRECAUTIONS Read these precautions carefully before setting up your NS-AW592 / NS-AW392 speakers. • When installing these speakers outdoors, try to minimize their exposure to rain and snow by mounting the speaker in corners or under eaves. • Since these speakers are to be wall / ceiling mounted, it is essential that they are firmly secured. Be sure to consult a reliable source about the best type of fastener for your particular wall / ceiling's construction. • Do not attach them to thin plywood or soft wall / ceiling surface materials as the screws may tear free, causing the speakers to fall and be damaged, or result in personal injury. • Do not fasten the speakers to wall / ceiling with nails, adhesives, or other unsafe hardware. Long-term use and vibrations may cause them to pull free. • Do not place the speakers where they are liable to be knocked over or struck by falling objects. Stable placement will also ensure better sound performance. • When changing the angle of the speakers, be sure to adjust the angle after loosening the knob on the both sides. The speakers may be damaged by excessive power. • Lower the power amplifier / receiver volume control before changing input sources. Always turn the amplifier / receiver unit off when installing or removing input cables. • Anytime you note distortion, reduce the volume control on your power amplifier / receiver to a lower setting. Never allow your power amplifier to be driven into "clipping". • Do not attempt to modify or fix the speakers. Contact qualified Yamaha service personnel when any service is needed. The cabinet should never be opened for any reasons. • Do not attempt to clean the speakers with chemical solvents as this might damage the finish. To clean wipe with a dry, soft cloth. • Secure placement or installation is the owner's responsibility. Yamaha shall not be liable for any accident caused by improper placement or installation of speakers. 1 UNPACKING After unpacking, please inspect contents to confirm all the following items are contained. " Speaker × 2 # Bracket × 2 $ Knob × 4 % Non-skid pad (4 pcs.) × 2 2A MOUNTING THE SPEAKERS To wall / ceiling mount the speakers, use the included bracket. " Using the bracket as a template mark the locations (four points) of the key hole slots on the mounting area. # Using appropriate hardware (not included) securely fasten the bracket to the wall / ceiling. $ Position the speaker in the bracket and secure the speaker by using the two knobs included. % Rotate the YAMAHA emblem according to the position of the speaker. When using the brackets to mount the speakers on a wall / ceiling, please use safety wire (not included) between the speaker and the bracket to prevent the speaker from falling. Fix the safety wire with M5 screw (inch screw: No. 10-32) by using the screw hole [diameter: 5 mm (1/4″), depth: 15 mm (5/8″)] at the rear of the speakers. For security, please confirm that installed screw is in the screw hole more than 10 mm (3/8″). If speaker cable (not included) is being fed from a hole in the wall / ceiling behind the bracket, pull this speaker cable through the hole in the bracket before mounting the bracket [figure 2A - a ]. 2B PLACING THE SPEAKERS When placing the speakers on a flat surface, to enjoy the high sound quality, stabilize the speakers using the included non-skid pads. Affix the non-skid pads to prevent the speakers from moving as a result of vibration, etc. " When placing the speakers vertically, attach the bracket and the knobs to the speakers, and affix the non-skid pads on the bracket. When placing the speakers horizontally, attach the knobs to the speakers, and affix the non-skid pads on the side of the speakers. # Rotate the YAMAHA emblem according to the position of the speaker. 3 CONNECTING YOUR AMPLIFIER / RECEIVER Before making connections, make sure that the amplifier / receiver is switched off. CONNECTIONS • Connect the input terminals at the rear of the speakers to the speaker output terminals of the amplifier / receiver with the speaker cables (not included). • Connect each speaker making sure not to reverse the polarity "+" (red), "-" (black). If the speaker is connected with reversed polarity, the sound will be unnatural and lack bass. HOW TO CONNECT " Remove approximately 10 mm (3/8″) of insulation from the end of each speaker cable and twist the exposed wires of the cable together to prevent short circuits. # Unscrew the terminal knob. $ Insert one bare wire into the hole in the side of each terminal. % Tighten the terminal knob to secure the wire. Note: Do not let the bare speaker wires touch each other as this could damage the speaker or amplifier / receiver, or both. SPECIFICATIONS (For single speaker) NS-AW592 NS-AW392 Type Driver Tweeter Woofer Frequency response Impedance 2-Way Acoustic Suspension 2.5 cm (1″) soft dome type 2 cm (3/4″) soft dome type 16 cm (6-1/2″) cone type 13 cm (5-1/4″) cone type 55 Hz to 20 kHz (-10 dB) 60 Hz to 25 kHz (-10 dB) 6 ohms Nominal input Maximum input Sensitivity 50 W 150 W 88 dB / 2.83 V, 1 m 40 W 120 W 86 dB / 2.83 V, 1 m Crossover frequency Dimension (W × H × D) (excluding bracket and knobs) 5 kHz 206 × 341 × 170 mm (8-1/8″ × 13-5/8″ × 6-3/4″) 6 kHz 170 × 273 × 136 mm (6-3/4″ × 10-3/4″ × 5-3/8″) Weight (including bracket and knobs) 2.4 kg (5.29 lbs.) 1.8 kg (3.97 lbs.) * Specifications subject to change without notice due to product improvements. Warranty policy for European Economic Area (EEA) and Switzerland, Australia customer In the unlikely event that your Yamaha product needs guarantee service, please contact the dealer from whom it was purchased. If you experience any difficulty, please contact Yamaha representative office in your country. You can find full details on our website EEA and Switzerland: (http://www.yamaha-hifi.com/ or http://www.yamahauk.com/ for U.K. resident). Australia: (http://www.yamahamusic.com.au/) Warranty policy for U.S. and Canada customer Your Yamaha product is covered by a limited warranty for two years from the date of purchase. In the unlikely event of failure due to defective materials or workmanship, Yamaha will repair or replace them at no charge. Please visit our website for full details. U.S.: (http://www.yamaha.com/yec/), Canada: (http://www.yamaha.ca/) Information for Users on Collection and Disposal of Old Equipment This symbol specified in the Directives 2002/96/EC indicates that used electrical and electronic products should not be mixed with general household waste. For proper treatment to avoid harmful effect on human health and environment, please contact your local municipality, your waste disposal service or the point of sale where you purchased the items. Français MISES EN GARDES POUR L'UTILISATION Avant de positionner les enceintes NS-AW592 / NS-AW392, lisez attentivement ces mises en garde. • En cas d'installation des enceintes à l'extérieur, faites en sorte de réduire leur exposition à la pluie et à la neige en les installants dans des coins ou sous des abris. • Ces enceintes devant être installées au mur ou au plafond, il est important qu'elles soient fixées fermement. Consultez une source fiable pour le type de fixations les mieux adaptées à vos murs / plafond. • Ne les fixez pas sur des contre-plaqués minces ou des surfaces de mur / plafond molles les vis pouvant s'arracher et entraîner la chute des enceintes qui pourraient s'endommager et provoquer des lésions corporelles. • Ne fixez pas les enceintes au mur / plafond en utilisant des clous, des adhésifs ou autre matériel peu sûr. Une utilisation prolongée et les vibrations pourraient les décrocher. • N'installez pas les enceintes où elles pourraient être renversées ou heurtées par des objets tombant de haut. Une mise en place stable garantit aussi une meilleure réproduction du son. • En cas de changement d'angle des enceintes, vérifiez d'avoir correctement réglé l'angle en desserrant le bouton situé sur les deux côtés. Sinon les enceintes risquent d'être endommagées par une puissance trop élevée. • Avant de modifier les sources d'entrée, baissez le volume de l'amplificateur / récepteur. Avant de brancher ou de débrancher les câbles d'entrée éteignez l'amplificateur / récepteur. • Lorsque vous entendez de la distorsion, réduisez le niveau de volume de votre amplificateur / récepteur. Ne laissez pas l'amplificateur «écrêter». • N'essayez pas de modifier ou de réparer les enceintes. Pour la réparation, contactez un centre de service après-vente Yamaha agréé. L'enceinte ne doit en aucun cas être ouverte. • N'essayez pas de nettoyer les enceintes avec des solvants chimiques. Cela risquerait d'endommager l'apprêt. Pour le nettoyage, utilisez un chiffon sec et doux. • Le propriétaire des enceintes est responsable de leur emplacement et de leur installation. Yamaha décline toute responsabilité en cas d'accident causé par un positionnement ou une installation inadéquate des enceintes. 1 DEBALLAGE Après le déballage vérifiez que les articles suivant sont présents. " Enceinte × 2 # Patte de fixation × 2 $ Bouton × 4 % Tampons andidérapants (4 pcs.) × 2 2A INSTALLATION DES ENCEINTES Pour l'installation au mur / plafond des enceintes, utilisez la patte de fixation livrée avec ces dernières. " En utilisant la patte de fixation comme gabarit, marquez les emplacements (quatre points) des boutonnières sur la zone d'installation. # Utilisez le matériel de fixation approprié (non compris) pour fixer fermément la patte de fixation au mur / plafond. $ Placez l'enceinte sur la patte de fixation et fixez-la en utilisant les deux boutons compris dans la fourniture. % Tournez le symbole YAMAHA suivant la position de l'enceinte. Lors de l'utilisation des pattes de fixation pour l'installation des enceintes au mur / plafond, placez un câble de sécurité (non compris) entre l'enceinte et la patte de fixation pour éviter que l'enceinte ne tombe. Fixez le câble de sécurité à l'aide d'une vis M5 (vis : N° 10-32) insérée dans le trou (diamètre : 5 mm, profondeur : 15 mm) percé sur la face arrière des enceintes. Pour des raisons de sécurité, vérifiez que la vis a pénétrée dans le trou pour plus de 10 mm. Si le câble d'enceinte (non compris) passe au travers d'un trou du mur / plafond situé derrière la patte de fixation, avant d'installer la patte de fixation faites passer le câble d'enceinte à travers le trou percé dans la patte de fixation [figure 2A - a ]. 2B POSITIONNEMENT DES ENCEINTES Lorsque les enceintes sont positionnées sur une surface plane, pour profiter de la haute qualité du son, stabilisez les enceintes en appliquant les tampons antidérapants. Appliquez les tampons antidérapants pour éviter que les enceintes ne se déplacent à la suite de vibrations, etc. " Lorsque les enceintes sont installées verticalement, fixez la patte de fixation et les boutons sur les enceintes puis fixez les tampons antidérapants sur la patte de fixation. Lorsque les enceintes sont installées horizontalement, fixez les boutons aux enceintes, puis fixez les tampons antidérapants sur le côté des enceintes. # Tournez le symbole YAMAHA suivant la position de l'enceinte. 3 BRANCHEMENT DE L'AMPLIFICATEUR / RECEPTEUR Avant de réaliser les raccordements, assurez-vous que l'amplificateur / récepteur est éteint. RACCORDEMENTS • Raccordez les bornes d'entrée situées sur la face arrière des enceintes aux bornes de sortie des enceintes situées sur l'amplificateur / récepteur en utilisant les câbles d'enceintes (non compris). • Raccordez chaque enceinte en veillant à ne pas inverser la polarité « + » (rouge), « - » (noir). Si l'enceinte est raccordée avec la polarité inversée, le son émis sera innaturel et sans graves. REALISATION DU RACCORDEMENT " Enlevez environ 10 mm d'isolement de l'extrémité de chaque câble d'enceinte et torsadez ensemble la partie dénudée des câbles afin d'éviter tout court-circuit. # Dévissez le terminal bouton. $ Insérez un câble dénudé dans le trou situé sur le côté de chaque borne. % Serrez le terminal bouton pour fixer le câble. Remarque : Veillez à ce que les câbles dénudés des enceintes n'entrent pas en contact les uns avec les autres. Cela pourrait endommager l'enceinte ou l'amplificateur / récepteur ou les deux. CARACTERISTIQUES TECHNIQUES (Pour une enceinte) NS-AW592 NS-AW392 Type Driver Tweeter Woofer Suspension sonore à 2 voies 2,5 cm type dôme souple 2 cm type dôme souple 16 cm type cône 13 cm type cône Réponse en fréquence Impédance Entrée nominale 55 Hz à 20 kHz (-10 dB) 60 Hz à 25 kHz (-10 dB) 6 ohms 50 W 40 W Entrée maximum Sensibilité Fréquence de crossover 150 W 88 dB / 2,83 V, 1 m 5 kHz 120 W 86 dB / 2,83 V, 1 m 6 kHz Dimensions (L × H × P) (avec exclusion des pattes de fixation et des boutons) Poids (y compris la patte de fixation et les boutons) 206 × 341 × 170 mm 2,4 kg 170 × 273 × 136 mm 1,8 kg * Les spécifications sont sujettes à changement sans notification pour amélioration des performances du produit. Conditions de garantie pour la Communauté économique européenne (CEE) et la Suisse Si votre produit Yamaha a besoin d'une réparation pendant sa période de garantie, veuillez contacter votre revendeur. En cas de difficulté, veuillez contacter le représentant Yamaha de votre pays. Vous trouverez toutes les informations nécessaires sur notre site Web (CEE et Suisse) à l'adresse suivante : (http://www. yamaha-hifi .com/ ou http:// www.yamahauk.com/ pour les résidents au Royaume- Uni) Garantie Canadienne Votre produit Yamaha est couverts par une garantie limitée de deux années à compter de la date d'achat. Dans le cas improbable d'un échec dû aux matériaux ou à l'exécution défectueux, Yamaha les réparera ou les remplacera gratuit. Veuillez visiter notre site Web pour les détails complets (http://www.yamaha.ca/) Information concernant la Collecte et le Traitement des piles Usagées et des déchets d'équipements électriques et électroniques Ce symbole, spécifié dans la Directive 2002/96/CE, signifie que les produits électriques ou électroniques usagés ne doivent pas être mis au rebut avec les déchets ménagers. Pour traiter ces équipements de manière appropriée, et éviter ainsi les effets néfastes sur la santé humaine et sur l'environnement, contactez votre municipalité, votre service de traitement des déchets ou le point de vente où vous avez acheté les produits. Deutsch SICHERHEITSVORSCHRIFTEN FÜR DIE KUNDEN Lesen Sie die folgenden Sicherheitsvorschriften aufmerksam, bevor Sie Ihre NS-AW592 / NS-AW392 Lautsprecher installieren. • Sorgen Sie bei der Installation dieser Lautsprecher in Außenbereichen dafür, dass sie ausreichend vor Regen und Schnee geschützt sind; montieren Sie sie zu diesem Zweck in einer Ecke oder unter einer Traufe. • Diese Lautsprecher sind für die Wand-/Deckenmontage ausgelegt und müssen daher unbedingt sicher befestigt werden. Lassen Sie sich bei einem zuverlässigen Händler über die Art Verbindungselemente beraten, die für Ihre spezifische Wand-/Deckenkonstruktion am besten geeignet ist. • Montieren Sie die Lautsprecher nicht an dünnem Sperrholz oder an weichen Wand-/Deckenmaterialien, da sich die Schrauben möglicherweise lösen und die Lautsprecher herunterfallen, was Schäden an den Lautsprechern oder Körperverletzungen zur Folge haben kann. • Befestigen Sie die Lautsprecher nicht mit Nägeln, Klebstoff oder anderen ungeeigneten Verbindungselementen an der Wand/Decke. Nach langjähriger Nutzung oder durch Vibrationen können sich die Lautsprecher ebenfalls von der Wand/Decke lösen. • Positionieren Sie die Lautsprecher nicht an Stellen, an denen die Gefahr besteht, dass sie umgestoßen oder von herunterfallenden Gegenständen getroffen werden können. Eine stabile Positionierung garantiert auch einen besseren Klang. • Wenn Sie die Lautsprecher in einem anderen Winkel positionieren möchten, stellen Sie den Winkel entsprechend ein, nachdem Sie den Knopf auf beiden Seiten gelöst haben. Durch eine zu große Leistung können die Lautsprecher beschädigt werden. • Reduzieren Sie den Lautstärkepegel des Leistungsverstärkers / Receivers, bevor Sie den Signaleingang wechseln. Schalten Sie der Verstärker / Receiver immer aus, bevor Sie die Eingangskabel anschließen oder entfernen. • Reduzieren Sie jedes Mal, wenn Verzerrung auftritt, den Lautstärkepegel am Leistungsverstärker / Receiver. Achten Sie darauf, dass der Leistungsverstärker nie in eine „Begrenzungsverzerrung" getrieben wird. • Versuchen Sie nicht, die Lautsprecher abzuändern oder zu reparieren. Falls Reparaturarbeiten erforderlich sind, wenden Sie sich bitte immer an das qualifizierte Kundendienstpersonal von Yamaha. Das Gehäuse sollte unter keinen Umständen geöffnet werden. • Verwenden Sie zum Reinigen der Lautsprecher keine chemischen Lösungsmittel, da diese die Appretur beschädigen könnten. Wischen Sie sie mit einem trockenen, weichen Tuch ab. • Der Benutzer ist für die sichere Positionierung oder Montage der Lautsprecher verantwortlich. Yamaha haftet unter keinen Umständen für Unfälle, die auf die unsachgemäße Positionierung oder Montage der Lautsprecher zurückzuführen sind. 1 AUSPACKEN Prüfen Sie nach dem Auspacken, dass alle nachfolgend angeführten Artikel im Lieferumfang enthalten sind. " 2 Lautsprecher # 2 Halterungen $ 4 Drehknöpfe % 2 Rutschfeste Unterlagen (je 4 Stck.) 2A MONTAGE DER LAUTSPRECHER Verwenden Sie bei der Wand-/Deckenmontage der Lautsprecher die mitgelieferten Halterungen. " Nehmen Sie die Halterung als Vorlage und markieren Sie die Stellen (vier Punkte) für die Löcher, die zwecks Montage der Lautsprecher zu bohren sind. # Befestigen Sie die Halterung mit den passenden (nicht mitgelieferten) Verbindungselementen an der Wand/Decke. $ Setzen Sie den Lautsprecher in die Halterung und sichern Sie ihn mit den beiden mitgelieferten Drehknöpfen. % Drehen Sie das YAMAHA-Logo entsprechend der Position des Lautsprechers. Wenn Sie die Lautsprecher mit den Halterungen an einer Wand/Decke montieren, bringen Sie zwischen den Lautsprechern und der Halterung einen (nicht mitgelieferten) Sicherheitsdraht an um zu verhindern, dass die Lautsprecher herunterfallen. Befestigen Sie den Sicherheitsdraht mit einer M5 Schraube (Zoll-Schraube: Nr. 10-32) im Schraubenloch (Durchmesser: 5 mm, Tiefe: 15 mm) auf der Rückseite der Lautsprecher. Stellen Sie sicher, dass die Schraube mehr als 10 mm in das Schraubenloch eingeschraubt ist. Wenn das (nicht mitgelieferte) Lautsprecherkabel von einem Loch in der Wand/ Decke hinter der Halterung zum Lautsprecher geführt wird, ziehen Sie dieses Kabel durch das Loch in der Halterung, bevor Sie die Halterung montieren [siehe Abbildung 2A - a ]. 2B POSITIONIERUNG DER LAUTSPRECHER Wenn Sie die Lautsprecher an einer glatten Oberfläche anbringen, geben Sie den Lautsprechern mit den mitgelieferten rutschfesten Unterlagen Halt, um die hochwertige Klangqualität voll zur Geltung zu bringen. Bringen Sie die rutschfesten Unterlagen an um zu verhindern, dass sich die Lautsprecher aufgrund von Vibrationen etc. bewegen. " Wenn Sie die Lautsprecher vertikal montieren, befestigen Sie die Halterung und die Drehknöpfe an den Lautsprechern und bringen Sie die rutschfeste Unterlage an der Halterung an. Wenn Sie die Lautsprecher horizontal montieren, befestigen Sie die Drehknöpfe an den Lautsprechern und bringen Sie die rutschfeste Unterlage an der Seite der Lautsprecher an. # Drehen Sie das YAMAHA-Logo entsprechend der Position des Lautsprechers. 3 ANSCHLUSS DES VERSTÄRKERS / RECEIVERS Stellen Sie sicher, dass der Verstärker / Receiver ausgeschaltet ist, bevor Sie die Anschlüsse vornehmen. ANSCHLÜSSE • Schließen Sie die Eingangsklemmen mit den (nicht mitgelieferten) Lautsprecherkabeln an der Rückseite der Lautsprecher an die Lautsprecherausgangsklemmen des Verstärkers / Receivers an. • Schließen Sie die Lautsprecher an; achten Sie dabei auf die korrekte Polarität „+" (rot), „-" (schwarz). Bei umgepoltem Anschluss der Lautsprecher ist der Klang unnatürlich und der Bass ist nicht gut hörbar. SO NEHMEN SIE DIE ANSCHLÜSSE VOR " Entfernen Sie circa 10 mm der Isolierung vom Ende der Lautsprecherkabel und verdrehen Sie die abisolierten Drähte des Kabels miteinander, um Kurzschlüsse zu vermeiden. # Schrauben Sie den Terminal-Knopf los. $ Führen Sie einen blanken Draht in das Loch an der Seite jeder Klemme ein. % Schrauben Sie den Terminal-Knopf fest, um den Draht zu befestigen. Hinweis: Achten Sie darauf, dass sich die blanken Lautsprecherdrähte nicht berühren, da anderenfalls der Lautsprecher oder der Verstärker / Receiver oder beide beschädigt werden können. TECHNISCHE DATEN (je Lautsprecher) NS-AW592 NS-AW392 Typ Treiber Hochtöner Tieftöner 2-Wege Acoustic Suspension 2,5 cm Weich-Kalottenhochtöner 2 cm Weich-Kalottenhochtöner 16 cm Konustieftöner 13 cm Konustieftöner Frequenzgang Impedanz Nenneingangsleistung 55 Hz bis 20 kHz (-10 dB) 60 Hz bis 25 kHz (-10 dB) 6 Ohm 50 W 40 W Maximale Eingangsleistung Empfindlichkeit Überschneidungsfrequenz 150 W 88 dB / 2,83 V, 1 m 5 kHz 120 W 86 dB / 2,83 V, 1 m 6 kHz Abmessungen (B × H × T) (ohne Halterung und Drehknöpfe) 206 × 341 × 170 mm 170 × 273 × 136 mm Gewicht (einschließlich Halterung und Drehknöpfe) 2,4 kg 1,8 kg * Änderungen der technischen Daten aus Gründen der Produktverbesserung ohne vorherige Ankündigung vorbehalten. Garantieanwendung für den Europäischen Wirtschaftsraum (EWR) und Schweiz Falls Sie im unwahrscheinlichen Fall für Ihr Yamaha-Produkt eine Garantie-Dienstleistung in Anspruch nehmen müssen, kontaktieren Sie bitte den Händler, bei dem Sie das Produkt gekauft haben. Sollten dabei Schwierigkeiten auftreten, bitte den Yamaha-Importeur Ihres Landes benachrichtigen. Sie können die gesamten Informationen auf unserer Webseite EWR und Schweiz finden: (http://www.yamaha-hifi.com/ oder http://www.yamahauk.com/ für britische Staatsbürger) Verbraucherinformation zur Sammlung und Entsorgung alter Elektrogeräte und Benutzter Batterien Dieses Symbol, das in den Richtlinien 2002/96/EC spezifiziert wird, gibt an, dass elektrische und elektronische Produkte nicht im allgemeinen Hausmüll entsorgt werden dürfen. Für Einzelheiten zur korrekten Entsorgung, um schädliche Wirkungen auf die menschliche Gesundheit und Umwelt zu vermeiden, bitte Ihre lokale Gemeinde-/Stadtverwaltung, Ihr Abfallbeseitigungsunternehmen oder die Verkaufsstelle, wo Sie das Produkt erworben haben, kontaktieren. Italiano PRECAUZIONI PER I CONSUMATORI Leggere attentamente queste precauzioni prima di configurare gli speaker NS-AW592 / NS-AW392. • In caso di installazione degli speaker in un ambiente esterno, cercare di minimizzarne l'esposizione a pioggia e neve montandoli in angoli o sotto a dei cornicioni. • Dato che gli speaker sono destinati a essere montati a parete o al soffitto, è essenziale fissarli saldamente. Accertarsi di consultare una fonte affidabile per conoscere l'elemento di fissaggio migliore per il proprio tipo di parete / soffitto. • Non fissare gli speaker a materiali morbidi o in legno compensato sottile per il montaggio a parete o al soffitto, dato che le viti potrebbero causare lacerazioni in grado di far cadere e danneggiare gli speaker o di causare lesioni personali. • Non fissare gli speaker alla parete / al soffitto con chiodi, adesivi o altre minuterie non sicure. L'utilizzo a lungo termine e le vibrazioni potrebbero causarne la rimozione. • Non posizionare gli speaker in luoghi in cui potrebbero essere rovesciati o colpiti da oggetti cadenti. Una collocazione stabile garantirà anche migliori prestazioni acustiche. • In fase di modifica dell'angolazione degli speaker, assicurarsi di regolare l'angolazione dopo aver allentato la manopola su entrambi i lati. Gli speaker potrebbero danneggiarsi a causa della potenza eccessiva. • Abbassare il volume dell'amplificatore / ricevitore di potenza prima di modificare le fonti di ingresso. Spegnere sempre l'amplificatore / ricevitore in fase di installazione o rimozione dei cavi di ingresso. • Quando si rileva una distorsione, ridurre il volume dell'amplificatore / ricevitore di potenza a un'impostazione inferiore. Non portare mai l'amplificatore di potenza fino al livello di saturazione. • Non cercare di modificare o di riparare gli speaker. Contattare un tecnico qualificato dell'assistenza Yamaha per l'esecuzione di ogni intervento di manutenzione richiesto. Non aprire mai l'armadio per nessun motivo. • Non cercare di pulire gli speaker con solventi chimici, in quanto potrebbero danneggiare le finiture. Per pulirli utilizzare un panno asciutto e morbido. • La correttezza della posizione e dell'installazione è responsabilità del proprietario. Yamaha esclude ogni responsabilità in caso di incidenti causati da errori di posizionamento o installazione degli speaker. 1 DISIMBALLAGGIO Dopo il disimballaggio, ispezionare il contenuto della confezione per confermare la presenza di tutti gli elementi seguenti. " Speaker × 2 # Staffa × 2 $ Manopola × 4 % Tappetino antiscivolo (4 pz) × 2 2A MONTAGGIO DEGLI SPEAKER Per montare a parete / al soffitto gli speaker, utilizzare la staffa inclusa. " Utilizzando la staffa come guida, contrassegnare le posizioni (quattro punti) dei fori sull'area di montaggio. # Utilizzando della minuteria appropriata (non fornita) fissare saldamente la staffa alla parete / al soffitto. $ Posizionare lo speaker nella staffa e fissarlo utilizzando le due manopole incluse. % Ruotare l'emblema YAMAHA in base alla posizione dello speaker. In caso di utilizzo delle staffe per montare gli speaker a parete / al soffitto, utilizzare del filo protettivo (non fornito) tra lo speaker e la staffa, al fine di impedire l'eventuale caduta dello speaker. Fissare il filo protettivo con una vite M5 (n. 10-32) inserendola nell'apposito foro (diametro: 5 mm, profondità: 15 mm) sul retro degli speaker. Per motivi di sicurezza, controllare che la vite installata sia entrata nel foro per oltre 10 mm. Se il cavo dello speaker (non fornito) viene inserito attraverso un foro nella parete / nel soffitto dietro la staffa, farlo passare attraverso il foro nella staffa prima di montare quest'ultima [figura 2A - a ]. 2B POSIZIONAMENTO DEGLI SPEAKER In caso di posizionamento degli speaker su una superficie piatta, al fine di ottenere la massima qualità sonora, stabilizzare gli speaker utilizzando i tappetini antiscivolo inclusi. Collocare i tappetini antiscivolo in modo da impedire il movimento degli speaker dovuto a vibrazioni, ecc. " In caso di posizionamento degli speaker in posizione verticale, fissare la staffa e le manopole agli speaker e applicare i tappetini antiscivolo alla staffa. In caso di posizionamento degli speaker in posizione orizzontale, fissare le manopole agli speaker e applicare i tappetini antiscivolo lateralmente sugli speaker. # Ruotare l'emblema YAMAHA in base alla posizione dello speaker. 3 COLLEGAMENTO DELL'AMPLIFICATORE / RICEVITORE Prima di effettuare i collegamenti, assicurarsi che l'amplificatore / ricevitore sia spento. COLLEGAMENTI • Collegare i morsetti di ingresso sul retro degli speaker ai morsetti di uscita degli speaker dell'amplificatore / ricevitore mediante i cavi per speaker (non forniti). • Collegare ciascuno speaker rispettandone la polarità "+" (rosso), "-" (nero). Se uno speaker viene collegato con la polarità invertita, il suono risulterà innaturale e privo di bassi. COME EFFETTUARE I COLLEGAMENTI " Rimuovere circa 10 mm di isolamento dall'estremità di ciascun cavo degli speaker e attorcigliare insieme i fili esposti del cavo per impedire cortocircuiti. # Svitare il terminale manopola. $ Inserire un filo privo di isolamento nel foro sul lato di ciascun morsetto. % Serrare il terminale manopola per bloccare il filo. Nota: Impedire il contatto tra i fili privi di isolamento dello speaker, dato che ciò potrebbe causare danni allo speaker o all'amplificatore / ricevitore o a entrambi. SPECIFICHE (per il singolo speaker) NS-AW592 NS-AW392 Tipo Sospensione acustica bidirezionale Driver Tweeter 2,5 cm tipo a cupola morbida 2 cm tipo a cupola morbida Woofer 16 cm tipo conico 13 cm tipo conico Risposta in frequenza Da 55 Hz a 20 kHz (-10 dB) Da 60 Hz a 25 kHz (-10 dB) Impedenza 6 ohm Ingresso nominale 50 W 40 W Ingresso massimo 150 W 120 W Sensibilità 88 dB / 2,83 V, 1 m 86 dB / 2,83 V, 1 m Frequenza di incrocio 5 kHz 6 kHz Dimensioni (L × A × P) (esclusi staffa e manopole) 206 × 341 × 170 mm 170 × 273 × 136 mm Peso (inclusi staffa e manopole) 2,4 kg 1,8 kg * Specifiche soggette a modifica senza preavviso per miglioramenti al prodotto. Norme di garanzia per lo Spazio economico europeo (SEE) e la Svizzera Nell'improbabile eventualità che il prodotto Yamaha richieda un intervento di assistenza in garanzia, rivolgersi al rivenditore presso cui il prodotto è stato acquistato. Se si dovessero incontrare difficoltà, rivolgersi al rappresentante Yamaha nel proprio paese. Per informazioni dettagliate consultare il sito Web per SEE e Svizzera: http://www.yamahahifi.com/ oppure http://www.yamahauk.com/(per i residenti nel Regno Unito) Informazioni per gli utenti sulla raccolta e lo smaltimento di vecchia attrezzatura e batterie Usate Il presente simbolo, previsto dalla direttiva 2002/96/CE, indica che i prodotti elettrici ed elettronici usati non devono essere smaltiti con i rifiuti domestici. Per il corretto smaltimento al fine di prevenire effetti nocivi sulla salute e sull'ambiente, rivolgersi alle autorità locali, alla società di smaltimento dei rifiuti o al punto vendita presso cui i prodotti sono stati acquistati.
-
 1
1 -
 2
2
 |
 |