Yamaha NS-P430 Owner's Manual - Page 14
USING THE SUBWOOFER (YST-SW015), Controls and their functions
 |
View all Yamaha NS-P430 manuals
Add to My Manuals
Save this manual to your list of manuals |
Page 14 highlights
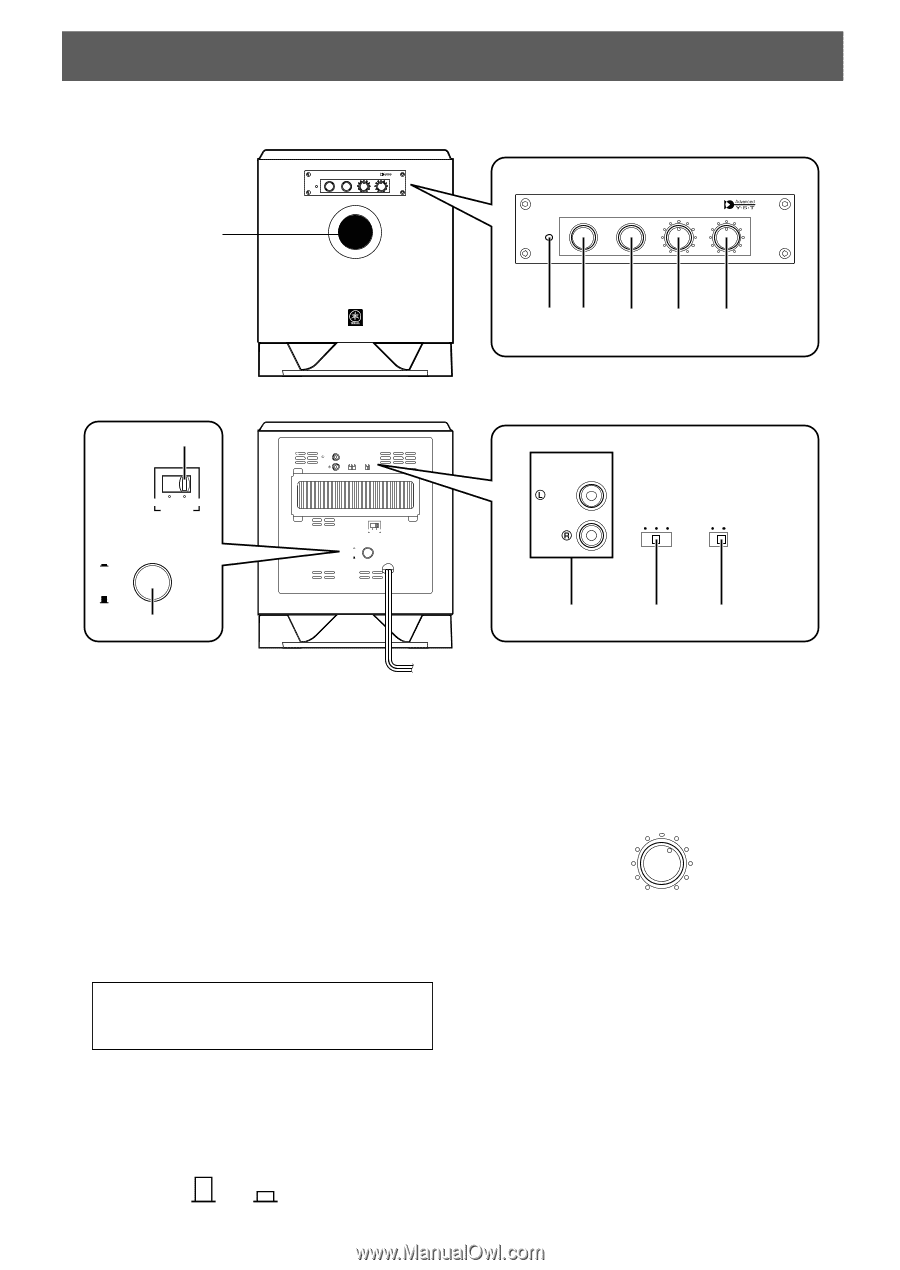
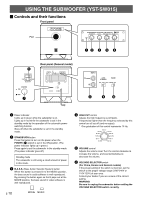
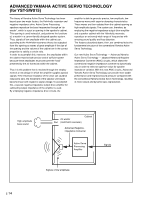
USING THE SUBWOOFER (YST-SW015) Ⅵ Controls and their functions Front panel Port SUBWOOFER SYSTEM YST-SW015 STANDBY/ON B.A.S.S. HIGH CUT50-150Hz VOLUME 0-10 SUBWOOFER SYSTEM YST-SW015 STANDBY/ON B.A.S.S. HIGH CUT50-150Hz VOLUME 0-10 12 3 4 5 6 110V-120V 220V-240V VOLTAGE SELECTOR POWER ON OFF 7 Rear panel (General model) INPUT /MONO AUTO STANDBY PHASE OFF LOW HIGH NORM REV 110V-120V 220V-240V VOLTAGE SELECTOR POWER ON OFF INPUT /MONO AUTO STANDBY PHASE OFF LOW HIGH NORM REV 8 90 1 Power indicator Lights up in green while the subwoofer is on. Lights up in red while the subwoofer is set in the standby mode by the operation of the automatic powerswitching function. Goes off when the subwoofer is set in the standby mode. 2 STANDBY/ON button Press this button to turn on the power when the POWER (7) switch is set in the ON position. (The power indicator lights up in green.) Press again to set the subwoofer in the standby mode. (The power indicator goes off.) Standby mode The subwoofer is still using a small amount of power in this mode. 3 B.A.S.S. (Bass Action Selector System) button When this button is pressed in to the MUSIC position, the bass sound in audio software is well reproduced. By pressing the button again so that it pops out at the MOVIE position, the bass sound in video software is well reproduced. E-10 MOVIE MUSIC 4 HIGH CUT control Adjusts the high frequency cut off point. Frequencies higher than the frequency selected by this control are all cut off (and no output). * One graduation of this control represents 10 Hz. 100 Hz 90 Hz 110 Hz 80 Hz 120 Hz 70 Hz 130 Hz 60 Hz 50 Hz 140 Hz 150 Hz 5 VOLUME control Adjusts the volume level. Turn the control clockwise to increase the volume, and counterclockwise to decrease the volume. 6 VOLTAGE SELECTOR switch (For China, Korean and General models) If the preset setting of the switch is incorrect, set the switch to the proper voltage range (220V-240V or 110V-120V) of your area. Consult your dealer if you are unsure of the correct setting. WARNING Be sure to unplug the subwoofer before setting the VOLTAGE SELECTOR switch correctly.
-
 1
1 -
2
-
3
-
4
-
5
-
6
-
7
-
8
-
 9
9 -
 10
10 -
 11
11 -
 12
12 -
 13
13 -
 14
14 -
 15
15 -
 16
16 -
 17
17 -
 18
18 -
 19
19 -
20
 |
 |