Yamaha RHH135 Owner's Manual
Yamaha RHH135 Manual
 |
UPC - 086792880006
View all Yamaha RHH135 manuals
Add to My Manuals
Save this manual to your list of manuals |
Yamaha RHH135 manual content summary:
- Yamaha RHH135 | Owner's Manual - Page 1
refer to the attached "Accessories List" sheet included with the Pads Set when confirming package contents. ● RHH135: z RHH135 main unit x 1 (å: Main unit x 1, ∫: Clamp base assembly x 1, ç: Stand base x 1), x Stereo phone cable x 2, c Cable band x 1 , v Owner's Manual (this sheet) x 1 Lieferumfang - Yamaha RHH135 | Owner's Manual - Page 2
du support ou Si le produit est sale ou collant, nettoyez-le Hat compatibles con el RHH135, recomendamos la utilización de un soporte de Yamaha RHH135, deslice el RHH135 en el eje del charles !1 y coloque el RHH135 de forma que el logotipo de YAMAHA aparezca en la parte frontal. 8. Suba el RHH135 - Yamaha RHH135 | Owner's Manual - Page 3
DTXPRESS IV] • Special settings are not required. (The RHH135 is compatible with this module's factory settings.) [DTXPRESS III] • Set the Trigger Setup setting (refer to the Owner's Manual that came with the DTXPRESS III) to "4. SP Med." The RHH135 is especially designed to take advantage of the - Yamaha RHH135 | Owner's Manual - Page 4
%." [DTXPLORER] 1. En la página Trigger Setup Edit RHH135 is used with a DTX Series Drum Trigger Module, enter the module's Trigger Setup Edit display and set the Gain (pad input level) parameter so that the display reads 90-95% when the pad is struck strongly. Refer to the Owner's Manual Yamaha
-
 1
1 -
 2
2 -
 3
3 -
 4
4
 |
 |

English
Before using, please read this owner’s manual, and
use this product in a safe and proper manner.
Partic-
ularly in the case of children and young users, par-
ents or an instructor should teach the children the
proper manner in which to use the device.
Deutsch
Bitte lesen Sie vor Gebrauch diese
Bedienungsanleitung, und verwen-
den Sie das Produkt sicher und auf
geeignete Weise. Besonders für
Kinder und jüngere Anwender soll-
ten die Eltern oder ein Lehrer den
Kindern die richtige Art und Weise
zeigen, in der das Produkt ange-
wendet werden sollte.
PRECAUTIONS
WARNING
If this symbol is ignored and the equipment is used improperly, fatal injury to
persons or serious damage could occur.
If this product is used with a hi-hat stand, do not place a stand on a sloping, unstable surface, or on steps.
The stand may overturn or be damaged, resulting in injury.
If this product is used with a hi-hat stand, make sure all bolts are tightened firmly. Also, when adjusting the
height or angle, do not suddenly loosen the bolts. Loose bolts may result in the stand overturning or parts
dropping, causing injury.
Please be careful when children are close to or touching the product. Careless movement around the
product may result in injury.
When setting the product, please pay close attention to the handling and setting of cables. Carelessly
placed cables may cause the user and others to trip and fall.
Do not alter the product. Doing so may result in injury or damage/deterioration to the product.
CAUTION
If this symbol is ignored and the equipment is used improperly, there is a danger
or injury to persons handling the equipment, and material damage could occur.
Do not step on or place heavy objects on the product. It may result in damage.
Do not use or keep the product in places with extremely high temperature (places in direct sunlight, close
to a heater, in a closed car, etc.) or high humidity (bathroom, outside on a rainy day, etc.). Doing so may
result in deformation, discoloration, damage or deterioration.
When cleaning the product, do not use benzine, thinner or alcohol as it may result in discoloration or defor-
mation. Please wipe with a soft cloth or a damp cloth that has been wrung out thoroughly. If the product is
soiled or sticky, use a neutral detergent on a cloth then wipe with a damp cloth that has been wrung out
thoroughly to remove any remaining detergent. Also pay close attention so as not to let the water and
detergent come into contact with the cushions used in the product; doing so may result in deterioration.
Make sure you hold onto the plug, not the cable, when connecting or disconnecting the cable. Also, never
place any heavy or sharp objects on the cable. Applying excessive force to the cable may result in damage
to the cable, such as the wires being severed, etc.
To prevent against accidents and injury
Please follow the cautions listed below.
Caution (including danger, or warning). This
mark indicates cautions to which you should
pay close attention.
Actions indicated with this icon are prohibited
and should not be attempted.
VORSICHTSMASSNAHMEN
WARNUNG
Wenn dieses Symbol ignoriert und das Produkt falsch angewendet wird, können
schwere Personenschäden oder Sachschäden eintreten.
Wenn dieses Produkt mit einem Hi-Hat-Ständer verwendet wird, stellen Sie den Ständer nicht auf eine
schiefe, unstabile Oberfläche oder auf Stufen usw. Der Ständer könnte umkippen und beschädigt werden
und dabei Verletzungen verursachen.
Wenn dieses Produkt mit einem Hi-Hat-Ständer verwendet wird, achten Sie darauf, dass alle Bolzen fest-
gezogen sind. Wenn Sie Höhe oder Neigungswinkel einstellen, achten Sie darauf, nicht versehentlich die
Bolzen zu lösen. Lose Bolzen können bewirken, dass der Ständer umfällt und beschädigt wird sowie Ver-
letzungen verursacht.
Bitte seien Sie vorsichtig, wenn Kinder in der Nähe sind oder das Produkt berühren. Sorglose Bewegun-
gen in der Nähe des Produkts können Verletzungen verursachen.
Achten Sie beim Einstellen der Pads bitte sorgfältig auf die Handhabung der Kabel und die Kabelführung.
Achtlos platzierte Kabel können dazu führen, dass der Anwender oder Andere stolpern und hinfallen.
Modifizieren Sie das Produkt nicht. Dadurch können Verletzungen auftreten oder das Produkt beschädigt
oder beeinträchtigt werden.
VORSICHT
Wenn dieses Symbol ignoriert und das Produkt falsch angewendet wird, besteht
Verletzungsgefahr für Personen, die mit dem Produkt umgehen, oder es können
Sachschäden entstehen.
Treten Sie nicht auf das Produkt und stellen Sie keine schweren Gegenstände darauf ab. Dadurch kann
das Produkt beschädigt werden.
Lagern oder verwenden Sie das Produkt nicht an Orten mit extrem hoher Temperatur (in direktem Sonnen-
licht, in Nähe einer Heizung, in einem geschlossenen Fahrzeug usw.) oder hoher Luftfeuchtigkeit (Bade-
zimmer, draußen im Regen usw.). Dadurch könnte das Instrument beschädigt, verfärbt, verformt oder
sonstwie beeinträchtigt werden.
Verwenden Sie kein Benzin, Lösemittel oder Alkohol, um das Produkt zu reinigen, da dies zu Verfärbung
oder Verformung führen kann. Bitte wischen Sie das Produkt mit einem weichen oder leicht angefeuchte-
tem und gut ausgewrungenem Tuch sauber. Wenn das Produkt stark verschmutzt ist, verwenden Sie ein
Tuch mit einem neutralen Reinigungsmittel, und wischen Sie das Produkt mit einem leicht angefeuchtetem
und gut ausgewrungenem Tuch sauber, so dass kein Reinigungsmittel auf dem Produkt verbleibt. Achten
Sie auch besonders darauf, dass kein Wasser und Reinigungsmittel in Kontakt mit den Kissen des Pro-
dukts gerät; dadurch wird das Produkt beeinträchtigt.
Vergewissern Sie sich, dass Sie am Stecker ziehen und nicht am Kabel, wenn Sie dieses anschließen
oder entfernen. Platzieren Sie auch keine schweren oder scharfen Gegenstände auf dem Kabel. Anwen-
dung übermäßiger Kraft auf das Kabel kann dieses beschädigen, z. B. durchtrennte Leiter usw.
Zur Vorbeugung gegen Unfälle und Verletzungen
Befolgen Sie bitte die unten aufgeführten Vorsichtsmaßnahmen.
Vorsicht (einschließlich Gefahr, oder Warnung). Dieses Symbol
markiert Vorsichtsmaßnahmen, die Sie genau beachten sollten.
Aktionen, die mit diesem Symbol versehen sind, sind unzulässig
und sollten nicht ausgeführt werden.
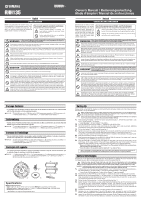
* To customers who purchased a Pads Set, please refer to the attached “Accessories List” sheet included
with the Pads Set when confirming package contents.
●
RHH135:
z
RHH135 main unit x 1 (
å
: Main unit x 1,
∫
: Clamp base assembly x 1,
ç
: Stand base x 1),
x
Stereo phone cable x 2,
c
Cable band x 1 ,
v
Owner’s Manual (this sheet) x 1
* Kunden, die ein Pads-Set erworben haben, beachten bitte das Blatt „Zubehörliste“, das mit dem Pads-Set
geliefert wurde, um den Lieferumfang zu prüfen.
●
RHH135:
z
RHH135-Haupteinheit x 1 (
å
: Haupteinheit x 1,
∫
: Klemmen-Einheit x 1,
ç
: Standfuß x 1),
x
Stereo-Klinkenkabel x 2,
c
Kabelbinder x 1,
v
Bedienungsanleitung (dieses Blatt) x 1
* Pour les clients qui achètent un jeu de pads, veuillez consulter la fiche intitulée « Liste des accessoires »
fournie avec ce produit, pour la vérification du contenu de l’emballage.
●
RHH135:
z
Unité principale RHH135 x 1 (
å
: Unité principale x 1,
∫
: Embase de pince assemblée x 1,
ç
: Base de support x 1),
x
Câble stéréo x 2,
c
Bande de câble x 1,
v
Mode d’emploi (cette fiche) x 1
* Los clientes que hayan adquirido un juego de pads deben consultar la hoja de “Lista de accesorios” que
se adjunta al juego al comprobar el contenido del paquete.
●
RHH135:
z
Unidad principal RHH135 x 1 (
å
: Unidad principal x 1,
∫
: Montaje base de abrazadera x 1,
ç
: Base de soporte x 1),
x
Un cable de auriculares estéreo x 2,
c
Banda para cables x 1,
v
Un manual de instrucciones (esta hoja) x 1
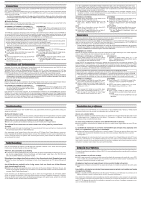
Before setting up the RHH135, prepare a hi-hat stand (Yamaha HS series stands, etc.), then follow the proce-
dures below to set up the RHH135.
Make sure the stand is set up in a stable and secure manner. If the clamp bolts, etc. are not tightened secu-
rely, the pad or stand can fall over causing injury. Also, placing the rack or stand on an unstable surface,
etc., can cause the pad or stand to fall over, resulting in injury.
NOTE:
Since hi-hat stands made by other manufacturers may not be compatible with the RHH135, we recommend
that a Yamaha hi-hat stand be used. (Recommended: HS650A, HS740A)
1.
After loosening the keybolt
q
of the hi-hat clutch using the tuning key
w
,
remove the clutch head
e
, lock
nuts
r
and felt washer
t
(as shown).
*
Leave felt washer
y
on top of stopper
u
(as shown).
2.
Place the RHH135 pad onto the stopper
u
, aligning the rods with the holes.
3.
Fix the felt washer
t
, lock nuts
r
and clutch head onto the stopper bolt in order (as shown), tightening
all parts firmly so that the hi-hat and clutch head assembly are secure.
4.
Fix the drum keybolt
q
tightly using the tuning key
w
.
5.
Set the hi-hat stand on a stable surface. Remove the hi-hat clutch and felt that came with the hi-hat stand.
(The clutch is not needed when using the RHH135; however, keep it in a safe place for future use.)
To adjust the support plate
o
horizontally, use the knob bolt
i
located on the underside of the support plate.
6.
Slide the stand base
!
0
onto the hi-hat stand shaft
!
1
.
7.
After loosening the wing bolt
!
2
on the RHH135, slide the RHH135 onto the hi-hat stand shaft
!
1
then set
the RHH135 so that YAMAHA logo mark appears in front.
8.
Raise the RHH135 to a suitable height, and tighten the wing bolt
!
2
to secure the hi-hat shaft
!
1
to the
clutch base. As the upper position of the clutch base determines the open hi-hat position (the space
between the open cymbals), set the clutch base position according to your playing preference.
*
Make sure to tighten the hi-hat shaft so that it doesn’t turn. This prevents the RHH135 from moving and pos-
sibly entangling and damaging the cable.
*
Secure the cables to the assembly using the cable band
!
3
as shown in Fig. A.
Bereiten Sie vor der Einrichtung des RHH135 einen Hi-Hat-Ständer vor (Ständer der Serie Yamaha HS usw.)
und folgen Sie dann dem nachstehenden Verfahren zur Einrichtung des RHH135.
Stellen Sie sicher, dass der Ständer stabil und sicher steht. Wenn die Klemmbolzen nicht richtig angezogen
sind, können Pad oder Ständer umkippen und Verletzungen verursachen. Wenn Sie das Rack oder den Ständer
auf eine instabile Unterlage usw. stellen, können Pad oder Ständer umkippen und Verletzungen verursachen.
HINWEIS:
Da Hi-Hat-Ständer anderer Hersteller möglicherweise nicht mit dem RHH135 kompatibel sind, empfehlen
wir die Verwendung eines Hi-Hat-Ständers von Yamaha. (Empfohlen: HS650A, HS740A)
1.
Entfernen Sie nach dem Lösen des Schlüsselbolzens
q
der Hi-Hat-Klemme mit dem Stimmschlüssel
w
den Klemmenkopf
e
, die Sperrmuttern
r
und die Filz-Unterlegscheibe
t
(wie gezeigt).
*
Lassen Sie die Filz-Unterlegscheibe
y
oben auf dem Stopper
u
liegen (wie gezeigt).
2.
Platzieren Sie das Pad RHH135 auf den Stopper
u
, wobei Sie die Löcher auf die Stangen ausrichten.
3.
Stecken Sie die Filz-Unterlegscheibe
t
, die Sperrmuttern
r
und den Klemmenkopf in dieser Reihen-
folge (wie gezeigt) auf den Stopperbolzen, und achten Sie bei jedem Teil auf festen Sitz, so dass die Hi-
Hat und der Klemmenkopf sicher und fest sitzen.
4.
Ziehen Sie den Schlüsselbolzen
q
mit dem Stimmschlüssel gut fest
w
.
5.
Stellen Sie den Hi-Hat-Ständer auf eine stabile Oberfläche. Entfernen Sie die Hi-Hat-Klemme und den
Filz, welche mit dem Hi-Hat-Ständer ausgeliefert wurden. (Die Klemme wird bei Verwendung des
RHH135 nicht benötigt; bewahren Sie sie jedoch für späteren Gebrauch an einem sicheren Ort auf.)
Zur horizontalen Einstellung der Stützplatte
o
verwenden Sie den Knopfbolzen
i
an der Unterseite der
Stützplatte.
6.
Schieben Sie die Basis des Ständers
!
0
auf den Schaft des Hi-Hat-Ständers
!
1
.
7.
Nachdem Sie die Flügelschraube
!
2
am RHH135 gelöst haben, schieben Sie das RHH135 auf den
Schaft
!
1
des Hi-Hat-Ständers und justieren das RHH135 so, dass das YAMAHA-Logo vorne erscheint.
8.
Heben Sie das RHH135 auf eine geeignete Höhe und ziehen Sie die Flügelschraube
!
2
fest, um den Hi-
Hat-Schaft
!
1
sicher mit der Klemmen-Einheit zu verbinden. Da die obere Stellung der Klemmen-Einheit
Package Contents
Lieferumfang
Contenu de l’emballage
Contenido del paquete
Specifications
■
RHH135 Real Hi-hat Pad
●
Size:
ø329 x 61 (H) mm (hi-hat clutch not included)
●
Weight:
1.4 kg (hi-hat clutch included)
●
Sensor System:
Trigger sensor (piezo) x 1, switch x 1 (edge)
●
Controller Type:
Multi-step Switch
●
Output jack:
Standard stereo phone jack x 2
* Specifications are subject to change without notice.
z
c
x
å
∫
ç
Setting Up
* When
not playing or using the RHH135, make sure to leave space between the pad and the stand base
!
0
.
Resting the pad on the stand base for extended periods of time may result in response problems.
Spielvorbereitungen
RHH135
Owner’s Manual / Bedienungsanleitung
Mode d’emploi / Manual de instrucciones
ES
FR
DE
EN
A1