Yamaha RS150 Assembly Instructions - Page 2
Set up example, Optional Parts - rack
 |
View all Yamaha RS150 manuals
Add to My Manuals
Save this manual to your list of manuals |
Page 2 highlights
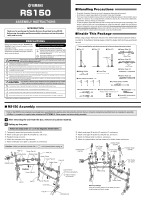
■ Optional Parts ● Pad and Drum Trigger Grouping q DTXTREME IIS Drum Trigger Module w PCY130/130S Cymbal Pad e PCY150S Cymbal Pad r RHH130 Real Hi-hat Pad t TP100 Drum Pad y TP120SD Drum Pad o Snare Stand *SS652 etc. !0 Hi-hat Stand *HS-740 etc. u KP65 Kick Pad i Foot Pedal * DFP-9310 etc. ● Monitor System and Attachement Grouping • SPAT1 (1 set L/R units) • CYAT150 • TPCL150 • MS50DR • Sub Woofer • Satellite amp unit Speakers • MS100DR • Sub Woofer • Satellite amp unit Speakers ■ Set up example Satellite Speaker PCY130S w q PCY150S e t Satellite Speaker w PCY130 t u y r !0 o i Sub Woofer amp unit 3 Attaching the DTXTREME IIS 3-1 Remove the module holder from the holder clamp, and use the supplied screws to attach the DTXTREME IIS. Make sure only the supplied screws are used. Using any other screws may result in the unit falling off the holder or damage. 3-2 Slide the module holder, with the DTXTREME IIS already attached, into the holder clamp. DTXTREME IIS Step 3 4 Attaching the cymbal pads Attach the cymbal pads to the cymbal holders and adjust their position, then secure in place. (Please refer to the Owner's Manual that came with the cymbal pads on attaching the cymbal pads.) 5 Attaching the drum pads Attach the drum pads to the tom clamp and adjust their position, then secure in place. Step 4 Felt Module Holder Step 3-1 Step 3-2 Step 5 Drum Pad Cymbal Pad (PCY130/130S/150S) Holder Clamp Anti-swivel brace (supplied with the (PCY130/130S/150S) Maker sure all bolts on clamps, pads, etc., are tightened firmly. However, loose or over-tightened bolts may result in the part falling off and/or damage. Please use caution. After assembly is complete, setup the kick pad, real hi-hat pad, etc., and connect the cables. Use the supplied cable bands to secure the cables to the frame pipes to keep cables out of the way during performance. If the rack is moved even after setup is complete, make sure the bolts are loosened before moving the rack. Printed in Indonesia WG24090
-
 1
1 -
 2
2
 |
 |
