Yamaha RX-A720 Quick Guide - Page 3
Controlling Zone2, Zone2 setup
 |
View all Yamaha RX-A720 manuals
Add to My Manuals
Save this manual to your list of manuals |
Page 3 highlights
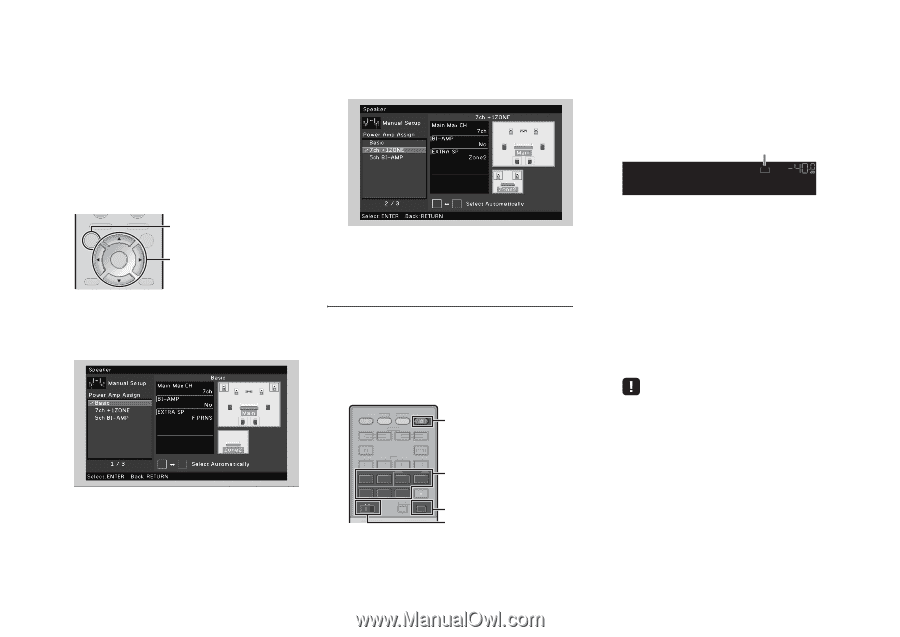
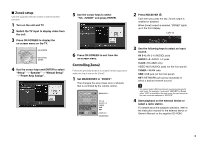
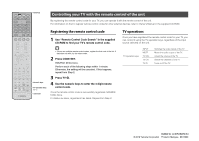
■ Zone2 setup Use the supplied remote control to set the Zone2 function. 1 Turn on the unit and TV. 2 Switch the TV input to display video from the unit. 3 Press ON SCREEN to display the on-screen menu on the TV. TOP MENU ON SCREEN POP-UP/MENU OPTION ENTER RETURN DISPLAY ON SCREEN Cursor keys ENTER 4 Use the cursor keys and ENTER to select "Setup" → "Speaker" → "Manual Setup" → "Power Amp Assign". 5 Use the cursor keys to select "7ch +1ZONE" and press ENTER. 6 Press ON SCREEN to exit from the on-screen menu. Controlling Zone2 Follow the procedure below to enable Zone2 output and select an input source for Zone2. 1 Set MAIN/ZONE2 to "ZONE2". This changes the zone (main zone or Zone2) that is controlled by the remote control. SOURCE RECEIVER HDMI 1 2 3 4 5 V-AUX AV 1 2 3 4 AUDIO 5 6 1 2 TUNER USB MAIN ZONE 2 NET PARTY HDMI OUT SCENE RECEIVER z AV 5-6 AUDIO 1-2 TUNER USB NET HDMI OUT MAIN/ZONE2 2 Press RECEIVER z. Each time you press the key, Zone2 output is enabled or disabled. When Zone2 output is enabled, "ZONE2" lights up in the front display. Lights up VOL. ZONE 2 Zone2 On 3 Use the following keys to select an input source. AV 5-6: AV 5-6 (AUDIO) jacks AUDIO 1-2: AUDIO 1-2 jacks V-AUX: (RX-A820 only) VIDEO AUX (AUDIO) jacks (on the front panel) TUNER: FM/AM radio USB: USB jack (on the front panel) NET: NETWORK jack (press repeatedly to select a desired network source) • You cannot select USB and network sources exclusively for each zone. For example, if you select "SERVER" for Zone2 when "USB" is selected for the main zone, the input source for the main zone also switches to "SERVER". 4 Start playback on the external device or select a radio station. For details about the playback operation, refer to the instruction manual for the external device or Owner's Manual on the supplied CD-ROM. 3
-
 1
1 -
 2
2 -
 3
3 -
 4
4
 |
 |