Yamaha RX-V2077 RX-V2077 Firmware Update Installation Manual - Page 2
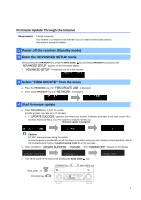
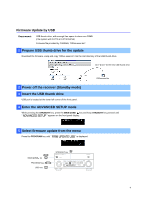
Enter the ADVANCED SETUP mode
 |
View all Yamaha RX-V2077 manuals
Add to My Manuals
Save this manual to your list of manuals |
Page 2 highlights
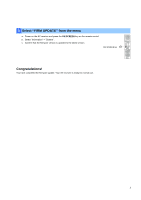
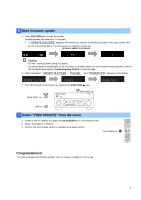
Firmware Update Through the Internet Requirement: Internet connection Your receiver is connected to the Internet if you can receive Internet radio stations. (See owner's manual for details) 1 Power off the receiver (Standby mode) 2 Enter the ADVANCED SETUP mode While pressing the STRAIGHT key, press the MAIN ZONE key and keep STRAIGHT key pressed until " ADVANCED SETUP " appears on the front panel display. * " ADVANCED SETUP " is displayed only for a few seconds. 3 Select "FIRM UPDATE" from the menu a. Press the PROGRAM key until " FIRM UPDATE USB " is displayed. b. Then, press STRAIGHT key until " NETWORK " is displayed. 4 Start firmware update a. Press INFO (WPS) key to start the update. (Update process may take up to 15 minutes) * If " UPDATE SUCCESS " appears, this means your receiver is already up-to-date. In this case, power off to exit from Advanced Setup. Your AV receiver is ready for normal use. Firmware update in progress Caution DO NOT interrupt power during the update. In case the power is accidentally cut off resulting in a condition where you can't recover normal operation, refer to the troubleshooting method (Troubleshooting CASE 2) on the last page. b. When completed, " UPDATE SUCCESS " , " PLEASE... " and " POWER OFF! " appears on the display. UPDATE SUCCESS PLEASE... c. Turn off the power of the receiver by pressing the MAIN ZONE key. MAIN ZONE key PROGRAM key STRAIGHT key INFO (WPS) key POWER OFF! 2
-
 1
1 -
 2
2 -
 3
3 -
 4
4 -
 5
5 -
 6
6
 |
 |
