Yamaha SPS-900 SPS-900 ASSEMBLY INSTRUCTION
Yamaha SPS-900 Manual
 |
View all Yamaha SPS-900 manuals
Add to My Manuals
Save this manual to your list of manuals |
Yamaha SPS-900 manual content summary:
- Yamaha SPS-900 | SPS-900 ASSEMBLY INSTRUCTION - Page 1
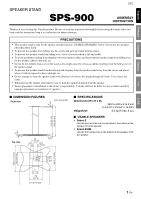
Español SPEAKER STAND SPS-900 GJ ASSEMBLY INSTRUCTION Thank you for selecting this Yamaha product. Be sure to read this instruction thoroughly before using this stand. After you have read this instruction, keep it in a safe place for future reference. PRECAUTIONS • This speaker stand is only - Yamaha SPS-900 | SPS-900 ASSEMBLY INSTRUCTION - Page 2
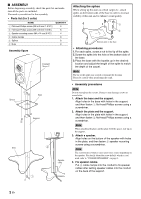
damage the flooring. Please be careful when positioning the stand. • Assembly procedures Note Do not overtighten the screws. Doing so may damage up on the support. 3. Attach a speaker. Align holes on the bottom of the speaker with holes in the plate, and then fasten 3 speaker mounting screws using
-
 1
1 -
 2
2
 |
 |

1
En
GJ
English
Français
Deutsch
Español
SPEAKER STAND
SPS-900
Thank you for selecting this Yamaha product. Be sure to read this instruction thoroughly before using this stand. After you
have read this instruction, keep it in a safe place for future reference.
■
DIMENSION FIGURES
■
SPECIFICATIONS
Dimensions (W x H x D):
360.3 x 603 x 415.3 mm
(14-3/16” x 23-3/4” x 16-3/8”)
Weight/unit:
6.5 kg (14 lbs. 5 oz.)
■
USABLE SPEAKERS
•
Soavo-2
Use the front and the rear screw holes in the bottom of the
speaker to fix the speaker.
•
Soavo-900M
Use the front screw hole in the bottom of the speaker to fix
the speaker.
PRECAUTIONS
•
This speaker stand is only for the speaker systems listed in “USABLE SPEAKERS” below. Do not use the speakers
other than these listed.
•
To prevent the speaker from falling, use the screws and parts provided with the stand.
•
To prevent the speaker stand from falling over, select a location which is flat and stable.
•
To avoid accidents resulting from tripping over loose speaker cables and to prevent the speaker stand from falling over,
fix the speaker cables to the wall, etc.
•
Do not let the children lean or sit on the stand as this might cause the serious accidents resulting from the falling over of
the speaker stand.
•
To prevent the speaker stand from discoloring and warping, keep the speaker stand away from the stoves and places
where it will be exposed to direct sunlight, etc.
•
Do not attempt to clean the speaker stand with chemical solvents as this might damage the finish. Use a clean, dry
cloth.
•
When moving the speaker and stand, be sure to hold the support detached from the speaker.
•
Secure placement or installation is the owner’s responsibility. Yamaha shall not be liable for any accident caused by
improper placement or installation of speakers.
415.3 (16-3/8)
175
(6-7/8)
77
(3-1/16)
49
(1-15/16)
37.5
(1-1/2)
48.5
(1-15/16)
360.3 (14-3/16)
180 (7-1/16)
73.2
(2-7/8)
320.3 (12-5/8)
572 (22-1/2)
4
(3/16)
603 (23-3/4)
25
(1)
2
(1/16)
15
(9/16)
Front view
unit: mm (inch)
Top view
ASSEMBLY
INSTRUCTION