Yamaha SVC210 Owner's Manual
Yamaha SVC210 Manual
 |
View all Yamaha SVC210 manuals
Add to My Manuals
Save this manual to your list of manuals |
Yamaha SVC210 manual content summary:
- Yamaha SVC210 | Owner's Manual - Page 1
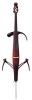
ELECTRIC SVC210 Owner's Manual Thank you for purchasing the Yamaha Silent Electric Cello. In order to obtain the maximum performance and enjoyment from your Silent Electric Cello, we urge you to read this Owner's Manual thoroughly before using the instrument. Please keep this Owner's Manual in - Yamaha SVC210 | Owner's Manual - Page 2
instructions contained in this manual, meets FCC requirements. Modifications not expressly approved by Yamaha and "ON", please try to eliminate the problem by using one of the following measures: Relocate the time period before damage occurs. NOTICE: Service charges incurred due to a lack of knowledge - Yamaha SVC210 | Owner's Manual - Page 3
Your Silent Electric Cello will give you years of reliable service if you follow the simple rules given below: I Location Do not expose it to receivers. If this occurs, move it further away from the affected equipment. YAMAHA is not responsible for damage caused by improper handling or operation. 3 - Yamaha SVC210 | Owner's Manual - Page 4
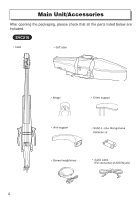
Main Unit/Accessories After opening the packaging, please check that all the parts listed below are included. SVC210 • Cello • Soft case • Bridge • Chest support • Arm support • SUM-3 size Manganese batteries x2 • Stereo headphones • Audio cable (For connection of AUX IN jack) 4 - Yamaha SVC210 | Owner's Manual - Page 5
Fingerboard 4th string (C) 3rd string (G) 2nd string (D) 1st string (A) Body Nomenclature G Rear Nut Neck Arm support Bridge Bridge seat Arm support fixing bolt Chest support attachment holes Controls → See page 6. Knee supports Saddle End pin stopper Adjuster Tailpiece Tail nylon End pin Knee - Yamaha SVC210 | Owner's Manual - Page 6
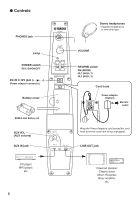
G Controls PHONES jack Lamp POWER switch REV. ON/ON/OFF DC-IN 9-12V jack (+ -) (Power adaptor connector) Battery cover SUM-3 size battery x2 AUX VOL (AUX volume) AUX IN jack CD player, MP3 player, etc. 6 Stereo headphones * Supplied headphones or any other type VOLUME REVERB switch RM ( - Yamaha SVC210 | Owner's Manual - Page 7
of the headphones are positioned on the correct ears. 3 Rotate the VOLUME dial to the desired playing level. I Reverb Function The Silent Electric Cello incorporates Yamaha's DSP reverb technology. Play while trying out the three types of reverb. 1 Slide the POWER switch to the REV. ON posi- tion - Yamaha SVC210 | Owner's Manual - Page 8
Tuning and Changing the Strings The Silent Electric Cello is shipped from the factory with the bridge unfitted in eye or other unexpected injuries. • The lower side of the bridge supports the 1st string (A), the higher side supports the 4th string (C). Make sure the bridge is placed properly, then - Yamaha SVC210 | Owner's Manual - Page 9
• The strings are tuned to the following pitches. The 1st string is tuned to A, the 2nd string to D, the 3rd string to G, and the 4th string to C. Use a piano, tuning fork, tuner, etc., and adjust the pitch of each string using the tuning pegs. 2nd string (D) Raise pitch 3rd string (G) • Use the - Yamaha SVC210 | Owner's Manual - Page 10
G Winding the Strings 1 Before you string the instrument, set the adjuster so that it is in the middle of its adjustment range. (All adjusters) 2 Place the ball (on the end of the string) in the notch on the adjuster. Make sure the ball is properly inserted in the adjuster's notch. The adjuster - Yamaha SVC210 | Owner's Manual - Page 11
The Silent Electric Cello is shipped with the knee supports folded. Before playing, follow the procedure shown below to properly set the knee supports into position. 1 Loosen the knee support lock knob (about 3 turns). • Do not loosen the knob too much. 2 Slowly unfold the knee support arms on both - Yamaha SVC210 | Owner's Manual - Page 12
prevent the instrument from slipping while you play. End Pin Stopper End Pin Rubber Foot I About the Arm Support The Silent Electric Cello is shipped with the arm support detached. Hold the arm support so that its attachment plate is parallel to the attachment position on the body. Tighten the arm - Yamaha SVC210 | Owner's Manual - Page 13
the battery compartment situated on the back of the Silent Electric Cello. 2 Insert the two batteries supplied (SUM-3 size). Take SUM PA-3C power adaptor. 1 Plug the adaptor's DC output cable into the Silent Electric Cello's DC IN 9-12V jack located on the back of the instrument, making sure the - Yamaha SVC210 | Owner's Manual - Page 14
for use with the SVC210 Silent Electric Cello. Attaching the protector (included in the case) allows storage and transport of the instrument with its bridge attached. G Placing the cello in the case 1 Fold up the knee supports, and remove the chest and arm supports from the Silent Electric - Yamaha SVC210 | Owner's Manual - Page 15
Specifications Neck Maple Body Spruce/Maple Fingerboard Ebony Bridge Maple (Aubert) Knee Supports/Arm Support Beech Tuning Pegs Worm Gear Type Tail Piece Adjuster 4 pieces (Wittner) Strings Ball-end type (Helicore) Sensor Piezo pick-up Connectors/Controls • Headphone Output • AUX
-
 1
1 -
 2
2 -
 3
3 -
 4
4 -
 5
5 -
 6
6 -
 7
7 -
8
-
9
-
10
-
11
-
12
-
13
-
14
-
15
 |
 |

1
English
Thank you for purchasing the Yamaha Silent Electric Cello. In order to obtain
the maximum performance and enjoyment from your Silent Electric Cello, we
urge you to read this Owner’s Manual thoroughly before using the instrument.
Please keep this Owner’s Manual in a safe place for later reference.
Precautions
....................................................................
3
Main Unit/Accessories
.......................................................
4
Nomenclature
................................................................
5
Set up
.............................................................................
8
■
Tuning and Changing the Strings
................................................
8
■
Setting the Knee Supports
........................................................
11
■
About the Chest Support
..........................................................
12
■
About the End Pin
.....................................................................
12
■
Attaching the Arm Support
.......................................................
12
Power Supply
......................................................................
13
■
Using Batteries
.........................................................................
13
■
Supplying AC Power
.................................................................
13
Putting the Instrument into the Soft Case
................
14
Specifications
.....................................................................
15
SVC210
Owner’s Manual
Contents
SILENT ELECTRIC