Yamaha SVV-200 Owner's Manual
Yamaha SVV-200 Manual
 |
View all Yamaha SVV-200 manuals
Add to My Manuals
Save this manual to your list of manuals |
Yamaha SVV-200 manual content summary:
- Yamaha SVV-200 | Owner's Manual - Page 1
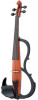
English SVV-200 Owner's Manual Congratulations! Thank you for purchasing the Yamaha Silent Viola. In order to obtain the maximum performance and enjoyment from your Silent Viola, we urge you to read this Owner's Manual thoroughly before using the instrument. Please keep this Owner's Manual in a - Yamaha SVV-200 | Owner's Manual - Page 2
to service this product beyond that described in the usermaintenance instructions. All other servicing should be referred to qualified service personnel retain this manual as a permanent record of your purchase. before requesting service. Model Serial No. ENVIRONMENTAL ISSUES: Yamaha strives to - Yamaha SVV-200 | Owner's Manual - Page 3
Silent Viola will give you years of reliable service OFF When Making Connections • To avoid damage to the Silent Viola and other devices to which it is connected (a sound to and discolor the surface). I Electrical Interference • This unit contains electric circuitry and may cause interference if - Yamaha SVV-200 | Owner's Manual - Page 4
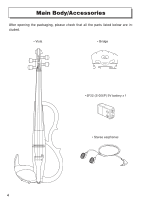
Main Body/Accessories After opening the packaging, please check that all the parts listed below are included. • Viola • Bridge • 6F22 (S-006P) 9V battery x 1 • Stereo earphones 4 - Yamaha SVV-200 | Owner's Manual - Page 5
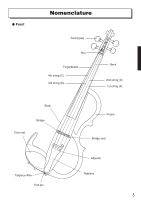
G Front Nomenclature Tuning peg Nut Fingerboard 4th string (C) 3rd string (G) Neck 2nd string (D) 1st string (A) Body Chin rest Bridge Frame Bridge seat Tailpiece Wire End pin Adjuster Tailpiece 5 - Yamaha SVV-200 | Owner's Manual - Page 6
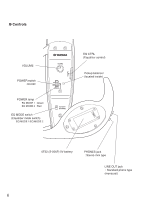
G Controls VOLUME POWER switch ON/OFF POWER lamp EQ MODE 1 : Green EQ MODE 2 : Red EQ MODE switch (Equalizer mode switch) EQ MODE 1/EQ MODE 2 EQ CTRL (Equalizer control) Pickup balancer (located inside) 6F22 (S-006P) 9V battery PHONES jack : Stereo mini type LINE OUT jack : Standard phone type ( - Yamaha SVV-200 | Owner's Manual - Page 7
Setup I Installing the Bridge The Silent Viola is shipped from the factory with the bridge unfitted. First, set up the bridge and then proceed with tuning. • The lower side of the bridge supports the 1st string (A), C GD A the higher side supports the 4th string (C). Make sure 4th string Slit - Yamaha SVV-200 | Owner's Manual - Page 8
come into contact with the instrument so as to prevent scratching the instrument's body. I The Shoulder Rest Most standard size viola rests can be attached to the body of the Silent Viola. Shoulder rest Natural wood is used for some parts in this instrument. Depending upon the manner in, or the - Yamaha SVV-200 | Owner's Manual - Page 9
I Changing Strings As the strings get old, sound quality will gradually decrease, and it will become difficult to tune the instrument. Change the strings as soon as you think they are getting old. Always change the strings one at a time, even if all strings must be changed. • The end of the strings - Yamaha SVV-200 | Owner's Manual - Page 10
3 Insert the string into the hole on the peg and wind the string onto the peg. • On the 1st (A) and 2nd (D) strings, make two winds toward the 3rd and 4th string side of the peg, then wind back over those winds and to the opposite side of the string hole. • On the 3rd (G) and 4th (C) strings, make - Yamaha SVV-200 | Owner's Manual - Page 11
Power Supply The Silent Viola is powered by a single 6F22 (S-006P) 9V battery. Before installing the battery, make sure that the POWER switch (ON/OFF) located on the backside of - Yamaha SVV-200 | Owner's Manual - Page 12
ON/OFF. w VOLUME w Used to control the volume. Rotate the knob to the e right to increase the volume. e EQ CTRL (Equalizer Control) q The SVV-200 Silent Viola is equipped with an Equal- izer Control that has the ability to isolate and control the upper partials of the harmonics that are - Yamaha SVV-200 | Owner's Manual - Page 13
t Pickup Balancer The Silent Viola's pickup system consists of separate sensors for low strings this cover. 2 Use a non-conductive screwdriver (made of plastic or resin so it does not conduct electricity) to turn the balance control located inside the hole to adjust the pickup balance. Use a pair of - Yamaha SVV-200 | Owner's Manual - Page 14
from external audio equipment or recording. You can also connect this jack to the INPUT jack on an electronic tuner and tune the Silent Viola like an electronic instrument using the instrument's output signal. u PHONES jack Connect a pair of stereo earphones, etc. to this jack (stereo mini). When - Yamaha SVV-200 | Owner's Manual - Page 15
Example Connections Silent Viola Stereo Earphones Powered Speaker Electronic Tuner P.A. Mixer, Recording Device When connecting the instrument to external audio equipment, check the jack size and make sure to - Yamaha SVV-200 | Owner's Manual - Page 16
Specifications Neck Body Fingerboard/Tuning Pegs Bridge Frame Chin Rest/Tailpiece Adjuster Strings Sensor Connectors/Controls Power Battery Life (Continuous Use) String Length Body Length Dimensions Weight (with battery) Hard Maple Spruce Ebony Hard Maple (Aubert) Plywood Ebony 1st string (Wittner
-
 1
1 -
 2
2 -
 3
3 -
 4
4 -
 5
5 -
 6
6 -
 7
7 -
8
-
9
-
10
-
11
-
12
-
13
-
14
-
15
-
16
 |
 |

1
Thank you for purchasing the Yamaha Silent Viola. In order to obtain the maxi-
mum performance and enjoyment from your Silent Viola, we urge you to read
this Owner’s Manual thoroughly before using the instrument. Please keep this
Owner’s Manual in a safe place for later reference.
Precautions
....................................................................
3
Main Body/Accessories
................................................
4
Nomenclature
................................................................
5
Setup
..............................................................................
7
■
Installing the Bridge
....................................................................
7
■
Tuning
.........................................................................................
8
■
The Shoulder Rest
......................................................................
8
■
Changing Strings
........................................................................
9
Power Supply
...............................................................
11
Using the Controls
......................................................
12
Example Connections
.................................................
15
Specifications
..............................................................
16
Congratulations!
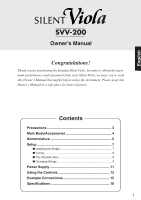
SVV-200
Owner’s Manual
Contents
English