Yamaha TP-3123 Owner's Manual - Page 10
Tuning Indicator Adjustment
 |
View all Yamaha TP-3123 manuals
Add to My Manuals
Save this manual to your list of manuals |
Page 10 highlights
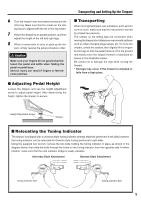
Adjusting the Pitch ■ Tuning Indicator Adjustment The tuning indicator shows where to set the pedal for each note. After tuning the instrument, you must set each note on the indicator to its proper position. 1 After you have tuned your timpani to the lowest note of its tonal range, make sure that the pointer is located within 10 mm from the pedal-side end of the indicator rail. * If not, refer to "Adjusting the Pointer Position". 2 Slide the lowest note of the indicator ("A" in the case of a 26" timpani-see "Standard Tonal Ranges for Yamaha Timpani" on page 8) to the position where its center line coincides with the pointer. 3 Tune the instrument to the next higher pitch (note) by moving the pedal, and then slide the corresponding note on the rail to the respective pointer position. Repeat for each remaining note. ● Adjusting the Pointer Position First loosen the pointer lock nut and then turn the adjuster as follows: • Pointer is located beyond the lower rail end when the heel of the pedal is lowered fully (lowest note). → Turn the adjuster to the left (counter clockwise) until the pointer is aligned with the lowest note of the indicator. • Pointer moves beyond the upper rail end before the toe of the pedal reaches the end of its stroke, or Pointer does not reach the lower rail end when the heel of the pedal is lowered fully (lowest sound) → Turn the adjuster to the right (clockwise) to correct the pointer position as required. Indicator rail Pointer Indicator rail Note Pointer Note Adjuster Adjuster nut 10
-
 1
1 -
2
-
3
-
4
-
 5
5 -
 6
6 -
 7
7 -
 8
8 -
 9
9 -
 10
10 -
 11
11
 |
 |
