Yamaha TP-3123EA Owner's Manual - Page 4
Transporting and Setting Up the Timpani
 |
View all Yamaha TP-3123EA manuals
Add to My Manuals
Save this manual to your list of manuals |
Page 4 highlights
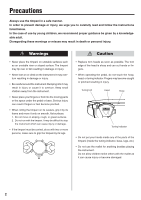
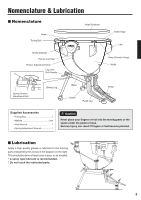
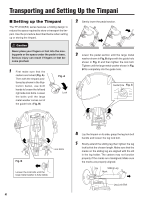
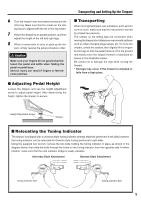
Transporting and Setting Up the Timpani ■ Setting up the Timpani The TP-3100(EA) series features a folding design to reduce the space required to store or transport the timpani. Use the procedure described below when setting up or storing the timpani. Caution Never place your fingers or foot into the moving parts or the space under the pedal or base. Serious injury can result if fingers or feet become pinched. 1 First make sure that the casters are locked (Fig. A). Then with the timpani positioned as shown in the illustration below, use both hands to loosen the left and right side lock bolts. Loosen the bolts until the large metal washer comes out of the guide hole. (Fig. B) Fig. A Lock 2 Gently lower the pedal section. 3 Lower the pedal section until the large metal washer shown in Fig. B aligns with the guide hole shown in Fig. C and then tighten the lock bolt. Tighten until the large metal washer shown in Fig. B fits completely into the guide hole. Guide Hole Fig. C Lock Bolts Fig. B Loosen the lock bolts until the large metal washer is fully visible. 4 4 Lay the timpani on its side, grasp the leg lock bolt handle and loosen the leg lock bolt. 5 Slowly extend the sliding leg then tighten the leg lock bolt at the chosen length. Make sure that the marks on the sliding leg are aligned with the slit in the leg holder. The casters may not function properly if the marks are misaligned. Make sure the marks are properly aligned. Slit Sliding Leg Mark Leg Lock Bolt
-
 1
1 -
 2
2 -
 3
3 -
 4
4 -
 5
5 -
 6
6 -
 7
7 -
 8
8 -
 9
9 -
 10
10 -
11
 |
 |
