Yamaha TSX-B72 TSX-B72 Owners Manual - Page 7
Rear panel, Extending rod antenna, Connecting the AM Antenna, FM Rod Antenna, ALARM TYPE switch
 |
View all Yamaha TSX-B72 manuals
Add to My Manuals
Save this manual to your list of manuals |
Page 7 highlights
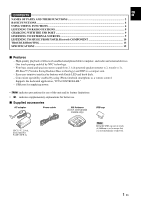
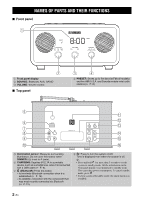
En 9 ALARM: Alarm on/off (☞ P. 5) 0 SET: Alarm setting (☞ P. 4) A NFC mark: Allows easy pairing with NFC technology (☞ P. 11). B SNOOZE/SLEEP (☞ P. 5) C FM, AM: Switches FM/AM (U.S.A. and Canada models only) D MEMORY (☞ P. 8) ■ Rear panel 15V : Connect the supplied AC adaptor and power cable. NAMES OF PARTS AND THEIR FUNCTIONS E DIMMER: Sets the brightness of the top and front panel A (auto) 3 (brightest) 2 1 (darkest) back to A y When A (auto) is set, the brightness of the top and front panel is adjusted automatically according to the brightness of the room. F TUNING (☞ P. 8) FM Rod Antenna (See below.) ALARM TYPE switch (☞ P. 4) CLOCK switch (☞ P. 4) AM Antenna terminal (U.S.A. and Canada models only. See below.) AUX: Connect an external device. (☞ P. 9) ■ Extending rod antenna Notes • When you listen to FM, extend the antenna. • If FM reception is poor, change the height or direction of the antenna, or relocate the unit. ■ Connecting the AM Antenna (U.S.A. and Canada models only) AM Antenna Assembling AM Antenna FM Rod Antenna Notes • Place the antenna in a location with good signal reception. • Signal reception may be inadvertently affected if a digital device is located near the antenna. 3 En
-
 1
1 -
 2
2 -
 3
3 -
 4
4 -
 5
5 -
 6
6 -
 7
7 -
 8
8 -
 9
9 -
 10
10 -
 11
11 -
 12
12 -
13
-
14
-
15
-
16
-
17
-
18
-
19
-
20
-
21
-
22
-
23
-
24
-
25
-
26
-
27
-
28
-
29
-
30
-
31
-
32
-
33
-
34
-
35
-
36
-
37
-
38
-
39
-
40
-
41
-
42
-
43
-
44
-
45
-
46
-
47
-
48
-
49
-
50
-
51
-
52
-
53
-
54
-
55
-
56
 |
 |
