Yamaha UB-DZR15H UB-DZR15H UB-DZR12H UB-DZR10H UB-DZR15V UB-DZR12V UB-DZR10V O - Page 4
Horizontal Bracket (UB-DZR15H, UB-DZR12H, and UB-DZR10H) Installation, then loosen the an
 |
View all Yamaha UB-DZR15H manuals
Add to My Manuals
Save this manual to your list of manuals |
Page 4 highlights
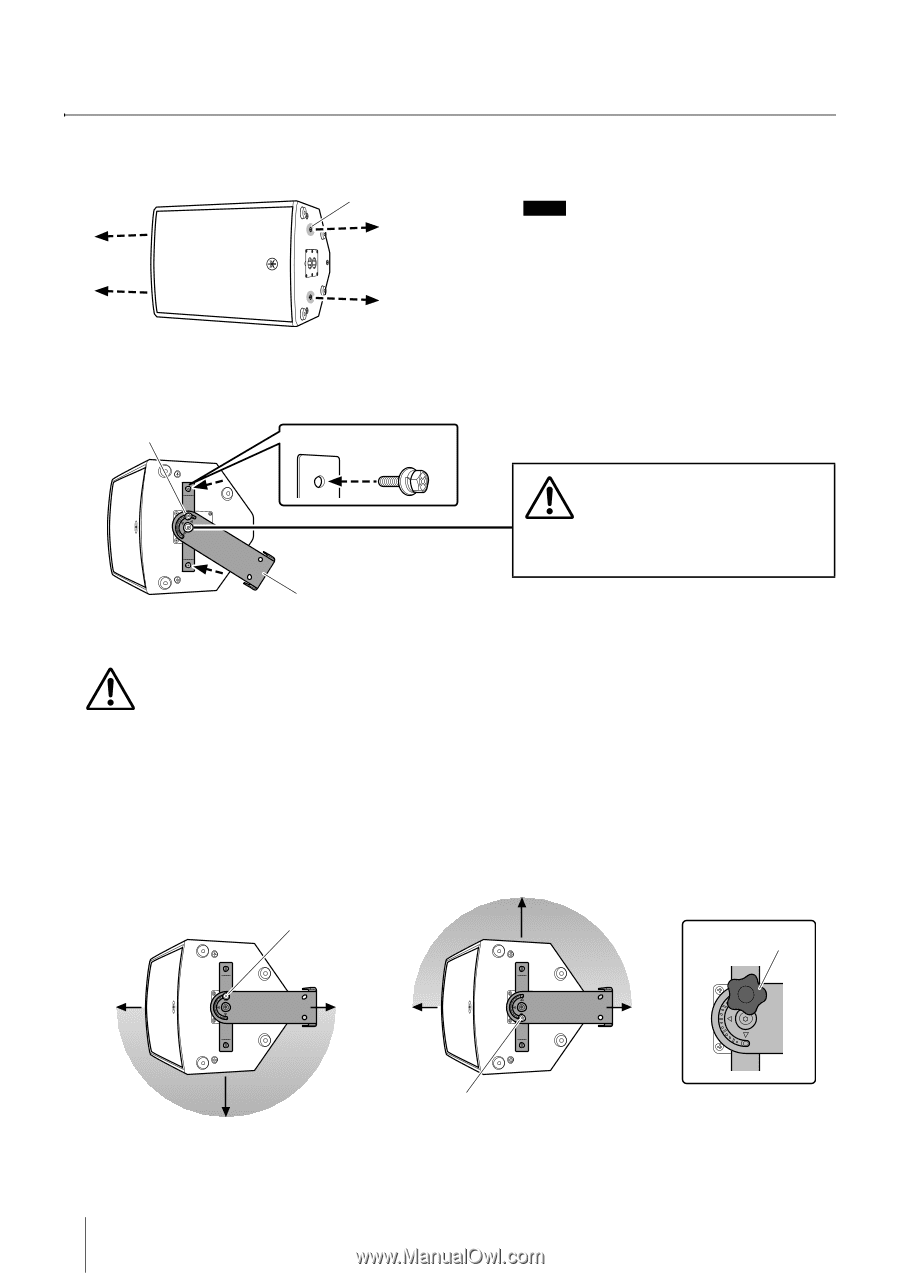
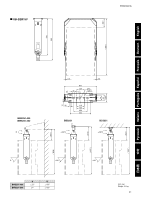
Horizontal Bracket (UB-DZR15H, UB-DZR12H, and UB-DZR10H) Installation 1. Remove the M8 screws (four total) from both the top and bottom faces of the speaker. Use a 5 mm hexagon wrench. M8 screw NOTE Carefully store the screws removed from the speaker so that they are not lost. Using the speaker with the screws removed will negatively affect sound quality due to air leakage because the screw holes penetrate the inside of the speaker cabinet. Re-install the screws to the original screw holes after removing the U-bracket. 2. Use the accessory M8×30 hexagon bolts (four total) to secure both sides of the U-bracket to the speaker. Use a 13 mm wrench. The recommended torque is 6.2 Nm. Angle-fixing bolt M8×30 hexagon bolt U-bracket WARNING Never loosen the center screw. Doing so may result in the speaker falling and possible injury. If it becomes loose, retighten it to a torque of 12.4 Nm or more. 3. Use a wrench to temporarily tighten the angle-fixing bolts on both sides, and install to the wall or ceiling. CAUTION Failure to temporarily tighten the bolts may result in the speaker or U-bracket rotating during installation and possible injury. 4. Hold the speaker with your hand to prevent it from rotating, then loosen the angle-fixing bolts. Adjust the speaker angle, then use a wrench to tighten the angle-fixing bolts until the speaker is thoroughly secured in position. • You can adjust the direction of an installed speaker in a range of 180°. You can also install the angle-fixing bolts to the other screw holes in order to adjust 180° in the opposite direction. • You can also use the accessory knob screws in place of the angle-fixing bolts when installing temporarily and tighten these by hand. However, when installing permanently, use the angle-fixing bolts and make sure they are securely tightened. The recommended torque is 12.4 Nm. Position of angle-fixing bolt 180° Knob screws 180° Position of angle-fixing bolt 4
-
 1
1 -
 2
2 -
 3
3 -
 4
4 -
 5
5 -
 6
6 -
 7
7 -
 8
8 -
 9
9 -
 10
10 -
11
-
12
-
13
-
14
-
15
 |
 |