Yamaha YCL-457-18 Owners Manual - Page 7
Alto Clarinet / Bass Clarinet, Caution When Assembling, On the alto clarinet - 17
 |
View all Yamaha YCL-457-18 manuals
Add to My Manuals
Save this manual to your list of manuals |
Page 7 highlights
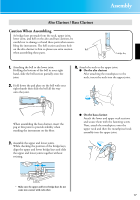
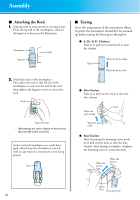
Assembly Alto Clarinet / Bass Clarinet Caution When Assembling As bridge keys protrude from the neck, upper joint, lower joint, and bell on the alto and bass clarinets, be careful not to damage or bend these parts when assem- bling the instrument. The bell section and tone hole on the alto clarinet is thin so please use extra caution Bell when assembling these parts. bridge key 1. Attaching the bell to the lower joint. Holding the bottom of the bell in your right hand, slide the bell section partially onto the joint. 2. Hold down the pad plate on the bell with your right thumb then slide the bell all the way onto the joint. 4. Attach the neck to the upper joint. ● On the alto clarinet After attaching the mouthpiece to the neck, insert the neck into the upper joint. When assembling the bass clarinet, insert the peg at this point to provide stability when standing the instrument on the floor. 3. Assemble the upper and lower joints. While checking the position of the bridge keys, align the upper and lower bridge keys and slide the upper and lower joints together without twisting. ● On the bass clarinet Attach the lower and upper neck sections and secure them with the fastening screw. Next, attach the mouthpiece onto the upper neck and then the mouthpiece/neck assembly into the upper joint. * Make sure the upper and lower bridge keys do not come into contact with each other. 17
-
 1
1 -
 2
2 -
 3
3 -
 4
4 -
 5
5 -
 6
6 -
 7
7 -
 8
8 -
 9
9 -
 10
10 -
 11
11 -
 12
12 -
13
-
14
 |
 |
