Yamaha YM-5104A Owner's Manual - Page 11
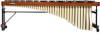
Attach the resonators.
 |
View all Yamaha YM-5104A manuals
Add to My Manuals
Save this manual to your list of manuals |
Page 11 highlights
ASSEMBLY c Attach the resonators. 3-1. Unbend the resonators, apply a hook and tighten the wing nut securely. When assembling the resonator pipes, make sure that the washer is positioned on the outer side of the hook as shown in the illustration below. * Positioning the washer on the inner side of the hook can result in noise while playing. * All the natural tone resonators are closed at the bottom. * When assembling the resonators, use care not cause any damage to them. Correct Hook Bad Wing nut Flat Washer 3-2. Insert the resonators into the resonator holders on the end frames in the same way as the rails. * Make sure not to confuse the natural tone resonators and accidental tone resonators. * Take care not to bump the resonators against the legs, etc. Resonators (Accidental tone side) Resonators (Natureal tone side) 25
-
 1
1 -
2
-
3
-
4
-
5
-
 6
6 -
 7
7 -
 8
8 -
 9
9 -
 10
10 -
 11
11 -
 12
12 -
 13
13 -
 14
14 -
 15
15 -
 16
16
 |
 |
