Zenith SL-5511-BZ User Guide
Zenith SL-5511-BZ - Heath - Quartz Motion-Sensing Light Manual
 |
UPC - 016963551107
View all Zenith SL-5511-BZ manuals
Add to My Manuals
Save this manual to your list of manuals |
Zenith SL-5511-BZ manual content summary:
- Zenith SL-5511-BZ | User Guide - Page 1
. Do not connect through a dimmer or other electronic switch. • If you want to use Manual Mode, the control must be wired through a switch. • Some codes require installation by a qualified electrician. • This product is intended for use with the enclosed gasket and with a junction box marked for use - Zenith SL-5511-BZ | User Guide - Page 2
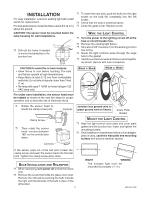
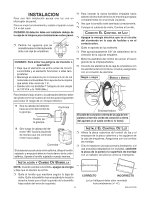
INSTALLATION ❒ To insert the new bulb, push the bulb into the right socket so the bulb fits completely into the left For easy installation, select an existing light with a wall socket. switch for replacement. ❒ Check that the bulb is seated properly. For best performance, locate the fixture - Zenith SL-5511-BZ | User Guide - Page 3
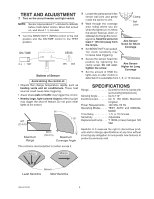
. . 120 VAC, 60 Hz Operating Modes. . . . . . TEST, AUTO and MANUAL MODE Time Delay 1, 5, or 10 minutes Sensitivity Adjustable Replacement lamp. . . . . Maximum Coverage Angle HeathCo LLC reserves the right to discontinue products and to change specifications at any time without incurring any - Zenith SL-5511-BZ | User Guide - Page 4
TROUBLESHOOTING GUIDE SYMPTOM Light will not come on. Light comes on in daylight. normal under these conditions). Technical Service Please call 1-800-858-8501 (English speaking only) for assistance before returning product to store. If you experience a problem, follow this guide. You may also want - Zenith SL-5511-BZ | User Guide - Page 5
una placa adaptadora. Los adaptadores se pueden comprar en los Centros Comerciales para el Hogar y en las Tiendas de Aparatos Eléctricos. El modo manual funciona sólo cuando el interruptor de tiempo (ON-TIME) está en la posición de 1, 5 ó 10 minutos. ...préndalo. Resumen de las modalidades del - Zenith SL-5511-BZ | User Guide - Page 6
INSTALACION ❒ Para insertar la nueva bombilla empújela hacia Para una fácil instalación escoja una luz con un interruptor de pared. adentro del enchufe derecho de manera que quepa completamente en el enchufe izquierdo. Para un mejor funcionamiento, instale el aparato a casi ❒ Vea que la bombilla - Zenith SL-5511-BZ | User Guide - Page 7
150 Vatios Máximo de luz incandescente halógeno Requisitos de Energía. . 120 VCA, 60 Hz Fases de Operación . . . PRUEBA, AUTOMATICO, y MODO MANUAL Retardo de Tiempo . . . . Ajustable de 1, 5, ó 10 minutos Sensibilidad Ajustable Bombilla de repuesto. . . T halógena de dos clavijas de 120 VCA y de - Zenith SL-5511-BZ | User Guide - Page 8
inglés), de 7:30 AM a 4:30 PM CST (L-V). Usted puede también escribir a: HeathCo LLC P.O. Box 90004, Bowling Green, KY 42102-9004 ATTN: Technical Service (Servicio Técnico) * Si se llama al Servicio Técnico, por favor tener lista la siguiente información: Número de Modelo, Fecha de compra y Lugar de - Zenith SL-5511-BZ | User Guide - Page 9
FONCTIONNEMENT Luminaire halogène compact de 150 W à détecteur de mouvement Mode: Temps en circuit : En fonction : jour nuit Essai 5 Secondes xx Auto 1, 5 ou 10 Min x Manuel au choix, amanecer* x * Revient au mode automatique au lever du soleil. Note : Après la mise en circuit, attendre - Zenith SL-5511-BZ | User Guide - Page 10
INSTALLATION Pour une installation facile, remplacer un luminaire existant raccordé à un interrupteur. Pour une performance supérieure, placer le luminaire à environ 2,4 m au-dessus du sol. AVERTISSEMENT: Pour une installation au mur, le capteur doit être placé sous le boîtier du luminaire. ❒ Percez - Zenith SL-5511-BZ | User Guide - Page 11
ESSAIS ET RÉGLAGES ❒ Mettre en circuit le disjoncteur et l'interrupteur d'éclairage. REMARQUE: Le capteur doit se réchauffer 1 1/2 minute avant de pouvoir détecter le mouvement. Lorsque l'appareil est mis en circuit ou changé de mode, attendre 1 1/2 minute. ❒ Tourner la commande de sensibilité ( - Zenith SL-5511-BZ | User Guide - Page 12
l'aide avant de retour- ner l'article au magasin. En cas de problème, suivez ce guide. Vous pouvez aussi visiter notre site Web à www.hzsupport.com. Si le problème persiste, composez* le 1 800 858-8501 (service en anglais seulement), entre 7 h 30 et 16 h 30, HNC, du lundi au vendredi. Vous pouvez
-
 1
1 -
 2
2 -
 3
3 -
 4
4 -
 5
5 -
 6
6 -
 7
7 -
8
-
9
-
10
-
11
-
12
 |
 |
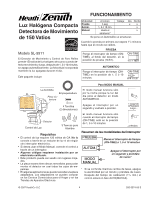
Compact 150 Watt
Motion Sensing Halogen
Model SL-5511
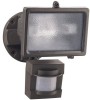
The Motion Sensor Quartz Security Light turns on 150
watts of quartz-halogen lighting when motion is detected
and then, after a selectable period of time, automati-
cally turns the lighting off. The built-in photocell keeps
the lighting off during daylight hours.
Cover
Plate
Sensor
3 Wire
Connectors
4 Screws
(2 sizes)
Light Fixture
Cover Plate
Gasket
© 2007 HeathCo LLC
595-5574-06
Halogen
Bulb
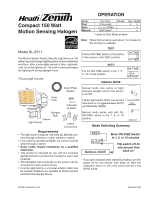
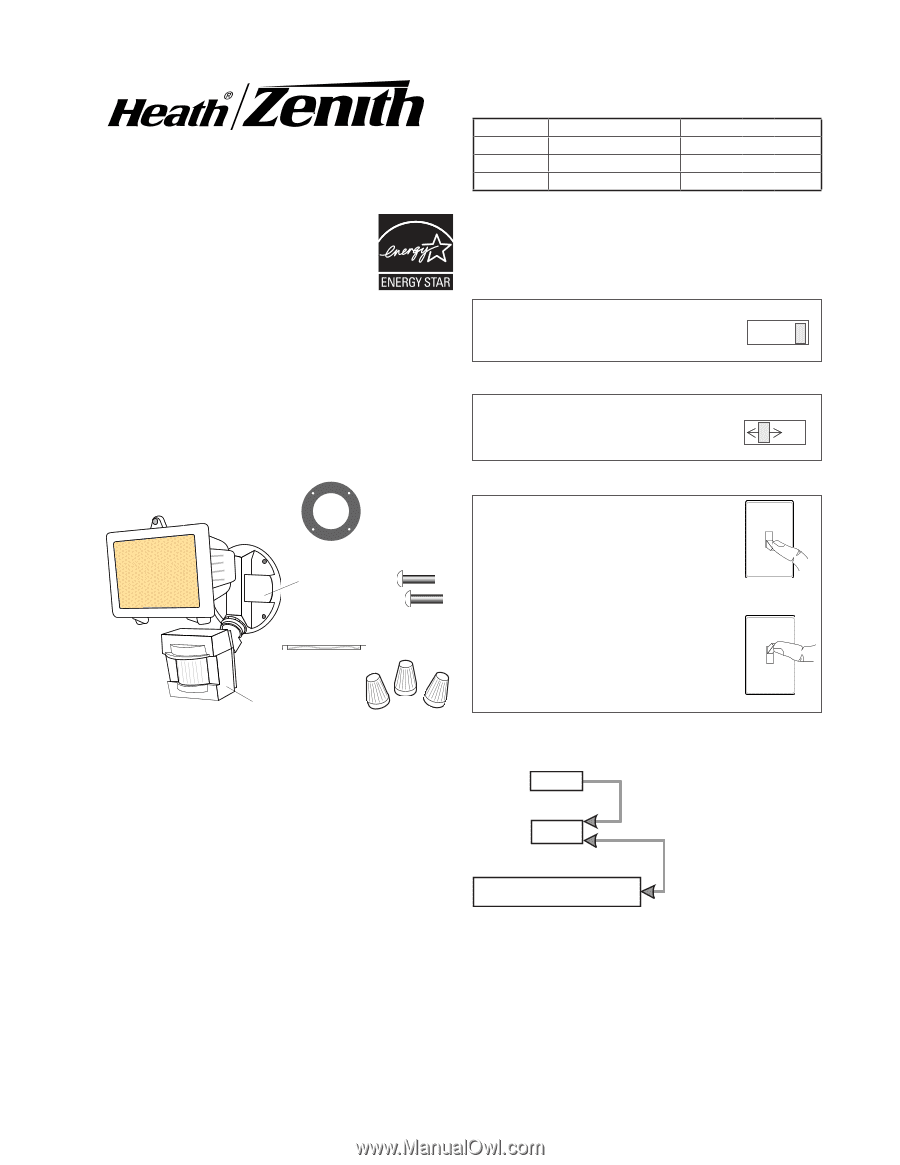
OPERATION
Move ON-TIME Switch
to 1, 5, or 10 minutes
Mode Switching Summary
Flip switch off for
one second then
back on*
* resets to Auto Mode at dawn.
TEST
AUTO
MANUAL MODE
ON-TIME
ON-TIME
Requirements
• The light control requires 120-volts AC.
Do not
con-
nect through a dimmer or other electronic switch.
• If you want to use Manual Mode, the control must be
wired through a switch.
•
Some codes require installation by a qualified
electrician.
• This product is intended for use with the enclosed
gasket and with a junction box marked for use in wet
locations.
• The backplate has knockouts so the sensor can be
mounted on most junction boxes.
• In some applications a universal adaptor plate may
be needed. Adaptors are available at Home Centers
and Electrical Supply Stores.
* If you get confused while switching modes, turn the
power off for one minute, then back on. After the
calibration time (1
1
/
2
min.) the control will be in the
AUTO mode.
10 5 1
TEST
10 5 1
TEST
MANUAL MODE
AUTO
TEST
... back on.
1 Second OFF
then
...
Manual mode only works at night
because daylight returns the sensor
to AUTO.
Flip the light switch off for one second
then back on to toggle between AUTO
and MANUAL MODE.
Manual mode works only with the
ON-TIME switch in the 1, 5, or 10
position.
This package includes:
Note:
When first turned on wait about 1
1
/
2
minutes for
the circuitry to calibrate.
Put the ON-TIME switch in the 1, 5,
or 10 minute position.
Put the ON-TIME switch on the bottom
of the sensor in the TEST position.
Mode:
On-Time
Works:
Day Night
Test
5 Seconds
x
x
Auto
1, 5, or 10 Min
x
Manual
Until Dawn*
x