2007 BMW 6 Series Owner's Manual - Page 47
2007 BMW 6 Series Manual
Page 47 highlights
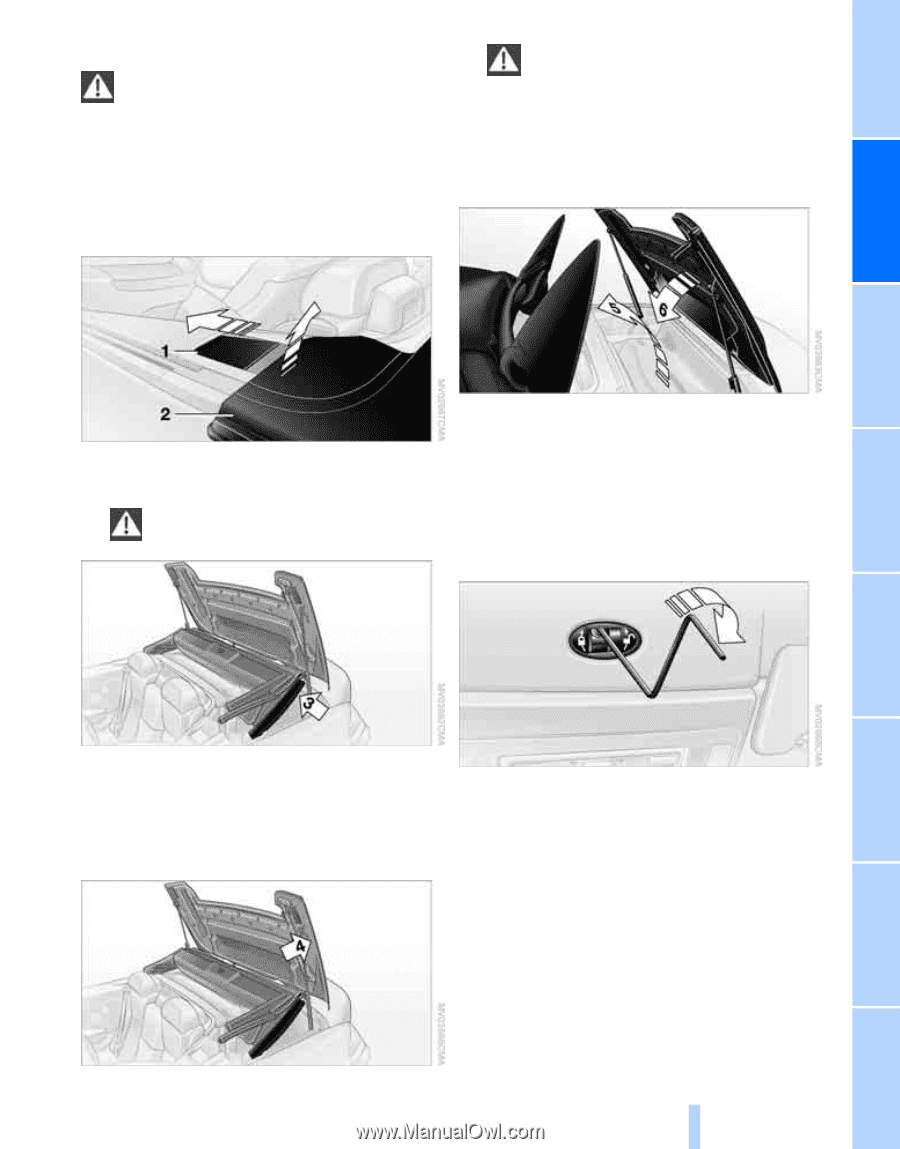
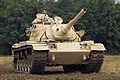
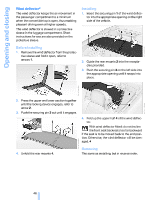
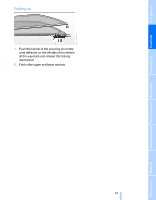
Closing Perform the following work steps with the assistance of a second person and with the doors open, otherwise injury and damage to the convertible top can occur.< 1. Push the cover 1 on the left and right of the side panel forward. Reach into the resulting openings and raise the convertible top compartment lid 2 as far as it will go. Do not carry out the next operation, raising top ends, until the top has been swung forward, otherwise damage can occur.< 4. Raise the two convertible top ends as far as possible, arrow 5, and close the convertible top compartment lid, arrow 6. 5. Fold the top ends down onto the convertible top compartment lid. 2. Grasp the top with both hands at the left and right side frame, arrow 3. Only lift out the top by the side frame, otherwise the top may be damaged.< 6. From the interior, take out the cover in the center of the front top frame; use a screwdriver if necessary. 7. Insert the Allen wrench into the opening provided. 3. Together with the other person, pull the two sides of the convertible top out simultaneously and pivot forward. When doing so, keep the convertible top compartment lid open, arrow 4, e.g. with your shoulder. 8. From the outside, both persons pull the front frame of the convertible top downward, as simultaneously as possible on the two sides. 9. Turn the Allen wrench in the direction of the arrow until the front convertible top frame is locked to the windshield frame. The rear convertible top ends are automatically pressed onto the convertible top compartment lid and close tightly with tension. 10. If necessary, close the rear window again manually in the same way as above. 45 Online Edition for Part no. 01 41 0 013 312 - © 02/07 BMW AG Reference Mobility Communications Entertainment Navigation Driving tips Controls At a glance
-
 1
1 -
2
-
3
-
4
-
5
-
6
-
7
-
8
-
9
-
10
-
11
-
12
-
13
-
14
-
15
-
16
-
17
-
18
-
19
-
20
-
21
-
22
-
23
-
24
-
25
-
26
-
27
-
28
-
29
-
30
-
31
-
32
-
33
-
34
-
35
-
36
-
37
-
38
-
39
-
40
-
41
-
 42
42 -
 43
43 -
 44
44 -
 45
45 -
 46
46 -
 47
47 -
 48
48 -
 49
49 -
 50
50 -
 51
51 -
 52
52 -
53
-
54
-
55
-
56
-
57
-
58
-
59
-
60
-
61
-
62
-
63
-
64
-
65
-
66
-
67
-
68
-
69
-
70
-
71
-
72
-
73
-
74
-
75
-
76
-
77
-
78
-
79
-
80
-
81
-
82
-
83
-
84
-
85
-
86
-
87
-
88
-
89
-
90
-
91
-
92
-
93
-
94
-
95
-
96
-
97
-
98
-
99
-
100
-
101
-
102
-
103
-
104
-
105
-
106
-
107
-
108
-
109
-
110
-
111
-
112
-
113
-
114
-
115
-
116
-
117
-
118
-
119
-
120
-
121
-
122
-
123
-
124
-
125
-
126
-
127
-
128
-
129
-
130
-
131
-
132
-
133
-
134
-
135
-
136
-
137
-
138
-
139
-
140
-
141
-
142
-
143
-
144
-
145
-
146
-
147
-
148
-
149
-
150
-
151
-
152
-
153
-
154
-
155
-
156
-
157
-
158
-
159
-
160
-
161
-
162
-
163
-
164
-
165
-
166
-
167
-
168
-
169
-
170
-
171
-
172
-
173
-
174
-
175
-
176
-
177
-
178
-
179
-
180
-
181
-
182
-
183
-
184
-
185
-
186
-
187
-
188
-
189
-
190
-
191
-
192
-
193
-
194
-
195
-
196
-
197
-
198
-
199
-
200
-
201
-
202
-
203
-
204
-
205
-
206
-
207
-
208
-
209
-
210
-
211
-
212
-
213
-
214
-
215
-
216
-
217
-
218
-
219
-
220
-
221
-
222
-
223
-
224
-
225
-
226
-
227
-
228
-
229
-
230
-
231
-
232
-
233
-
234
-
235
-
236
-
237
-
238
-
239
-
240
-
241
-
242
-
243
-
244
-
245
-
246
-
247
-
248
-
249
-
250
-
251
-
252
-
253
-
254
 |
 |