2011 Chevrolet Impala Owner's Manual - Page 226
2011 Chevrolet Impala Manual
Page 226 highlights
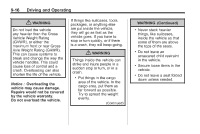
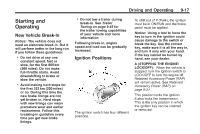
9-18 Driving and Operating The steering can bind with the wheels turned off center. If this happens, move the steering wheel from left to right while turning the key to ACC/ACCESSORY. If this doesn't work, then the vehicle needs service. B (ACC/ACCESSORY): This is the position in which you can operate the radio and windshield wipers while the engine is off. To use ACC/ACCESSORY, turn the key clockwise. C (ON/RUN): This position can be used to operate the electrical accessories and to display some instrument panel cluster warning and indicator lights. The switch stays in this position when the engine is running. If you leave the key in the ACC/ACCESSORY or ON/RUN position with the engine off, the battery could be drained. You may not be able to start the vehicle if the battery is allowed to drain for an extended period of time. D (START): This is the position that starts the engine. When the engine starts, release the key. The ignition switch returns to ON/RUN for driving. A warning chime will sound and the Driver Information Center (DIC) will display DRIVER DOOR OPEN when the driver door is opened, the ignition is in ACC/ACCESSORY or LOCK/OFF, and the key is in the ignition. See Door Ajar Messages on page 5‑31 for more information. Do not turn the engine off when the vehicle is moving. This will cause a loss of power assist in the brake and steering systems and disable the airbags. In an emergency: 1. Brake using a firm and steady pressure. Do not pump the brakes repeatedly. This may deplete power assist, requiring increased brake pedal force. 2. Shift the vehicle to neutral. This can be done while the vehicle is moving. After shifting to neutral, firmly apply the brakes and steer the vehicle to a safe location. 3. Come to a complete stop, shift to P (Park), and turn the ignition to LOCK/OFF. On vehicles with an automatic transmission, the shift lever must be in P (Park) to turn the ignition switch to the LOCK/OFF position. 4. Set the parking brake. See Parking Brake on page 9‑29
-
 1
1 -
2
-
3
-
4
-
5
-
6
-
7
-
8
-
9
-
10
-
11
-
12
-
13
-
14
-
15
-
16
-
17
-
18
-
19
-
20
-
21
-
22
-
23
-
24
-
25
-
26
-
27
-
28
-
29
-
30
-
31
-
32
-
33
-
34
-
35
-
36
-
37
-
38
-
39
-
40
-
41
-
42
-
43
-
44
-
45
-
46
-
47
-
48
-
49
-
50
-
51
-
52
-
53
-
54
-
55
-
56
-
57
-
58
-
59
-
60
-
61
-
62
-
63
-
64
-
65
-
66
-
67
-
68
-
69
-
70
-
71
-
72
-
73
-
74
-
75
-
76
-
77
-
78
-
79
-
80
-
81
-
82
-
83
-
84
-
85
-
86
-
87
-
88
-
89
-
90
-
91
-
92
-
93
-
94
-
95
-
96
-
97
-
98
-
99
-
100
-
101
-
102
-
103
-
104
-
105
-
106
-
107
-
108
-
109
-
110
-
111
-
112
-
113
-
114
-
115
-
116
-
117
-
118
-
119
-
120
-
121
-
122
-
123
-
124
-
125
-
126
-
127
-
128
-
129
-
130
-
131
-
132
-
133
-
134
-
135
-
136
-
137
-
138
-
139
-
140
-
141
-
142
-
143
-
144
-
145
-
146
-
147
-
148
-
149
-
150
-
151
-
152
-
153
-
154
-
155
-
156
-
157
-
158
-
159
-
160
-
161
-
162
-
163
-
164
-
165
-
166
-
167
-
168
-
169
-
170
-
171
-
172
-
173
-
174
-
175
-
176
-
177
-
178
-
179
-
180
-
181
-
182
-
183
-
184
-
185
-
186
-
187
-
188
-
189
-
190
-
191
-
192
-
193
-
194
-
195
-
196
-
197
-
198
-
199
-
200
-
201
-
202
-
203
-
204
-
205
-
206
-
207
-
208
-
209
-
210
-
211
-
212
-
213
-
214
-
215
-
216
-
217
-
218
-
219
-
220
-
 221
221 -
 222
222 -
 223
223 -
 224
224 -
 225
225 -
 226
226 -
 227
227 -
 228
228 -
 229
229 -
 230
230 -
 231
231 -
232
-
233
-
234
-
235
-
236
-
237
-
238
-
239
-
240
-
241
-
242
-
243
-
244
-
245
-
246
-
247
-
248
-
249
-
250
-
251
-
252
-
253
-
254
-
255
-
256
-
257
-
258
-
259
-
260
-
261
-
262
-
263
-
264
-
265
-
266
-
267
-
268
-
269
-
270
-
271
-
272
-
273
-
274
-
275
-
276
-
277
-
278
-
279
-
280
-
281
-
282
-
283
-
284
-
285
-
286
-
287
-
288
-
289
-
290
-
291
-
292
-
293
-
294
-
295
-
296
-
297
-
298
-
299
-
300
-
301
-
302
-
303
-
304
-
305
-
306
-
307
-
308
-
309
-
310
-
311
-
312
-
313
-
314
-
315
-
316
-
317
-
318
-
319
-
320
-
321
-
322
-
323
-
324
-
325
-
326
-
327
-
328
-
329
-
330
-
331
-
332
-
333
-
334
-
335
-
336
-
337
-
338
-
339
-
340
-
341
-
342
-
343
-
344
-
345
-
346
-
347
-
348
-
349
-
350
-
351
-
352
-
353
-
354
-
355
-
356
-
357
-
358
-
359
-
360
-
361
-
362
-
363
-
364
-
365
-
366
-
367
-
368
-
369
-
370
-
371
-
372
-
373
-
374
-
375
-
376
-
377
-
378
-
379
-
380
-
381
-
382
-
383
-
384
-
385
-
386
-
387
-
388
-
389
-
390
-
391
-
392
 |
 |
