2004 Chrysler Sebring Owner Manual Convertible - Page 231
2004 Chrysler Sebring Manual
Page 231 highlights
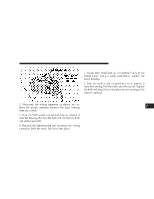
MAINTAINING YOUR VEHICLE 231 License Plate Bulb Replacement 1. Locate both small slots on the outboard side of the license lamp. Using a small screwdriver, remove the entire housing. 2. Turn the bulb socket counterclockwise to remove it from the housing. Pull the bulb out of the socket. Replace the bulb and snap it back into place on the housing of the chrome appliqué. 2. Disconnect the wiring connector as shown and remove the plastic retainers. Remove the light housing from the vehicle. 3. Turn the bulb socket counterclockwise to remove it from the housing. Remove the bulb and reinstall the bulb and socket assembly. 4. Reinstall the light housing and reconnect the wiring connector. Push the trunk liner back into place. 7
-
 1
1 -
2
-
3
-
4
-
5
-
6
-
7
-
8
-
9
-
10
-
11
-
12
-
13
-
14
-
15
-
16
-
17
-
18
-
19
-
20
-
21
-
22
-
23
-
24
-
25
-
26
-
27
-
28
-
29
-
30
-
31
-
32
-
33
-
34
-
35
-
36
-
37
-
38
-
39
-
40
-
41
-
42
-
43
-
44
-
45
-
46
-
47
-
48
-
49
-
50
-
51
-
52
-
53
-
54
-
55
-
56
-
57
-
58
-
59
-
60
-
61
-
62
-
63
-
64
-
65
-
66
-
67
-
68
-
69
-
70
-
71
-
72
-
73
-
74
-
75
-
76
-
77
-
78
-
79
-
80
-
81
-
82
-
83
-
84
-
85
-
86
-
87
-
88
-
89
-
90
-
91
-
92
-
93
-
94
-
95
-
96
-
97
-
98
-
99
-
100
-
101
-
102
-
103
-
104
-
105
-
106
-
107
-
108
-
109
-
110
-
111
-
112
-
113
-
114
-
115
-
116
-
117
-
118
-
119
-
120
-
121
-
122
-
123
-
124
-
125
-
126
-
127
-
128
-
129
-
130
-
131
-
132
-
133
-
134
-
135
-
136
-
137
-
138
-
139
-
140
-
141
-
142
-
143
-
144
-
145
-
146
-
147
-
148
-
149
-
150
-
151
-
152
-
153
-
154
-
155
-
156
-
157
-
158
-
159
-
160
-
161
-
162
-
163
-
164
-
165
-
166
-
167
-
168
-
169
-
170
-
171
-
172
-
173
-
174
-
175
-
176
-
177
-
178
-
179
-
180
-
181
-
182
-
183
-
184
-
185
-
186
-
187
-
188
-
189
-
190
-
191
-
192
-
193
-
194
-
195
-
196
-
197
-
198
-
199
-
200
-
201
-
202
-
203
-
204
-
205
-
206
-
207
-
208
-
209
-
210
-
211
-
212
-
213
-
214
-
215
-
216
-
217
-
218
-
219
-
220
-
221
-
222
-
223
-
224
-
225
-
 226
226 -
 227
227 -
 228
228 -
 229
229 -
 230
230 -
 231
231 -
 232
232 -
 233
233 -
 234
234 -
 235
235 -
 236
236 -
237
-
238
-
239
-
240
-
241
-
242
-
243
-
244
-
245
-
246
-
247
-
248
-
249
-
250
-
251
-
252
-
253
-
254
-
255
-
256
-
257
-
258
-
259
-
260
-
261
-
262
-
263
-
264
-
265
-
266
-
267
-
268
-
269
-
270
-
271
 |
 |

2. Disconnect the wiring connector as shown and re-
move the plastic retainers. Remove the light housing
from the vehicle.
3. Turn the bulb socket counterclockwise to remove it
from the housing. Remove the bulb and reinstall the bulb
and socket assembly.
4. Reinstall the light housing and reconnect the wiring
connector. Push the trunk liner back into place.
License Plate Bulb Replacement
1. Locate both small slots on the outboard side of the
license lamp. Using a small screwdriver, remove the
entire housing.
2. Turn the bulb socket counterclockwise to remove it
from the housing. Pull the bulb out of the socket. Replace
the bulb and snap it back into place on the housing of the
chrome appliqué.
MAINTAINING YOUR VEHICLE
231
7