2012 Dodge Durango User Guide - Page 99
2012 Dodge Durango Manual

Page 99 highlights
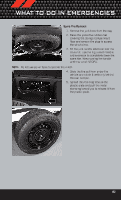
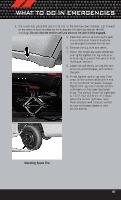
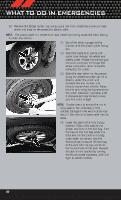
WHAT TO DO IN EMERGENCIES 4. For a rear tire, place the jack in the slot on the rear tie-down bracket, just forward of the rear tire (as indicated by the triangular lift point symbol on the sill molding). Do not raise the vehicle until you are sure the jack is fully engaged. 5. Raise the vehicle by turning the jack screw clockwise. Raise the vehicle just enough to remove the flat tire. 6. Remove the lug nuts and wheel. 7. Install the temporary spare wheel/tire and lightly tighten the lug nuts prior to lowering to prevent the vehicle from moving on the jack. 8. Lower the vehicle by turning the jack screw counterclockwise, and remove the jack. 9. Finish tightening the lug nuts. Push down on the wrench while at the end of the handle for increased leverage. Tighten the lug nuts in a star pattern until each nut has been tightened twice. The correct wheel nut tightness is 110 ft lbs (150 N·m). If in doubt about the correct tightness, have them checked with a torque wrench by your authorized dealer or at a service station. Mounting Spare Tire 97
-
 1
1 -
2
-
3
-
4
-
5
-
6
-
7
-
8
-
9
-
10
-
11
-
12
-
13
-
14
-
15
-
16
-
17
-
18
-
19
-
20
-
21
-
22
-
23
-
24
-
25
-
26
-
27
-
28
-
29
-
30
-
31
-
32
-
33
-
34
-
35
-
36
-
37
-
38
-
39
-
40
-
41
-
42
-
43
-
44
-
45
-
46
-
47
-
48
-
49
-
50
-
51
-
52
-
53
-
54
-
55
-
56
-
57
-
58
-
59
-
60
-
61
-
62
-
63
-
64
-
65
-
66
-
67
-
68
-
69
-
70
-
71
-
72
-
73
-
74
-
75
-
76
-
77
-
78
-
79
-
80
-
81
-
82
-
83
-
84
-
85
-
86
-
87
-
88
-
89
-
90
-
91
-
92
-
93
-
 94
94 -
 95
95 -
 96
96 -
 97
97 -
 98
98 -
 99
99 -
 100
100 -
 101
101 -
 102
102 -
 103
103 -
 104
104 -
105
-
106
-
107
-
108
-
109
-
110
-
111
-
112
-
113
-
114
-
115
-
116
-
117
-
118
-
119
-
120
-
121
-
122
-
123
-
124
-
125
-
126
-
127
-
128
-
129
-
130
-
131
-
132
 |
 |
