2004 Ford Explorer Sport Trac Quick Reference Guide 2nd Printing - Page 2
2004 Ford Explorer Sport Trac Manual

Page 2 highlights
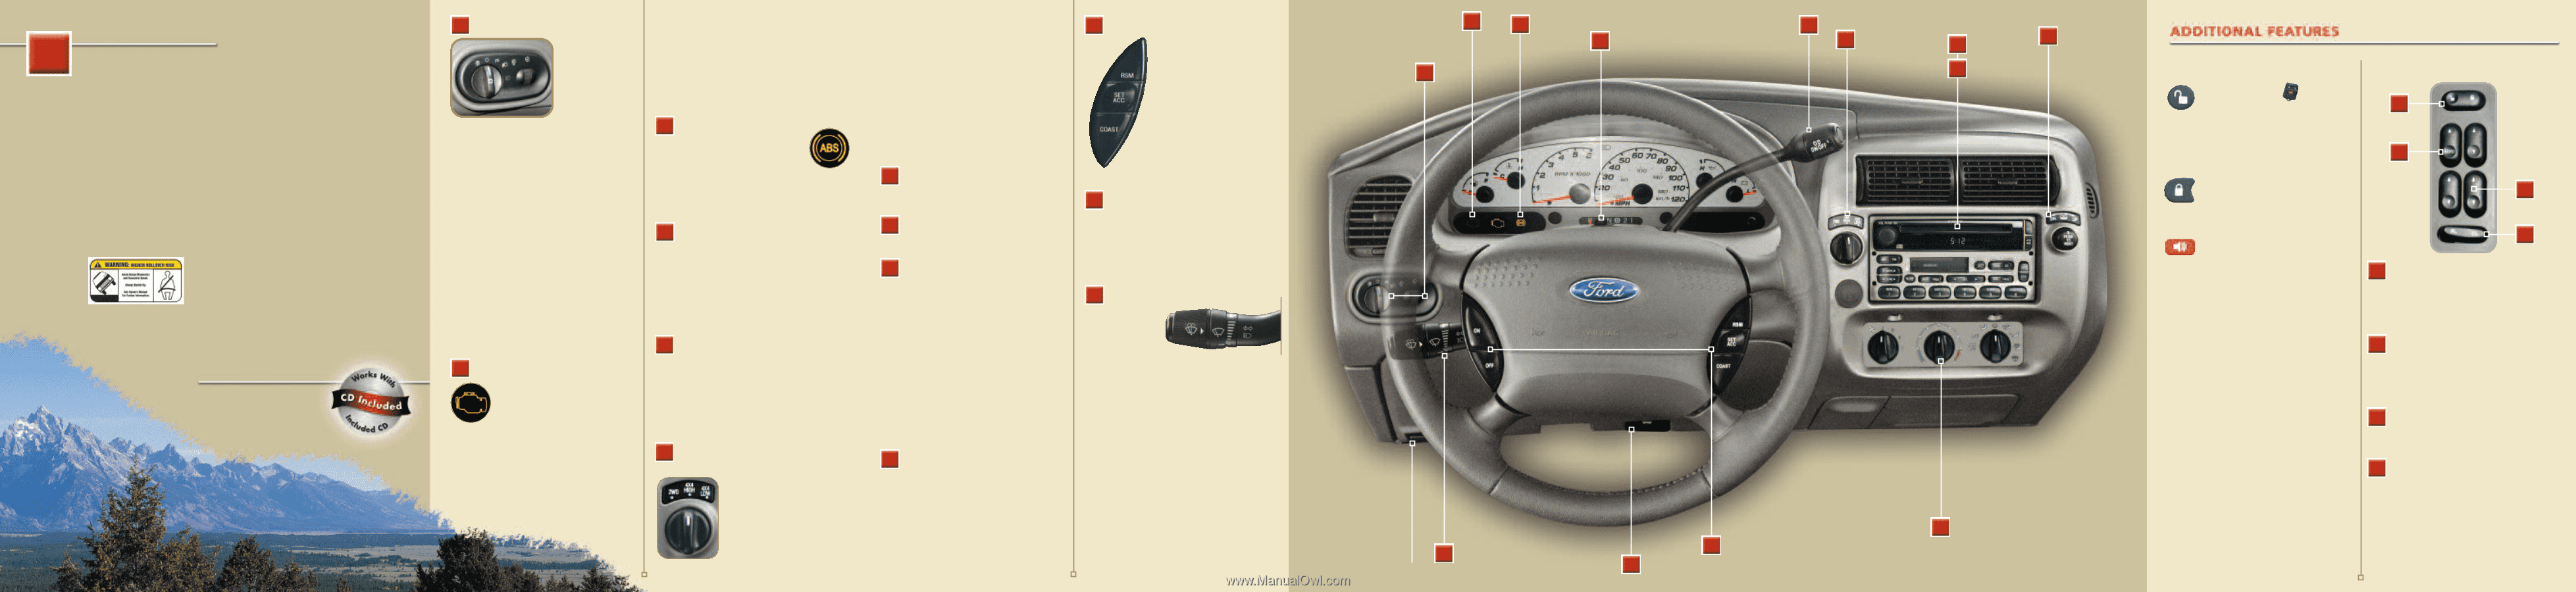
2 Headlamp/Panel Dimmer Control 1 From the rugged exterior styling to the bountiful amenities, every No Boundaries vehicle is fully equipped to help you enter the next territory. In order to help you fully appreciate the numerous features of your new vehicle, we invite you to explore this easy-to-use Quick Reference Guide. Used in conjunction with the Interactive Owner Experience CD-Rom, you can briefly hear how to operate the features listed to the right once you place the CD into any audio CD player. Find the numbered call-out from the photograph of the instrument panel located in the center of the Quick Reference Guide, and then select the corresponding numbered audio track on the CD. For more comprehensive information, place the CD into any computer.* This vehicle handles differently from an ordinary passenger car in driving conditions which may occur on streets and highways and off-road. DRIVE WITH CARE AND WEAR A SAFETY BELT AT ALL TIMES. Ford urges you to read the Owner's Guide and Driving Your SUV or Truck Supplement for further information on safe driving precautions and instructions. Rotate clockwise to the first position to turn on the parking lamps, instrument panel lamps, license plate lamps and tail lamps. Rotate to the second position to also turn on the headlamps. Use the instrument panel dimmer control, which is located to the right of the headlamp control, to adjust the intensity of the panel lighting during headlamp and parking lamp operation. Rotate up to brighten and down to dim. Rotate to the full up position (past detent) to also turn on the interior lamps. To turn off the interior lamps, rotate to the full down position (past detent). You may also set the headlamps to automatically turn on at night and off during the day by using the autolamp delay system (if equipped) located on the headlamp control. In addition, the delay system can be set to keep the headlamps on for up to three minutes after the key is turned to OFF. For more information, please consult your Owner's Guide. Your vehicle is also equipped with a check fuel cap lamp that illuminates when the fuel cap is not correctly installed. Continually driving with this light on may cause the check engine warning light to come on. To help prevent activation, always secure your fuel cap by turning it clockwise 1/8 of a turn until it stops. 4X4 Low uses extra gearing to provide maximum power to all four wheels. To shift between 2WD and 4X4 High: Turn the control between the 2WD and the 4X4 High position at any forward speed, as long as the rear wheels are NOT slipping. To shift to or from 4X4 Low: Bring the vehicle to a complete stop. Depress the brake. Place the gearshift in N (Neutral), and then turn the control to the desired position. 12 Speed Control (if equipped) To operate, the speed control must be ON and the vehicle's speed must be at or above 48 km/h (30 mph). To set a speed, press SET ACC. To set a higher speed, press SET ACC again. To set a lower speed, press COAST. Pressing RSM will return to a previously set speed. To turn the speed control off, press the OFF button or turn off the vehicle's ignition. Depress the brake pedal to disengage. Check Engine Lamp Headlamp/Panel Dimmer Control 2 3 4 ABS Warning Lamp 5 Hazard Flasher Control Gearshift/ Overdrive Control 6 7 Four-Wheel Drive (4X4) Control (if equipped) 8 9 Audio Systems 10 Power Down Back Window Control Remote Entry System (if equipped) Press this control once to unlock the driver's door, and twice to unlock all of the doors. The interior lamps will illuminate. Press this control once to lock all of the doors. Pressing the control a second time within three seconds will chirp the horn and flash the lights to confirm that all doors are closed and locked. Press this control to activate the panic alarm. Press the control again or turn the ignition to ON to deactivate the alarm. The alarm will only operate when the ignition is in the OFF or ACC position. The interior lights will turn on when the remote is used to unlock the doors or sound the panic alarm. The lights will turn off if the ignition switch is turned to the ON position, or after 25 seconds of illumination. The dome lamp control must not be set to the OFF position for the system to operate. Keyless Entry System (if equipped) This system, located on the outside portion of the driver's door, can be used to lock or unlock the doors without using a key or the activate/deactivate autolock feature. For more information, please consult your Owner's Guide. SecuriLock™ Passive Anti-Theft System The SecuriLock™ passive anti-theft system is an engine immobilization system. This system prevents the engine from being started unless a coded key programmed to your vehicle is used. Please note that for security purposes, your coded keys cannot be copied. If you would like spare coded keys, they can be purchased from your dealership. Door Controls A 4 ABS Warning Lamp Illuminates momentarily when the ignition is turned to the ON position. In an emergency, apply continuous force on the brake to prevent wheel lock when braking on slippery surfaces - do not pump your brakes. Any pulsation or noise you may feel or hear is normal. B C 8 Premium Dual Media Radio (if equipped) Please see reverse side for more details. 13 Hood Release 5 Hazard Flasher Control 9 In Dash Six CD Radio (if equipped) The hazard flasher control is located on the steering column, just behind the steering wheel. Press to activate all hazard flashers simultaneously in an emergency, or to warn traffic of vehicle breakdown, approaching danger, etc. Press the control again to turn the flashers off. The hazard flashers can be operated when the ignition is off. Please see reverse side for more details. 10 Power Down Back Window Control Inside the vehicle, pull the hood release handle located under the bottom of the instrument panel near the steering column. Next, release the auxiliary latch located in the center between the hood and the grille. Lift the hood and secure it with the prop rod. Turn 14 Turn Signal and Wiper/Washer Control Rotate the end of the control to increase or decrease the speed of the wipers. When the wiper control is on, the speed of the wipers will automatically adjust with the vehicle's speed. Push the control on the end of the stalk briefly for a single wipe (no wash). Push and hold for three wipes with a wash. A long push and hold will activate a longer wash cycle (up to ten seconds). The Explorer Sport Trac is also equipped with a rear window wiper and washer control, located to the right of your audio system. Turn the control clockwise to the desired interval speed. Press to activate the washer fluid. For extended wiper blade quality, occasional cleaning of the wiper blades is required. D A Power Door Locks - Press the left portion of the control to unlock all doors and the right portion to lock all doors. The power door lock controls are located on the driver and front passenger door panels. One-Touch Down - This feature allows you to fully open the driver's window when you press AUTO completely down and release quickly. Depress again to stop the window operation. Power Windows - Press the top portion of the rocker switch to close the window. Press the bottom portion to open. Window Lock - This feature allows only the driver to operate the power windows. To lock out all window controls except for the driver's, press the left side of the control. Press the right side to restore the window controls. 6 Gearshift/Overdrive Control 3 *Refer to the minimum configuration requirements located on the back panel of the CD jacket. Check Engine Lamp The Check Engine indicator light illuminates when the ignition is first turned to the ON position to check the bulb. Solid illumination after the engine is started indicates the On Board Diagnostics System (OBD-II) has detected a malfunction. For more information, please consult the On board diagnostics (OBD-II) section in the Maintenance and Specifications chapter of your Owner's Guide. Overdrive is the normal drive position for the best fuel economy. Only deactivate (O/D OFF) overdrive when: driving with a heavy load, towing a trailer up or down steep hills, or when additional engine braking is desired. To deactivate, press the transmission control switch on the end of the gearshift lever. Turn counterclockwise and release to lower the window to the full-open position. Turn the control clockwise and release to raise the window to the full-closed position. Press once to move the window (up or down) to the vent position. If the window is already in the vent position and the control is pressed, no movement will occur. To operate the power down back window, the ignition switch must be in the ON or ACC position. All rear-seat occupants and/or cargo must be properly restrained and clear of the back window opening before operating the power down back window. B C 7 Four-Wheel Drive (4X4) Control (if equipped) 11 Climate Control System D Two-wheel drive (2WD) powers the rear wheels only and is used for street and highway driving. 4X4 High is used for extra traction such as in snow, icy roads, or in off-road situations. It should not be operated on dry pavement. Please see reverse side for more details. Park Brake Release 14 Turn Signal and Wiper/Washer Control Hood 13 Release 12 Speed Control (if equipped) Climate 11 Control System
-
 1
1 -
 2
2
 |
 |