2004 Ford F150 Quick Reference Guide 1st Printing - Page 2
2004 Ford F150 Manual
Page 2 highlights
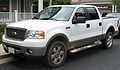
21963_F150qrg_Q5.qxd 3/10/04 9:14 AM Page 7 The Ford F-150, there's nothing like it on earth. It's the boldest, strongest, and most capable Ford F-150 to roam the crowded street or climb a remote trail. Outside it's stance is firm. Inside it initiates a new era of truck design and comfort. Underneath it is built in the strongest, most advance F-150 chassis and suspension ever. And above all it is built Ford tough. The F-150 comes equipped with many new features, some will require no explanation, others may be new to you. This Quick Reference Guide was designed to acquaint you with many of the features you will use most. This Quick Reference Guide is not intended to replace the vehicle Owner's Guide. Please refer to it for more detailed information on your F -150. HEADLAMP AND PANEL DIMMER CONTROL Rotate clockwise one position from off to turn on the parking lamps. Rotate two positions from off to also turn on the headlamps. Rotate counterclockwise from off to activate autolamp (if equipped), which provides light-sensitive automatic On/Off control of the exterior lights and keeps them on for a short period of time after the ignition is turned off. When the control is in any position except high beams or off, pull the control toward you to activate the foglamps (if equipped). 1 To increase speed, tap the SET button and the speed will increase in small increments each time or use the accelerator pedal to reach desired speed and then press SET. To reduce speed, press the left side of the CST/SET button until desired speed is reached. Release or tap the left side of the CST/SET button and speed will decrease in small increments. Also, you can depress the brake pedal until desired speed is reached and press SET. Press RES/RESUME to return the vehicle to a previously set speed if vehicle is traveling more than 30 mph (48 kph). COCKPIT FEATURES ADDITIONAL FEATURES DOOR CONTROLS Use the panel dimmer control, located to the right of the headlamp control, to adjust the brightness of the instrument panel during the headlamps and parking lamps operation. Rotate to the full up position, past the detent, to turn on the interior lamps. Rotate to the full down position, past the detent, to prevent the interior lights from illuminating when doors are opened. 2 POWER ADJUSTABLE PEDALS (if equipped) Press and hold the top end of rocker control to adjust the accelerator and brake pedal away from you. Hold the lower end of the button to move the pedals toward you. Adjust the pedals only when the vehicle is stopped and the gearshift lever is in the P (Park) position. If equipped with memory function, the adjustable pedals, along with the driver's seat, can be automatically positioned in two programmable positions using the control located on the driver's seat. Refer to your Owner's Guide for instructions on how to use this memory feature. MESSAGE CENTER (if equipped) With the ignition on, the message center displays important vehicle information through a constant monitor of vehicle systems. The system will notify you of potential vehicle problems by displaying warnings, followed by a long indicator chime. You may select the INFO or SETUP buttons on the message center to display trip odometer, odometer, compass, distance to empty, average fuel economy, and trip elapsed drive time. The RESET button may be used to reset selected functions in the INFO and SETUP menus. For more information about message center functions, please refer to your Owner's Guide. REMOTE ENTRY SYSTEM (if equipped) 1 Press this control once to lock all doors. Pressing the control a second time will chirp the horn to confirm that all doors are closed and locked. 2 3 1 2 6 Press this control once to unlock the driver's door and twice to unlock all doors. Press this control to sound the panic alarm. To silence, press the control again, or turn the ignition on. The remote entry system can also control the memory feature (if equipped). Please refer to your Owner's Guide for instructions on how to activate this feature. KEYLESS ENTRY SYSTEM (if equipped) With this control you can lock or unlock all doors without using a key. First, enter your five-digit program code and then press the corresponding quick key; Unlock all doors = 3 • 4 Lock all doors = 7 • 8 and 9 • 0 simultaneously DRIVER / PASSENGER BELTMINDER The BeltMinder feature is a supplemental warning to the safety belt warning function. This feature provides additional reminders by intermittently sounding a chime and illuminating the safety belt warning lamp in the instrument cluster when the driver's and front passenger's safety belt is unbuckled. Both the driver's and front passenger's safety belt usages are monitored and either may activate the BeltMinder feature. REVERSE SENSING SYSTEM (RSS) (if equipped) This sonar system sounds a tone to warn the driver of obstacles near the rear bumper when the reverse gear is selected. Obstacles can be detected within approximately 6 feet (2 m) behind the rear bumper while the vehicle moves in reverse at speeds less than 3 mph (5 km/h). The reverse sensing system defaults to on, but can be disabled by turning the ignition on, placing the gearshift in reverse and pressing the RSS control. An indicator light, located next to the cigarette lighter on the control, will illuminate when the system is turned off. TOWING INFORMATION For more details on towing with your vehicle, please refer to your Owner's Guide or request a copy of the Ford Motor Company 2004 MY RV and Trailer Towing Guide (Form RV-FDTK-0902) from your dealer. 3 3 SERVICE ENGINE SOON LAMP Illuminates briefly when the ignition is turned to the ON position to ensure the system is functional. If the light comes on after the engine is started, refer to your Owner's Guide. This lamp will illuminate if the fuel cap is not fully secured. In addition, "Check fuel cap" will appear on the message center display. Make sure that the fuel cap is secure by turning it clockwise 1/4 of a turn until it stops. FOUR-WHEEL DRIVE CONTROL (if equipped) 2H (2WD HIGH) delivers power to the rear wheels only and is the optimal position for smoothness and fuel economy. 4H (4x4 HIGH) provides mechanically locked four-wheel drive power to all four wheels. 4L (4x4 LOW) provides mechanically locked four-wheel drive when extra power at reduced speeds is required. With either an Electronic Shift 4WD system or Manual 4WD system, to shift from 2H to 4H, move the control at any forward speed up to 55 mph (88 kph). To shift to or from 4L, bring the vehicle to a stop and keep the brake pedal depressed. Next, place the gearshift in N (Neutral), and then move the control to or from 4L. Some mechanical noise may be heard when the system engages. This is normal and no service is required. Note: The Manual 4WD system has a N (Neutral) position in the transfer case. This setting overrides the transmission and puts the vehicle in Neutral regardless of gearshift position. This setting should only be used when towing the vehicle. 7 ABS WARNING LAMP Illuminates briefly when the ignition is turned to the ON position. If the light comes on after the engine is started, refer to your Owner's Guide. 4 8 IN-DASH CD6/MP3 DISC PIONEER AUDIO SYSTEM (if equipped) Please see reverse side for more details. SPEED CONTROL (if equipped) To set the speed control, press the ON button and release. Accelerate to the desired speed and press the SET button and release. Once the system is engaged, an icon will appear in the instrument cluster. To increase speed, tap the SET button and the speed will increase in small increments each time, or use the accelerator pedal to reach desired speed and then press SET. To reduce speed, press and hold CST until desired speed is reached. Release or tap the CST button and speed will decrease in small increments. Also, you can depress the brake pedal until desired speed is reached and press SET. Press RES/RESUME to return the vehicle to a previously set speed if vehicle is traveling more than 30 mph (48 kph). 5 PASSENGER AIRBAG DEACTIVATED LAMP / PASSENGER AIRBAG ON/OFF SWITCH (if equipped) Please refer to the Seating and Safety Restraints section of your Owner's Guide for information on the Passenger Airbag Deactivated Lamp and Passenger Airbag ON/OFF Switch. 9 1 10 AUXILIARY POWER POINT (12V) An auxiliary power point is located on the instrument panel. For Super Cab and SuperCrew vehicles, there is an additional auxiliary power point located on the lower rear side of the center console that is accessible from the rear seats. Do NOT plug optional electrical accessories into the cigarette lighter. 2 3 4 5 6 7 8 9 10 FOR REDUNDANT STEERING WHEEL CONTROLS (if equipped). To set the speed control, press the right side of the ON/OFF switch. Accelerate to the desired speed and press the right side of the CST/SET button and release. Once the system is engaged, an icon will appear in the instrument cluster.
-
 1
1 -
 2
2
 |
 |
