2007 Ford Expedition Quick Reference Guide 1st Printing - Page 1
2007 Ford Expedition Manual
Page 1 highlights
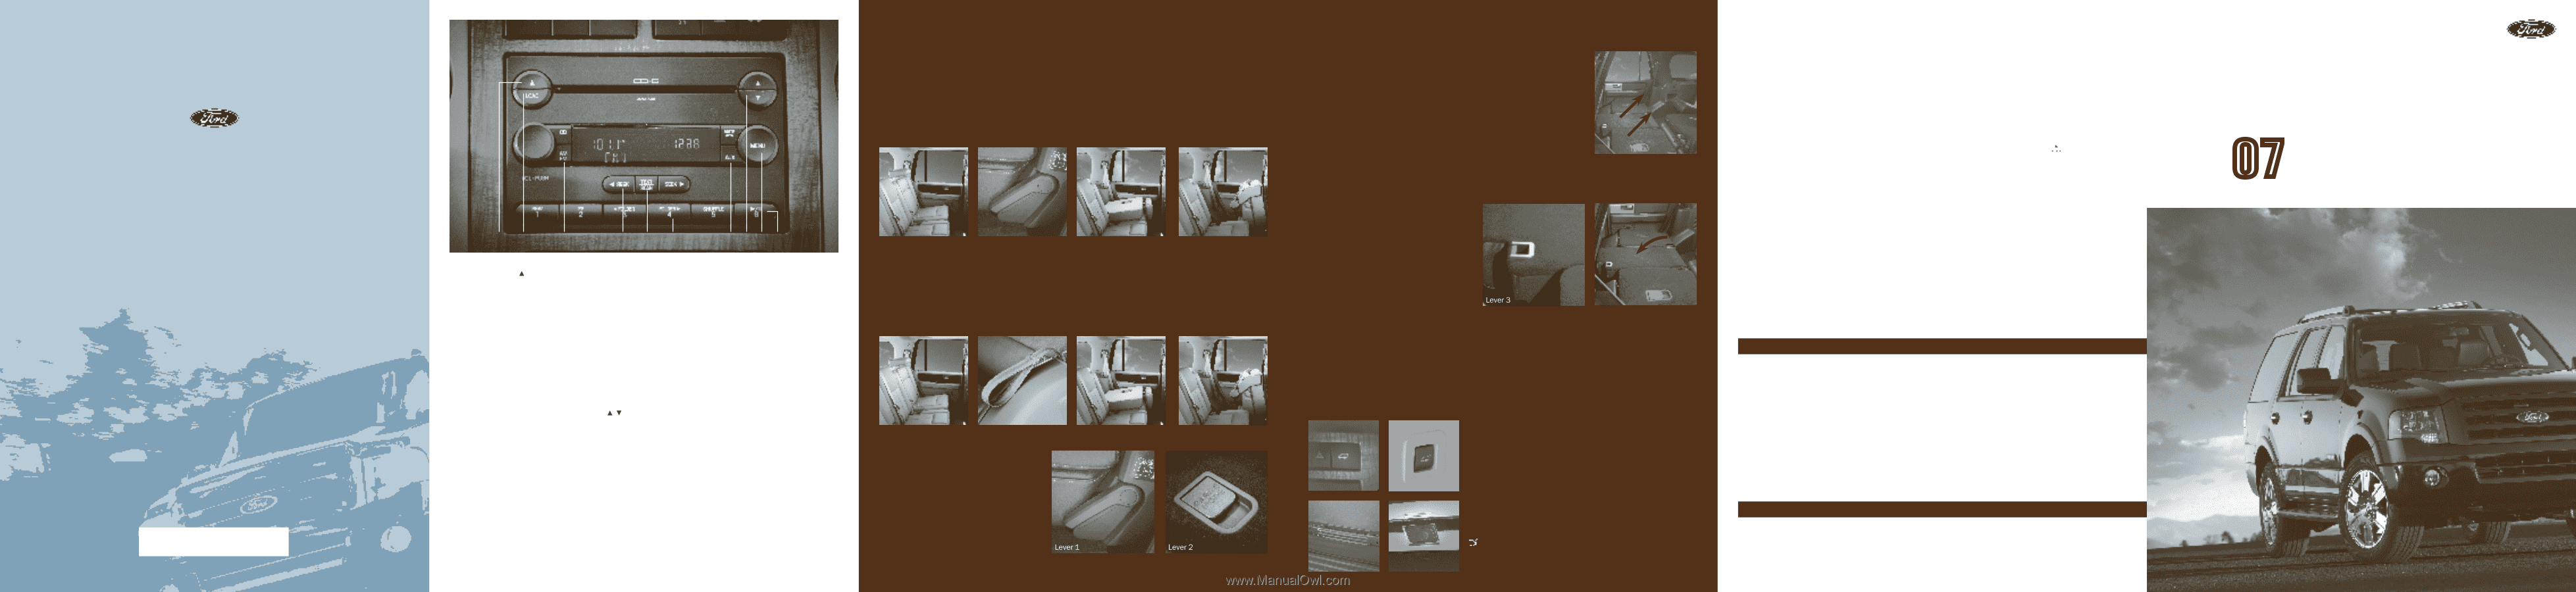
Ford Motor Company Customer Relationship Center P.O. Box 6248 Dearborn, MI 48121 1-800-392-3673 (FORD) (TDD for the hearing impaired: 1-800-232-5952) AUDIO SYSTEM SECOND ROW SEATS Important: Before folding the second row seats, ensure that the head restraints are fully flipped down by pulling on the strap and that all items have been removed from the floor and off the seats.. Entering the Third Row Seat Fold head restraint forward (Pos. 1). Pull up on the lever (Lever 1) located on the side of either outboard second row seat until the seat back folds forward to the cushion (Pos. 2). Pull lever fully upward (Lever 1). The seat will then flip forward (Pos. 3). SECOND ROW SEATS (Continued) Premium/Audiophile AM/FM Stereo In-Dash Six CD/MP3 Sound System (if equipped) Returning the Seats to the Upright Position From the Fully-Lowered Floor Position The seat back cannot be returned to the upright position until the seat is returned from the kneel-down position. To return the seat to the upright position, lift and pull the seat rearward until the latch is fully engaged. Do not attempt to unlatch the rear floor hooks while the seat is in the kneel-down position. With the seat back in the folded down position, lift up on the seat back. This will allow the seat back to be lifted to the upright locked position. Essential Information Fuel Tank Capacity Your vehicle's fuel tank can accommodate 28 gallons (106L) of gasoline. (Expedition EL accomodates 33.5 gallons (126.8L) of gasoline.) Your vehicle is designed to use "Regular" unleaded gasoline with a pump (R+M)/2 octane rating of 87 for optimum performance. The use of gasoline with lower octane ratings may degrade performance. Tire Pressure Your tire pressure is properly set at the dealership according to the recommended specifications found on the Certification Label located on the front door latch pillar on the driver's side. Please check your tire pressure during routine maintenance and seasonal changes and when the Tire Pressure Monitoring System warning indicator (if equipped) is illuminated. Warning: Improperly inflated tires can affect vehicle handling and tire performance. See "Additional Features" on the reverse side for more information. Fuses If electrical components in the vehicle are not working, a fuse may have blown. For more information about changing a fuse, please consult your Owner's Guide. Fuel Pump Shut-Off Switch After a collision, if the engine cranks but does not start, the fuel pump shut-off switch may have to be reset. The switch is located in the left rear quarter trim panel, near the liftgate, behind an access panel. For complete details on resetting the switch, please consult your Owner's Guide. Changing the Tires If you get a flat tire while driving, do not apply the brake heavily. Instead, gradually decrease your speed. Hold the steering wheel firmly and slowly move to a safe place on the side of the road. Prior to jacking, hoisting or towing your vehicle, be sure to turn OFF the running boards (if equipped), and the air suspension switch. Your vehicle may be equipped with a conventional spare tire that is different in one or more of the following: type, brand, size, speed rating and tread design. Your vehicle may be equipped with a spare wheel that may not match the road wheels and is not equipped with a Tire Pressure Monitor System (TPMS) Sensor. Location of the Spare Tire and Tools Item Location Spare Tire Under the vehicle, just forward of the rear bumper Jack Tools and Under the access panel, located in the floor compartment behind the Jacking Instructions third row seat This Quick Reference Guide is not intended to replace your vehicle Owner's Guide which contains more detailed information concerning the features of your vehicle, as well as important safety warnings designed to help reduce the risk of injury to you and your occupants. Please read your entire Owner's Guide carefully as you begin learning about your new vehicle and refer to the appropriate chapters when questions arise. All information contained in this Quick Reference Guide was accurate at the time of duplication. We reserve the right to change features, operation and/or functionality of any vehicle specification at any time. Your Ford dealer is the best source for the most current information. For detailed operating and safety information, please consult your Owner's Guide. 07 EXPEDITION QUICK REFERENCE GUIDE quick reference guide Folding the 20% Middle Seat (if equipped) to a Load Floor Position 1 2 3 4 5 6 7 8 9 10 Pos. 1 Lever 1 Pos. 2 Pos. 3 1 CD EJECT Press and a memory preset 1-6 to eject a CD from a specific slot. Press and hold to auto eject all CDs present in the system. 2 LOAD Press LOAD and a memory preset to load a specific slot. Press and hold to autoload up to six CDs. 3 AM/FM Press to select AM/ FM1/FM2 frequency band. 4 SEEK Press to access the previous or next strong station, CD track, previous/next channel (if equipped with satellite radio), previous/additional display text or category. 5 TEXT/SCAN Press and hold to hear a brief sampling of radio stations or CD tracks. Press again to stop. In CD/MP3 mode, press and release to display track title, artist name and disc title. SATELLITE RADIO FEATURES AND CONTROLS (if equipped) 7 AUX Press repeatedly to cycle through FES/DVD (if equipped), SAT1, SAT2, SAT3 (satellite radio mode if equipped), LINE IN (auxiliary audio mode if equipped) or FES/DVD (if equipped). Once Satellite Radio mode is activated you may use the following functions: Press MENU until CATEGORY MODE appears in the display. Press / to scroll through the list of SIRIUS channel categories. Press SEEK to select. Press SCAN to hear a brief sampling of channels in the selected category. Press SEEK to access the previous/next channels. Press and release TEXT/SCAN to display the current song title. Press again to scroll through current song title, artist, channel category and the SIRIUS long channel name. Press and hold for a brief sampling of the next channels. Press again to stop. 8 TUNE/DISC SELECTOR In radio mode, press to go up/down the frequency band in individual increments. 9 MENU Press repeatedly to cycle through the following modes: Category (if equipped with satellite radio), Setting the Clock, Autoset, RBDS ON/OFF, Treble, Bass, Balance, Fade, SPEEDVOL (Speed Sensitive Volume, if equipped), ALL SEATS (Occupancy Mode), Track/Folder, and Compression. For more information, please consult your Owner's Guide. 10 SETTING MEMORY PRESETS Select AM, FM1 or FM2 band, then tune to a station. Next, press and hold a numbered preset button until the sound returns. SETTING THE CLOCK Press MENU until SELECT HOUR or SELECT MINS is displayed. Press up/down arrows/ to adjust the hours/minutes. Exiting the Third Row Seat Fold head restraint forward (Pos. 4). Pull up on the strap located at the back of the second row seat by the outboard side shield (Pull Strap). The seat back will fold forward to the cushion (Pos. 5). Continue pulling up on the pull strap and the seat will flip forward (Pos. 6). To return the seat to the upright position, push the seat down until it is latched to the floor strikers. Then, lift the seat back to the upright position and flip the head restraint to the upright position. To fold the seat, pull the lever (lever 3) located on the seat back to release the folding seat latch. With the latch released, the seat back can be lowered into the load floor position. A moderate force may be required to move the seat forward and down. RETURNING THE 20% MIDDLE SEAT TO THE UPRIGHT POSITION FROM THE FULLY-LOWERED FLOOR POSITION To return the seat to the upright position, lift and pull the seat back until the seat latch is fully engaged. POWER LIFTGATE OPERATION Pos. 4 Pull Strap Pos. 5 Pos. 6 Folding the Outboard Seat backs to a Load Floor Position - (Refer to the important note above) To fold the seats to a load floor position, lift the lever (Lever 1) located on the outboard side of the seat to release the seat back. To lower the seat further to the fully-lowered position for maximum cargo capacity, locate (Lever 2) on the seat back. Releasing the lever releases the seat into the kneel-down floor position. A moderate force may be required to move the seat forward and down. To open the optional power liftgate, push the button on the instrument panel (Figure A), or press and release the control located in the left rear quarter panel (Figure B). Keep clear of the liftgate when operating the rear switch. A Roadside Emergencies To fully assist you if you should have a vehicle concern, Ford Motor Company offers a complimentary roadside assistance program. This program is separate from the New Vehicle Limited Warranty. The service is available 24 hours a day, seven days a week for the New Vehicle Limited Warranty period (U.S.) or Basic Warranty period (Canada) of three years or 36,000 miles (60,000 km). Roadside assistance will cover: q Changing a flat tire q Lockout assistance q Jump-starts q Towing of your vehicle Phone Number 1-800-241-3673 1-800-665-2006 q Limited fuel delivery q Winch Out B To open the liftgate manually, place your hand on top of the liftgate handle (Figure C) and pull. Do not pull the handle from the bottom. To close, make certain the liftgate glass is closed, and then push the liftgate closed until it latches securely. To unlatch the liftgate glass, push the button (Figure D) under the center of the license plate lamp shield. Pressing on your keyfob will also unlatch the liftgate glass. Roadside Assistance Centers Country United States Canada June 2006 First Printing Quick Reference Guide 7L1J19G217AA 7 L 1 J - 19G 217 - A A Expedition Litho in U.S.A. 6 FOLDER In folder mode, press to access previous or next folder on MP3 discs, if available. C D Do not open the liftgate or the liftgate glass in a garage or other enclosed area with a low ceiling. For complete details on any roadside assistance concern, please consult the Roadside Emergencies chapter, or the Customer Assistance chapter in your Owner's Guide.
-
 1
1 -
 2
2
 |
 |