2007 Ford Explorer Sport Trac Quick Reference Guide 1st Printing - Page 1
2007 Ford Explorer Sport Trac Manual
Page 1 highlights
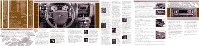
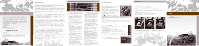
07 SPORT TRAC Instrument Panel 01 02 03 04 05 06 07 08 04 7. Speed Control To engage speed control, ensure a vehicle speed of 30 mph or greater, and press ON, then momentarily press SET+. To set a higher speed, press and hold SET +, then release the control when you have reached your desired speed. To set a lower speed, press and hold SET - until you have reached your desired speed, or depress the brake pedal and press the SET + control. To return to a previously set speed faster than 30 mph, press RES. To disengage speed controls, depress the brake pedal or press OFF. 8. Headlamp and Panel Dimmer Control The headlamp control is located on the lower left portion of the instrument panel. The first clockwise position controls the parking lamps; the second clockwise position controls the headlamps. If your vehicle is equipped with fog lamps, pull the control out one position to activate the lamps to aid visibility in fog, snow or rain. The autolamps feature (if equipped) automatically activates/deactivates your headlamps as necessary. To use the autolamps feature, rotate the control counterclockwise; to deactivate the feature, place the control in the O (Off) position. 9. Parking Brake Release Pull the release lever to release the parking brake. Driving with the parking brake engaged will cause the brakes to wear out prematurely and reduce fuel economy. The parking brake is not recommended to stop a moving vehicle. However, if normal brakes fail, the parking brake can be used to stop your vehicle in an emergency. Because the parking brake applies only the rear brakes, the vehicle's stopping distance will increase greatly and the handling of your vehicle will be adversely affected. 10. Four-Wheel Drive (if equipped) When 4X4 AUTO is selected, power is automatically provided to all four wheels. It is used for normal street and highway driving. 4X4 HIGH is used for extra traction in slippery conditions, such as in snow, on icy roads, or in off-road situations. It should not be operated on dry pavement. 4X4 LOW can be selected to provide extra gearing to deliver maximum power to all four wheels. It is intended only for off-road applications such as deep sand, steep grades or pulling heavy objects. 11. AdvanceTrac® with Roll Stability Control (RSC®) The AdvanceTrac® with RSC® system enhances your vehicle's stability during maneuvers that require all available tire traction, like in wet/snowy/icy road conditions and/or when performing emergency maneuvers. In an emergency lane change, the driver will experience better overall vehicle traction, and have better control of the vehicle. The AdvanceTrac® with RSC® button allows the driver to turn off certain features of the AdvanceTrac® with RSC® system for speeds below 25 mph (40 km/h). To deactivate, please refer to the Owner's Guide for additional information. 12. Power Adjustable Foot Pedals (if equipped) Press and hold the control to adjust the position of the accelerator and brake pedal forward or away from you, to a maximum of three inches of travel. The accelerator and brake pedal should only be adjusted when the vehicle is stopped and the gearshift lever is in the P (Park) position. 13. Heated Seats (if equipped) The heated seat controls are located in the lower center of the instrument panel. To operate the heated seat function, push the control to activate and push again to deactivate. 14. Heated Windshield (if equipped) The heated windshield control is located on the instrument panel just under the climate controls behind the gear shift lever. To activate the heated windshield, push the control. During initial start-up, the windshield may have a shimmering appearance. This is normal operation and will only last for approximately one minute. The heated windshield will turn off automatically after a period of eight minutes if the outside temperature is below 40˚F or a period of four minutes when the outside temperature is above 40˚F. To manually turn off the heated windshield before the specified time has passed, push the control switch again. 15. Gearshift / Overdrive (O/D) Control Overdrive is the normal driving position for the best fuel economy, and can be deactivated by pressing the transmission control switch on the side of the gearshift lever. This position allows for all forward gears except overdrive, provides engine braking and should be used when driving conditions cause excessive shifting from O/D to other gears, such as city traffic, hilly terrain and trailer towing. 07 SPORT TRAC Cargo Management System & Pickup Box Storage 07 SPORT TRAC If your Sport Trac came equipped with another climate system, refer to your Owner's Guide for detailed information. Dual Automatic Temperature Control (DATC) (if equipped) The cargo management system consists of 3 storage bins; one large compartment located in the front floor of the pickup box and two smaller compartments located behind the pickup box wheel wells. 1. To release the cover, pull the release handle located on the inside of the pickup box, on the driver's side just underneath the top edge. Lift up on the cover to open. 2. To close, lower the cover and push down until it clicks. A storage compartment is located behind each wheel well in the pickup box. 1. Turn the latch counterclockwise to unlock and open the storage compartment cover. 2. To close, lower the cover and turn the latch clockwise to lock. During nighttime conditions, the interior dome lamps, outside mirror approach lamps (if equipped), and pickup box cargo lamps can be turned on manually by rotating the panel dimmer control (under the headlamp knob) fully to the right (past detent). Cargo Cage (if equipped) Your vehicle may be equipped with a cargo cage designed to extend the pickup box for larger loads. To extend the cargo cage: 1. Lower tailgate. 2. Rotate the lever on each side of the cargo cage to release it from the pickup box. 3. Flip the cargo cage over on to the tailgate. 4. Evenly push down on the cargo cage and push the lever in on each side locking it in place. To stow the cargo cage, follow steps one through four in reverse order. For more information, refer to the Driver Controls chapter of your Owner's Guide. Tonneau Cover (if equipped) Your vehicle may be equipped with a tonneau cover. It has been designed to maximize fuel economy and should be fully installed whenever possible. To operate the front panel: 1. Open the front driver side lock cover and unlock the front panel. 2. Push the release button to unlatch the front panel and lift the panel to access items in the pickup box near the cab. 3. To close, lower the panel down on the pickup box. To operate the rear panel: 1. Open the lock cover and unlock the rear panel. 2. Push the release button to unlatch the rear panel and lift the rear panel to access items in the pickup box. 3. To close, lower the rear panel on the pickup box. For a more detailed description on proper usage, refer to the Driver Controls chapter of your Owner's Guide. 5 1 2 2 6 3 4 7 8 10 11 09 1. EXT: Press the EXT button to display outside air temperature. Press again to display cabin temperature settings. 2. Temperature Controls: To control the temperature on the driver's side in single zone mode, select any temperature between 60º F and 90º F by pressing the driver temperature control; the climate system's display indicates the selected temperature. The passenger can also select any temperature between 60º F and 90º F by pressing the passenger temperature control. 3. AUTO: Press to select the desired temperature shown in the display window. The system will automatically determine the fan speed, the direction of the airflow, and outside or recirculated air to heat or cool the vehicle to the selected temperature. 4. OFF: Outside air is shut out and the fan will not operate. 5. Manual Override Controls: Allows you to manually determine where airflow is directed. To return to fully automatic control, press AUTO. 6. DUAL (Single/dual electric temperature control): Allows the driver to have full control of the cabin temperature settings (single zone) or allows the passenger to have control of their individual temperature settings (dual zone control). Press to turn on dual zone mode; press again to return to single zone. 7. MAX A/C: Press to distribute recirculated air through the instrument panel vents to cool the vehicle. This recooling of the interior air is more economical and efficient. 8. Defrost: Press to clear the windshield of fog and thin ice. 12 13 14 15 THE ALL-NEW 07 SPORT TRAC was engineered with your lifestyle in mind - tough enough to take on what the road ahead gives you, yet sophisticated with new and advanced features. Some of these features you will find to be intuitive, while others may be new to you. Please take a few moments to familiarize yourself with your new Sport Trac by reading this Quick Reference Guide, which discusses features, specifications and general information. For detailed information, consult your Owner's Guide. 1.ABS Warning Light Your anti-lock braking system (ABS) detects the onset of wheel lockup during brake applications and helps prevent wheels from locking during extreme braking situations. The ABS warning light will illuminate when you start the vehicle's engine. If the light remains illuminated, continues to flash, or fails to illuminate, see an authorized dealer's service department immediately. 2. Service Engine Soon Light The Service Engine Soon indicator light is located in the instrument cluster and illuminates when the engine is started. If the light remains illuminated, it may signal a problem with the On Board Diagnostics System (OBD-II), consult your Owner's Guide for additional information. If the light is blinking, engine misfire is occurring which could damage the vehicle's catalytic converter. If blinking occurs, drive in a moderate fashion and have your vehicle serviced immediately by an authorized dealer. 3. Tire Pressure Monitoring System (TPMS) When the Tire Pressure Monitoring System (TPMS) warning light is lit, one or more of your tires is significantly under-inflated. You should stop and check the tires as soon as possible, and inflate them to the proper pressure, as shown on the Safety Compliance Certification Label (located on the edge of the driver's door jamb or B-pillar). Driving on a significantly under-inflated tire causes the tire to overheat and can eventually lead to tire failure. Note: Outside temperatures affect tire pressure; refer to the Owner's Guide for additional tire information. 4. Message Center The message center displays features such as trip odometer, compass, distance to empty, average fuel economy and a language selector. The message center also provides vehicle system checks and will notify you of potential vehicle problems with a display of system warnings. Optional Message Center (if equipped) INFO: Press to scroll through the following displays: Odometer, Trip Odometer A or B, Distance to Empty, Average Fuel Economy, Instantaneous Fuel Economy, Fuel Used, Trip Elapsed Drive Time and Blank. RESET: Press to select and reset functions shown in the Info (Information) and Setup Menu. SETUP: Press to scroll through: System Check, Units (English/Metric), Language, Autolamp, Autolock, Autounlock and Compass. 5. Turn Signal and Wiper / Washer Control To use your windshield wiper/ washers: for a single swipe, push the end of the control briefly; push and hold for three swipes with wash, or hold for a longer wash (up to ten seconds). The bars of varying length are for intermittent wipers. Rotate the windshield wiper control upward for fast intervals and downward for slow intervals. 6. Hazard Flasher Control The hazard flasher is located on the steering column, just behind the steering wheel. Press the flasher control and all front and rear direction signals will flash; press the control again to deactivate the feature.
-
 1
1 -
 2
2
 |
 |
