2008 Ford Taurus Quick Reference Guide 2nd Printing - Page 2
2008 Ford Taurus Manual

Page 2 highlights
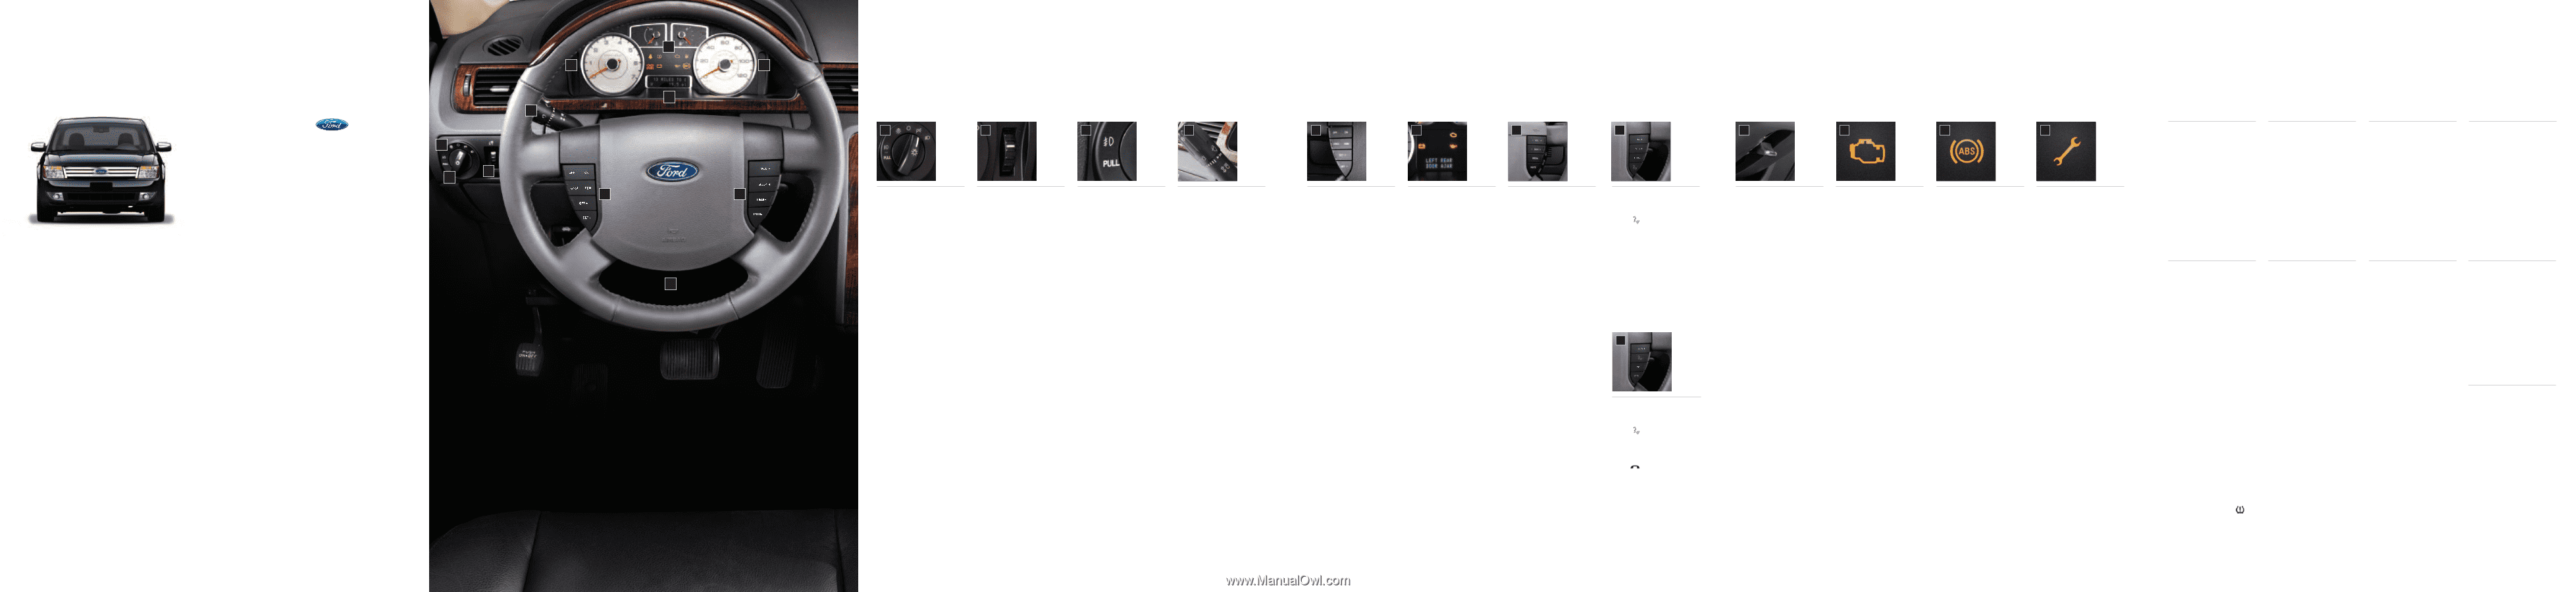
9 11 6 4 10 2008 FORD TAURUS ESSENTIAL INFORMATION 1 2 3 4 5 6 7 7 8 9 10 11 LOCATION OF SPARE TIRE AND TOOLS Your vehicle is equipped with a temporary spare tire, which is smaller than a regular tire, and designed for emergency use only. The jack, spare tire, jack handle, and lug nut wrench are under the cargo cover in the trunk of the vehicle. FORD TAURUS Your new Taurus speaks volumes without saying a word. You have chosen well. Your new Ford Taurus is the car that was built around you. Surrounding you with sleek, trim good looks and unexpected luxury. Putting you in command with impeccable road manners. Giving you the peace of mind knowing you're driving one of the smartest cars the road has ever known. This Quick Reference Guide was designed to help you get to know your new Taurus. For the most detailed information, consult your Owner's Guide. So, let's get to know your new Taurus. The road is waiting. FUSES If your electrical components are not working properly, a fuse may have blown. For more information, please consult your Owner's Guide. FUEL PUMP SHUT-OFF SWITCH This device stops the electric fuel pump from sending fuel to the engine when your vehicle has had a substantial jolt. After an accident, if the engine cranks but does not start, this switch may have been activated. The fuel pump shut-off switch is located in the front passenger footwell area in the right upper corner. UNLEADED FUEL RECOMMENDATIONS For optimum performance, use "Regular" unleaded fuel with a pump (R+M)/2 octane rating of at least 87. We do not recommend the use of gasolines labeled as "Regular" with octane ratings of 86 or lower that are sold in high altitude areas. 1 3 2 5 7 HEADLAMP CONTROL Turning the headlamp control clockwise to the first position turns on the parking lamps, instrument panel lamps, license plate lamps and the tail lamps. Continuing to turn the headlamp control to the second position turns on the headlamps. To use the autolamp lightsensitive, automatic on-off control for the headlamps, turn the headlamp control counterclockwise. If the windshield wipers are turned on for a fixed period of time, the exterior lamps will turn on with the headlamp control in the autolamp position. To turn autolamps off, turn the control clockwise to the OFF position. To activate the high beams, simply push the turn signal lever toward the instrument panel. Pull the lever toward you to deactivate high beams. Use the same lever to activate the "Flash to Pass" feature. Pull the lever toward you to slightly activate and release it to deactivate. PANEL DIMMER Use this control to adjust the brightness of the instrument panel and all applicable switches in the vehicle during headlamp and parking lamp operation. Move the control to the full upright position, past the detent, to turn on the interior lamps. FOGLAMP CONTROL (IF EQUIPPED) WINDSHIELD WIPER / WASHER The multifunction lever controls the windshield wiper modes, speeds and the windshield washer. Rotate the end of the control away from you to increase the speed of the wipers. Rotate the control towards you to decrease the speed of the wipers. For windshield washer control, push the end of the stalk briefly to cause a single swipe of the wiper. With a quick push and hold, the wipers will swipe three times with washer fluid. With a long push and hold, the wipers and washer fluid will activate for up to ten seconds. SPEED CONTROL For your speed control to work, you must press and release the ON button. Pressing and releasing the OFF button disengages the system and turns it off. To set a speed, press the ON button, accelerate to the desired speed, press the SET+ button, then take your foot off the accelerator pedal. You can increase your speed by pressing and releasing the SET+ button until you reach the desired speed, increasing speed by 1 mph (1.6 km/h) with each tap. You can decrease speed in the same way using the SET- button. Pressing the RSM (resume) button will automatically return the vehicle to the previously set speed. To disengage the speed control, press the OFF or CNCL button or depress the brake pedal. MESSAGE CENTER (IF EQUIPPED) STEERING WHEEL AUDIO CONTROLS (IF EQUIPPED) NAVIGATION HANDS FREE FEATURE (IF EQUIPPED) TILT STEERING COLUMN To adjust the steering wheel, push the adjustment lever down to unlock the steering column. While the lever is down, tilt the steering column to your desired position. Then, while holding the steering column in place, pull the lever up to its original position to lock the steering column. Do not adjust while driving. SERVICE ENGINE SOON The service engine soon indicator lamp illuminates when the ignition is first turned to the ON position to check the bulb. If the light turns solid or blinks, the On Board Diagnostics System has detected a malfunction. Drive in a moderate fashion (avoid heavy acceleration or deceleration) and have your vehicle serviced immediately. ABS WARNING LAMP In an emergency, apply continuous force to the brake pedal. Do not pump the brakes. Any pulsation or mechanical noise you may feel or hear is normal. If the lamp doesn't illuminate or stays on, have your vehicle serviced. Normal braking is still functional unless the brake warning lamp is also illuminated. THROTTLE CONTROL / TRANSMISSION LAMP The throttle control / transmission lamp illuminates when a powertrain fault has been detected. Contact your dealer as soon as possible. 8 With the ignition on, the foglamps can be turned on when the headlamp control is in the parking lamp, headlamp or autolamp position, and the high beams are not on. Simply pull the headlamp control toward you to turn on the foglamps. The foglamp indicator light will illuminate. The foglamps will not operate when the high beams are activated. Use extreme caution when using any device or feature that may take your attention off the road. Your primary responsibility is the safe operation of the vehicle. Only use non-essential features and devices when it is safe to do so. With the ignition in the ON position, the message center displays important vehicle information by constantly monitoring vehicle systems. You may select display features on the message center for a display of status. The system will also notify you of potential vehicle problems with a display of system warnings. For more information, please consult your Owner's Guide. These controls allow you to adjust the radio and CD features from the steering wheel. Press MEDIA to select AM, FM1, FM2 or CD. Press SEEK to access the previous/next strong station or track on a CD. Press VOL+/- to adjust volume, and MUTE to mute the volume. Press to access and use voice commands through your navigation system and SYNC (if equipped). For more information, please refer to your Navigation Supplement. TIRE PRESSURE Safe operation of your Taurus requires that your tires be properly inflated. The Ford recommended inflation pressure is found on the Tire Label or the Safety Compliance Certification Label located near the front door latch on the edge of the driver's door. At least once a month and before long trips, inspect each tire and check the air pressure with a digital or dial-type tire gauge. Don't forget the spare. Air pressure should be checked when the tires are cold. Inflate all tires to the inflation pressure recommended by Ford Motor Company. As an added safety feature, your vehicle has been equipped with a tire pressure monitoring system (TPMS) that illuminates a low tire pressure warning light when one or more of your tires is significantly under-inflated. ROADSIDE ASSISTANCE In addition to your New Vehicle Limited Warranty, Ford provides new vehicle owners with a complimentary roadside assistance program. It covers changing a flat tire, jump starts, limited fuel delivery, lock-out assistance, winch out and towing of your vehicle. United States (800) 241 - 3673 Canada (800) 665 - 2006 HOOD RELEASE To open the hood, pull the hood release handle under the bottom of the instrument panel near the steering column. Go to the front of the vehicle and release the auxiliary latch located under the front center of the hood. Use the prop rod to support the raised hood. Lift the prop rod by the sleeve, not the bare metal. REAR WINDOW BUFFETING When one or both of your rear windows are fully open, you may experience a wind throb or buffeting noise. This is common among all vehicles and can be eliminated simply by lowering a front window two to three inches. 7 SAFETY Please wear your safety belt, pay attention to changing road conditions and drive safely. For more safety related information, please consult your Owner's Guide. SYNC STEERING WHEEL CONTROLS (IF EQUIPPED) Press to access and use SYNC's voice recognition system. Press OK to confirm a selection in SYNC mode. Press to access SYNC's hands-free calling features. Press MENU when in SYNC mode to access the previous (-) or next (+) menu item. For more information, please refer to your SYNC supplement. 2008 QUICK REFERENCE GUIDE INSTRUMENT PANEL
-
 1
1 -
 2
2
 |
 |