2009 Ford F350 Super Duty Regular Cab Owner's Manual - Page 30
2009 Ford F350 Super Duty Regular Cab Manual

Page 30 highlights
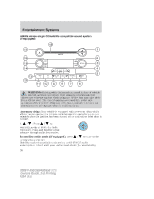
Entertainment Systems OK. The song will appear in the display for confirmation. Press OK again and the display will read SONG DELETED. If you do not want to delete the currently listed song, press / to select either RETURN or CANCEL. Note: If there are no songs presently saved, the display will read NO SONGS. • DELETE ALL SONGS: Press OK to delete all songs from the system's memory. The display will read ARE YOU SURE ? Press OK to confirm deletion of all saved songs and the display will read ALL DELETED. Note: If there are no songs presently saved, the display will read NO SONGS. • ENABLE ALERTS / DISABLE ALERTS: Press OK to enable/disable the satellite alert status which alerts you when your selected songs are playing on a satellite radio channel. (The system default is disabled.) SONG ALERTS ENABLED/DISABLED will appear in the display. The menu listing will display the opposite state. For example, if you have chosen to enable the song alerts, the menu listing will read DISABLE as the alerts are currently on, so your other option is to turn them off. Satellite radio is available only with a valid SIRIUS radio subscription. Check with your authorized dealer for availability. AUTOSET: Press MENU until the display reads AUTOSET. Autoset allows you to set the strongest local radio stations without losing your original manually set preset stations for AM/FM1/FM2. Use / / SEEK, SEEK to turn on/off. When the six strongest stations are filled, the station stored in preset 1 will begin playing. If there are less than six strong stations, the system will store the last one in the remaining presets. BASS: Press MENU to reach the bass setting. Use / / SEEK to adjust. TREB (Treble): Press MENU to reach the treble setting. Use / / SEEK, SEEK to adjust. SEEK, BAL (Balance): Press MENU to reach the balance setting. Use / / SEEK, SEEK to adjust the audio between the left (L) and right (R) speakers. FADE: Press MENU to reach the fade setting. Use / / SEEK, SEEK to adjust the audio between the back (B) and front (F) speakers. 30 2009 F-250/350/450/550 (f23) Owners Guide, 3rd Printing USA (fus)
-
 1
1 -
2
-
3
-
4
-
5
-
6
-
7
-
8
-
9
-
10
-
11
-
12
-
13
-
14
-
15
-
16
-
17
-
18
-
19
-
20
-
21
-
22
-
23
-
24
-
 25
25 -
 26
26 -
 27
27 -
 28
28 -
 29
29 -
 30
30 -
 31
31 -
 32
32 -
 33
33 -
 34
34 -
 35
35 -
36
-
37
-
38
-
39
-
40
-
41
-
42
-
43
-
44
-
45
-
46
-
47
-
48
-
49
-
50
-
51
-
52
-
53
-
54
-
55
-
56
-
57
-
58
-
59
-
60
-
61
-
62
-
63
-
64
-
65
-
66
-
67
-
68
-
69
-
70
-
71
-
72
-
73
-
74
-
75
-
76
-
77
-
78
-
79
-
80
-
81
-
82
-
83
-
84
-
85
-
86
-
87
-
88
-
89
-
90
-
91
-
92
-
93
-
94
-
95
-
96
-
97
-
98
-
99
-
100
-
101
-
102
-
103
-
104
-
105
-
106
-
107
-
108
-
109
-
110
-
111
-
112
-
113
-
114
-
115
-
116
-
117
-
118
-
119
-
120
-
121
-
122
-
123
-
124
-
125
-
126
-
127
-
128
-
129
-
130
-
131
-
132
-
133
-
134
-
135
-
136
-
137
-
138
-
139
-
140
-
141
-
142
-
143
-
144
-
145
-
146
-
147
-
148
-
149
-
150
-
151
-
152
-
153
-
154
-
155
-
156
-
157
-
158
-
159
-
160
-
161
-
162
-
163
-
164
-
165
-
166
-
167
-
168
-
169
-
170
-
171
-
172
-
173
-
174
-
175
-
176
-
177
-
178
-
179
-
180
-
181
-
182
-
183
-
184
-
185
-
186
-
187
-
188
-
189
-
190
-
191
-
192
-
193
-
194
-
195
-
196
-
197
-
198
-
199
-
200
-
201
-
202
-
203
-
204
-
205
-
206
-
207
-
208
-
209
-
210
-
211
-
212
-
213
-
214
-
215
-
216
-
217
-
218
-
219
-
220
-
221
-
222
-
223
-
224
-
225
-
226
-
227
-
228
-
229
-
230
-
231
-
232
-
233
-
234
-
235
-
236
-
237
-
238
-
239
-
240
-
241
-
242
-
243
-
244
-
245
-
246
-
247
-
248
-
249
-
250
-
251
-
252
-
253
-
254
-
255
-
256
-
257
-
258
-
259
-
260
-
261
-
262
-
263
-
264
-
265
-
266
-
267
-
268
-
269
-
270
-
271
-
272
-
273
-
274
-
275
-
276
-
277
-
278
-
279
-
280
-
281
-
282
-
283
-
284
-
285
-
286
-
287
-
288
-
289
-
290
-
291
-
292
-
293
-
294
-
295
-
296
-
297
-
298
-
299
-
300
-
301
-
302
-
303
-
304
-
305
-
306
-
307
-
308
-
309
-
310
-
311
-
312
-
313
-
314
-
315
-
316
-
317
-
318
-
319
-
320
-
321
-
322
-
323
-
324
-
325
-
326
-
327
-
328
-
329
-
330
-
331
-
332
-
333
-
334
-
335
-
336
-
337
-
338
-
339
-
340
-
341
-
342
-
343
-
344
-
345
-
346
-
347
-
348
-
349
-
350
-
351
-
352
-
353
-
354
-
355
-
356
-
357
-
358
-
359
-
360
-
361
-
362
-
363
-
364
-
365
-
366
-
367
-
368
-
369
-
370
-
371
-
372
-
373
-
374
-
375
-
376
-
377
-
378
-
379
-
380
-
381
-
382
-
383
-
384
-
385
-
386
-
387
-
388
-
389
-
390
-
391
-
392
-
393
-
394
-
395
-
396
-
397
-
398
-
399
-
400
-
401
-
402
-
403
-
404
-
405
-
406
-
407
-
408
-
409
-
410
-
411
-
412
-
413
-
414
-
415
-
416
-
417
-
418
-
419
 |
 |
