1996 Honda Accord Owner's Manual - Page 61
1996 Honda Accord Manual
Page 61 highlights
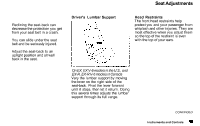
Seat Adjustments Make sure both rear shoulder belts are positioned in front of the rear seat-back whenever the seat-back is in its upright position. Make sure all items in the trunk, or items extending through the opening into the back seat, are tied down. Loose items can fly forward and cause injury if you have to brake hard. See Loading Cargo on page 111. To release the seat-back from inside the trunk, pull the release loop under the rear shelf. To lock the seat-back upright, push it firmly against the rear shelf. Make sure it is latched in place by pulling on the top of the seat. Never drive with the seat-back folded down and the trunk lid open. See Carbon Monoxide Hazard on page 29. Pull Instruments and Controls
-
 1
1 -
2
-
3
-
4
-
5
-
6
-
7
-
8
-
9
-
10
-
11
-
12
-
13
-
14
-
15
-
16
-
17
-
18
-
19
-
20
-
21
-
22
-
23
-
24
-
25
-
26
-
27
-
28
-
29
-
30
-
31
-
32
-
33
-
34
-
35
-
36
-
37
-
38
-
39
-
40
-
41
-
42
-
43
-
44
-
45
-
46
-
47
-
48
-
49
-
50
-
51
-
52
-
53
-
54
-
55
-
 56
56 -
 57
57 -
 58
58 -
 59
59 -
 60
60 -
 61
61 -
 62
62 -
 63
63 -
 64
64 -
 65
65 -
 66
66 -
67
-
68
-
69
-
70
-
71
-
72
-
73
-
74
-
75
-
76
-
77
-
78
-
79
-
80
-
81
-
82
-
83
-
84
-
85
-
86
-
87
-
88
-
89
-
90
-
91
-
92
-
93
-
94
-
95
-
96
-
97
-
98
-
99
-
100
-
101
-
102
-
103
-
104
-
105
-
106
-
107
-
108
-
109
-
110
-
111
-
112
-
113
-
114
-
115
-
116
-
117
-
118
-
119
-
120
-
121
-
122
-
123
-
124
-
125
-
126
-
127
-
128
-
129
-
130
-
131
-
132
-
133
-
134
-
135
-
136
-
137
-
138
-
139
-
140
-
141
-
142
-
143
-
144
-
145
-
146
-
147
-
148
-
149
-
150
-
151
-
152
-
153
-
154
-
155
-
156
-
157
-
158
-
159
-
160
-
161
-
162
-
163
-
164
-
165
-
166
-
167
-
168
-
169
-
170
-
171
-
172
-
173
-
174
-
175
-
176
-
177
-
178
-
179
-
180
-
181
-
182
-
183
-
184
-
185
-
186
-
187
-
188
-
189
-
190
-
191
-
192
-
193
-
194
-
195
-
196
-
197
-
198
-
199
-
200
-
201
-
202
-
203
-
204
-
205
-
206
-
207
-
208
-
209
-
210
-
211
-
212
-
213
-
214
-
215
-
216
-
217
-
218
-
219
-
220
-
221
-
222
-
223
-
224
-
225
-
226
-
227
-
228
-
229
-
230
-
231
-
232
-
233
-
234
-
235
-
236
-
237
-
238
-
239
-
240
-
241
-
242
-
243
-
244
-
245
-
246
-
247
-
248
-
249
-
250
-
251
 |
 |

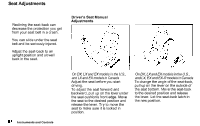
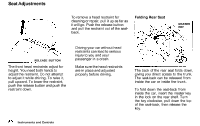
Seat Adjustments
To release the seat-back from inside
the trunk, pull the release loop under
the rear shelf.
To lock the seat-back upright, push it
firmly against the rear shelf. Make
sure it is latched in place by pulling
on the top of the seat.
Make sure both rear shoulder belts
are positioned in front of the rear
seat-back whenever the seat-back is
in its upright position.
Make sure all items in the trunk, or
items extending through the opening
into the back seat, are tied down.
Loose items can fly forward and
cause injury if you have to brake
hard. See
Loading Cargo
on page
111
.
Never drive with the seat-back
folded down and the trunk lid open.
See
Carbon Monoxide Hazard
on
page
29
.
Instruments and Controls
Pull