1997 Honda Civic Owner's Manual - Page 162
1997 Honda Civic Manual

Page 162 highlights
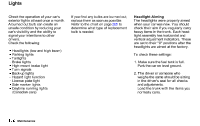
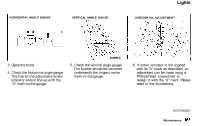
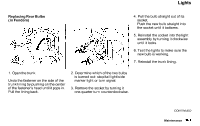
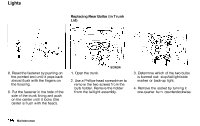
Lights HORIZONTAL ANGLE GAUGE VERTICAL ANGLE GAUGE HORIZONTAL ADJUSTMENT BUBBLE 3. Open the hood. 4. Check the horizontal angle gauge. The line on the adjustment screw indicator should line up with the "0" mark on the gauge. 5. Check the vertical angle gauge. The bubble should be centered underneath the longest scribe mark on the gauge. 6. If either indicator is not aligned with its "0" mark as described, an adjustment can be made using a Phillips-head screwdriver to realign it with the "0" mark. Please refer to the illustrations. CONTINUED Maintenance
-
 1
1 -
2
-
3
-
4
-
5
-
6
-
7
-
8
-
9
-
10
-
11
-
12
-
13
-
14
-
15
-
16
-
17
-
18
-
19
-
20
-
21
-
22
-
23
-
24
-
25
-
26
-
27
-
28
-
29
-
30
-
31
-
32
-
33
-
34
-
35
-
36
-
37
-
38
-
39
-
40
-
41
-
42
-
43
-
44
-
45
-
46
-
47
-
48
-
49
-
50
-
51
-
52
-
53
-
54
-
55
-
56
-
57
-
58
-
59
-
60
-
61
-
62
-
63
-
64
-
65
-
66
-
67
-
68
-
69
-
70
-
71
-
72
-
73
-
74
-
75
-
76
-
77
-
78
-
79
-
80
-
81
-
82
-
83
-
84
-
85
-
86
-
87
-
88
-
89
-
90
-
91
-
92
-
93
-
94
-
95
-
96
-
97
-
98
-
99
-
100
-
101
-
102
-
103
-
104
-
105
-
106
-
107
-
108
-
109
-
110
-
111
-
112
-
113
-
114
-
115
-
116
-
117
-
118
-
119
-
120
-
121
-
122
-
123
-
124
-
125
-
126
-
127
-
128
-
129
-
130
-
131
-
132
-
133
-
134
-
135
-
136
-
137
-
138
-
139
-
140
-
141
-
142
-
143
-
144
-
145
-
146
-
147
-
148
-
149
-
150
-
151
-
152
-
153
-
154
-
155
-
156
-
 157
157 -
 158
158 -
 159
159 -
 160
160 -
 161
161 -
 162
162 -
 163
163 -
 164
164 -
 165
165 -
 166
166 -
 167
167 -
168
-
169
-
170
-
171
-
172
-
173
-
174
-
175
-
176
-
177
-
178
-
179
-
180
-
181
-
182
-
183
-
184
-
185
-
186
-
187
-
188
-
189
-
190
-
191
-
192
-
193
-
194
-
195
-
196
-
197
-
198
-
199
-
200
-
201
-
202
-
203
-
204
-
205
-
206
-
207
-
208
-
209
-
210
-
211
-
212
-
213
-
214
-
215
-
216
-
217
-
218
-
219
-
220
-
221
-
222
-
223
-
224
 |
 |

Lights
3. Open the hood.
4. Check the horizontal angle gauge.
The line on the adjustment screw
indicator should line up with the
"0" mark on the gauge.
5. Check the vertical angle gauge.
The bubble should be centered
underneath the longest scribe
mark on the gauge.
6. If either indicator is not aligned
with its "0" mark as described, an
adjustment can be made using a
Phillips-head screwdriver to
realign it with the "0" mark. Please
refer to the illustrations.
CONTINUED
Maintenance
HORIZONTAL ANGLE GAUGE
VERTICAL ANGLE GAUGE
BUBBLE
HORIZONTAL ADJUSTMENT