1996 Lexus GS 300 Owners Manual - Page 152
1996 Lexus GS 300 Manual
Page 152 highlights
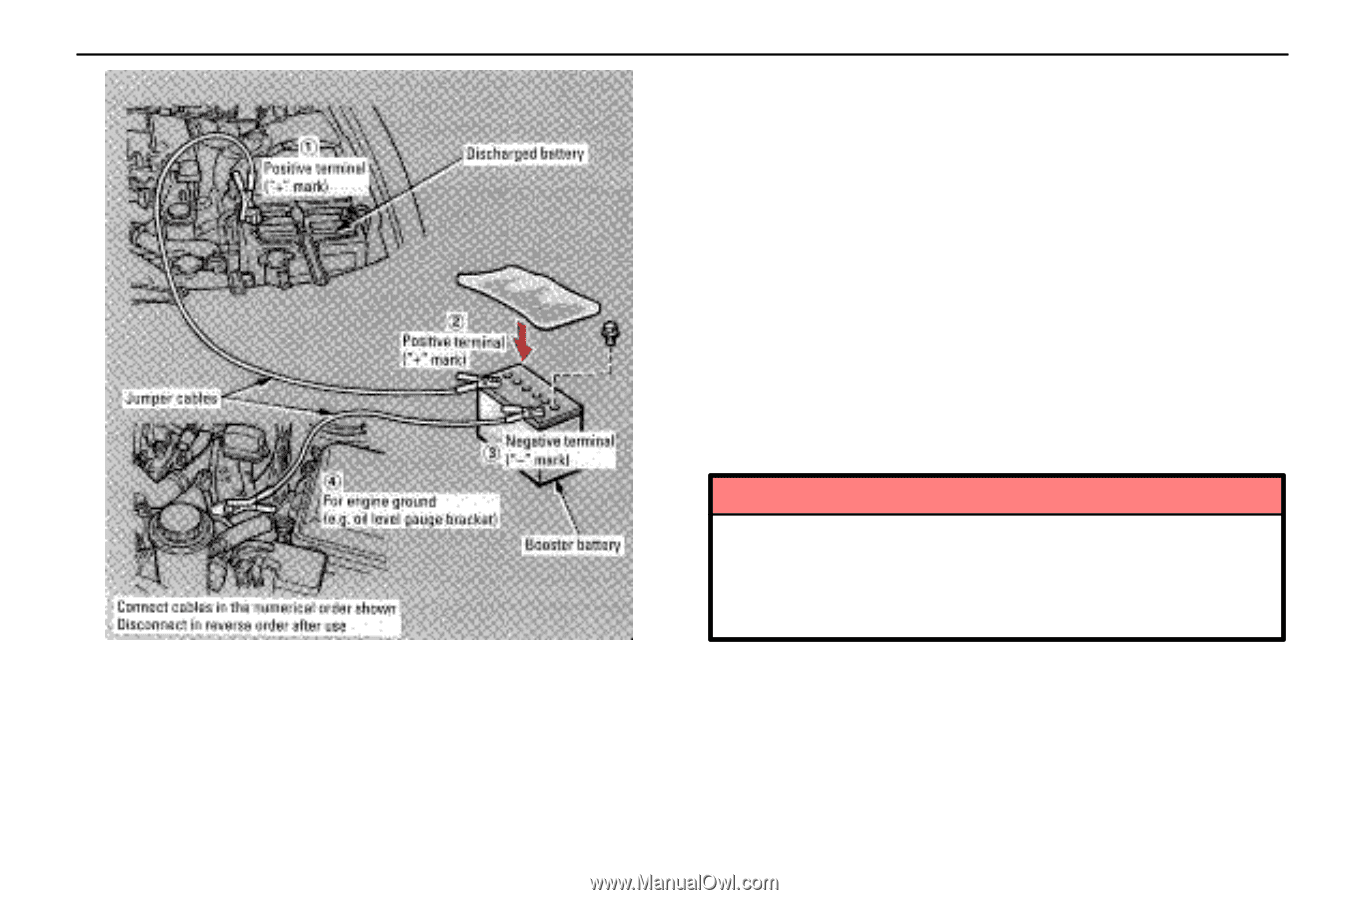
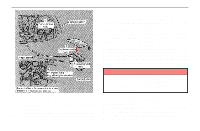
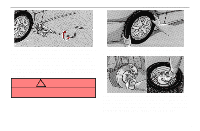
IN CASE OF AN EMERGENCY battery. (This helps reduce the explosion hazard, personal injuries and burns.) 3. If the engine in the vehicle with the booster battery is not running, start it and let it run for about 5 minutes. During jump starting, run the engine at about 2000 rpm with the accelerator pedal lightly depressed. 4. Connect the jumper cables in the exact order shown in the illustration: positive terminal ("+" mark)-to-positive terminal ("+" mark), and negative terminal ("-" mark) -to-engine or body ground. Note that you first connect the positive cable to the discharged battery and then to the booster battery. Next, connect the negative cable to the booster battery and then to a solid, stationary, unpainted metallic point (e.g. oil level gauge bracket) away from the battery. Do not connect it to or near any part that moves when the engine is cranked. NOTICE When making the connections, do not lean over the battery or accidentally let the jumper cables or clamps touch anything except the correct battery terminals or the ground. JUMP STARTING PROCEDURE 1. If the booster battery is installed in another vehicle, make sure the vehicles are not touching. Turn off all unnecessary lights and accessories. 2. If required, remove all the vent plugs from the booster battery. Lay a cloth over the open vents on the booster 138 5. Start your engine in the normal way. After starting, run it at about 2000 rpm for several minutes with the accelerator pedal lightly depressed. 6. Carefully disconnect the cables in the exact reverse order: the negative cable and then the positive cable. 7. Carefully dispose of the battery cover cloths which may now contain sulfuric acid.
-
 1
1 -
2
-
3
-
4
-
5
-
6
-
7
-
8
-
9
-
10
-
11
-
12
-
13
-
14
-
15
-
16
-
17
-
18
-
19
-
20
-
21
-
22
-
23
-
24
-
25
-
26
-
27
-
28
-
29
-
30
-
31
-
32
-
33
-
34
-
35
-
36
-
37
-
38
-
39
-
40
-
41
-
42
-
43
-
44
-
45
-
46
-
47
-
48
-
49
-
50
-
51
-
52
-
53
-
54
-
55
-
56
-
57
-
58
-
59
-
60
-
61
-
62
-
63
-
64
-
65
-
66
-
67
-
68
-
69
-
70
-
71
-
72
-
73
-
74
-
75
-
76
-
77
-
78
-
79
-
80
-
81
-
82
-
83
-
84
-
85
-
86
-
87
-
88
-
89
-
90
-
91
-
92
-
93
-
94
-
95
-
96
-
97
-
98
-
99
-
100
-
101
-
102
-
103
-
104
-
105
-
106
-
107
-
108
-
109
-
110
-
111
-
112
-
113
-
114
-
115
-
116
-
117
-
118
-
119
-
120
-
121
-
122
-
123
-
124
-
125
-
126
-
127
-
128
-
129
-
130
-
131
-
132
-
133
-
134
-
135
-
136
-
137
-
138
-
139
-
140
-
141
-
142
-
143
-
144
-
145
-
146
-
 147
147 -
 148
148 -
 149
149 -
 150
150 -
 151
151 -
 152
152 -
 153
153 -
 154
154 -
 155
155 -
 156
156 -
 157
157 -
158
-
159
-
160
-
161
-
162
-
163
-
164
-
165
-
166
-
167
-
168
-
169
-
170
-
171
-
172
-
173
-
174
-
175
-
176
-
177
-
178
-
179
-
180
-
181
-
182
-
183
-
184
-
185
-
186
-
187
-
188
-
189
-
190
-
191
-
192
-
193
-
194
-
195
-
196
-
197
-
198
-
199
-
200
-
201
-
202
-
203
-
204
-
205
-
206
-
207
-
208
-
209
-
210
-
211
-
212
-
213
-
214
-
215
-
216
-
217
-
218
-
219
-
220
-
221
-
222
-
223
-
224
-
225
-
226
-
227
-
228
 |
 |