2006 Lexus GX 470 Navigation Manual - Page 7
2006 Lexus GX 470 Manual
Page 7 highlights
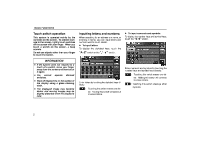
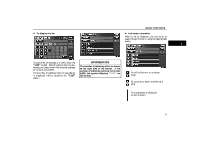
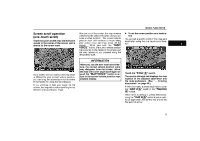
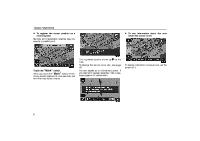
BASIC FUNCTIONS POI INFORMATION When the cursor is set on a POI icon, the name and "Info." switch are displayed on the top of the screen. If you touch the "Enter " switch, the position of cursor is set as a destination. If there is already a preset destination, the "Add to " switch and the "Replace " switch are displayed. When there is already a preset destination, using the "Add to " switch to set an additional destination, will set the new one as the first point of arrival. To register this POI as a memory point, touch the "Mark" switch. (For details, see page 68.) If you touch the switch, the registered telephone number can be called. MEMORY POINT INFORMATION When the cursor is set on a memory point icon, the name and "Info." switch are displayed on the top of screen. Touch the "Info." switch. Touch the "Info." switch. INFORMATION The desired Point of Interest can be displayed on the map screen. (For details, see page 51.) Information such as the name, address, and phone number are displayed. Information such as the name, location, and phone number are displayed. If you touch the "Enter " switch, the position of cursor is set as a destination. 7
-
 1
1 -
 2
2 -
 3
3 -
 4
4 -
 5
5 -
 6
6 -
 7
7 -
 8
8 -
 9
9 -
 10
10 -
 11
11 -
 12
12 -
13
-
14
-
15
-
16
-
17
-
18
-
19
-
20
-
21
-
22
-
23
-
24
-
25
-
26
-
27
-
28
-
29
-
30
-
31
-
32
-
33
-
34
-
35
-
36
-
37
-
38
-
39
-
40
-
41
-
42
-
43
-
44
-
45
-
46
-
47
-
48
-
49
-
50
-
51
-
52
-
53
-
54
-
55
-
56
-
57
-
58
-
59
-
60
-
61
-
62
-
63
-
64
-
65
-
66
-
67
-
68
-
69
-
70
-
71
-
72
-
73
-
74
-
75
-
76
-
77
-
78
-
79
-
80
-
81
-
82
-
83
-
84
-
85
-
86
-
87
-
88
-
89
-
90
-
91
-
92
-
93
-
94
-
95
-
96
-
97
-
98
-
99
-
100
-
101
-
102
-
103
-
104
-
105
-
106
-
107
-
108
-
109
-
110
-
111
-
112
-
113
-
114
-
115
-
116
-
117
-
118
-
119
-
120
-
121
-
122
-
123
-
124
-
125
-
126
-
127
-
128
-
129
-
130
-
131
-
132
-
133
-
134
-
135
-
136
-
137
-
138
-
139
-
140
-
141
-
142
-
143
-
144
-
145
-
146
-
147
-
148
-
149
-
150
-
151
-
152
-
153
-
154
-
155
-
156
-
157
-
158
-
159
-
160
-
161
-
162
-
163
-
164
-
165
-
166
-
167
-
168
-
169
-
170
-
171
-
172
-
173
-
174
-
175
-
176
-
177
-
178
-
179
-
180
-
181
-
182
-
183
-
184
-
185
-
186
-
187
-
188
-
189
-
190
-
191
-
192
-
193
-
194
-
195
 |
 |
