2003 Mazda MPV Owner's Manual - Page 25
2003 Mazda MPV Manual
Page 25 highlights
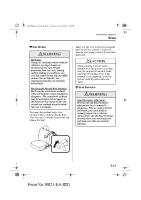
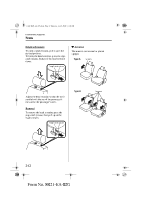
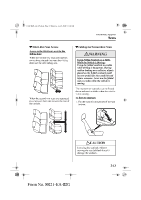
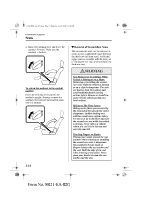
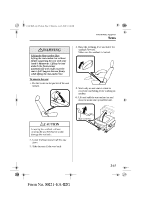
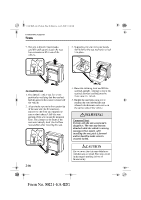
J16L_8R21-EA-02G.book Page 16 Saturday, June 8, 2002 11:16 AM Essential Safety Equipment Seats 7. The seat is heavier than it looks, carefully pull up and detach the seat. Get assistance to lift it out of the vehicle. Clamp 3. Supporting the seat with your hands, slowly lower the seat rearwards to lock it in place. Loops To install the seat 1. First identify which seat fits which position by verifying that the seat belt buckles point to the center (inboard) of the vehicle. 2. Align the clamps on the front underside of the seat with the forward loop anchors on the floor and support the seat so that it doesn't fall (the rear portion of the seat cannot be mounted first). The clamps on the front of the seat automatically lock into the floor loop anchors after lowering the seat. Clamp 4. Raise the reclining lever and lift the seatback upright. Attempt to move the seatback forward and backward to make sure it is locked. 5. Buckle the seat belts once just to confirm the seat belt buckles are inboard which means each seat is on the correct side of the vehicle. WARNING Unsecured Seat: Driving with the seat unsecured is dangerous. The seat may become detached while the vehicle is moving causing serious injury. After installing the seat, push it forward and backward to make sure it is securely locked. Loops CAUTION Do not move the side seat-slide lever with the seat removed. The lever could be damaged resulting in loss of functionality. 2-16 Form No. 8R21-EA-02G
-
 1
1 -
2
-
3
-
4
-
5
-
6
-
7
-
8
-
9
-
10
-
11
-
12
-
13
-
14
-
15
-
16
-
17
-
18
-
19
-
 20
20 -
 21
21 -
 22
22 -
 23
23 -
 24
24 -
 25
25 -
 26
26 -
 27
27 -
 28
28 -
 29
29 -
 30
30 -
31
-
32
-
33
-
34
-
35
-
36
-
37
-
38
-
39
-
40
-
41
-
42
-
43
-
44
-
45
-
46
-
47
-
48
-
49
-
50
-
51
-
52
-
53
-
54
-
55
-
56
-
57
-
58
-
59
-
60
-
61
-
62
-
63
-
64
-
65
-
66
-
67
-
68
-
69
-
70
-
71
-
72
-
73
-
74
-
75
-
76
-
77
-
78
-
79
-
80
-
81
-
82
-
83
-
84
-
85
-
86
-
87
-
88
-
89
-
90
-
91
-
92
-
93
-
94
-
95
-
96
-
97
-
98
-
99
-
100
-
101
-
102
-
103
-
104
-
105
-
106
-
107
-
108
-
109
-
110
-
111
-
112
-
113
-
114
-
115
-
116
-
117
-
118
-
119
-
120
-
121
-
122
-
123
-
124
-
125
-
126
-
127
-
128
-
129
-
130
-
131
-
132
-
133
-
134
-
135
-
136
-
137
-
138
-
139
-
140
-
141
-
142
-
143
-
144
-
145
-
146
-
147
-
148
-
149
-
150
-
151
-
152
-
153
-
154
-
155
-
156
-
157
-
158
-
159
-
160
-
161
-
162
-
163
-
164
-
165
-
166
-
167
-
168
-
169
-
170
-
171
-
172
-
173
-
174
-
175
-
176
-
177
-
178
-
179
-
180
-
181
-
182
-
183
-
184
-
185
-
186
-
187
-
188
-
189
-
190
-
191
-
192
-
193
-
194
-
195
-
196
-
197
-
198
-
199
-
200
-
201
-
202
-
203
-
204
-
205
-
206
-
207
-
208
-
209
-
210
-
211
-
212
-
213
-
214
-
215
-
216
-
217
-
218
-
219
-
220
-
221
-
222
-
223
-
224
-
225
-
226
-
227
-
228
-
229
-
230
-
231
-
232
-
233
-
234
-
235
-
236
-
237
-
238
-
239
-
240
-
241
-
242
-
243
-
244
-
245
-
246
-
247
-
248
-
249
-
250
-
251
-
252
-
253
-
254
-
255
-
256
-
257
-
258
-
259
-
260
-
261
-
262
-
263
-
264
-
265
-
266
-
267
-
268
-
269
-
270
-
271
-
272
-
273
-
274
-
275
-
276
-
277
-
278
-
279
-
280
-
281
-
282
-
283
-
284
-
285
-
286
-
287
-
288
-
289
-
290
-
291
-
292
-
293
-
294
-
295
-
296
-
297
-
298
-
299
-
300
-
301
-
302
-
303
-
304
-
305
-
306
-
307
 |
 |
