2009 Mercedes C-Class Owner's Manual - Page 149
2009 Mercedes C-Class Manual
Page 149 highlights
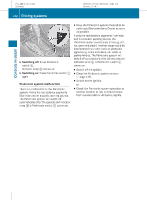
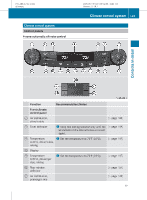
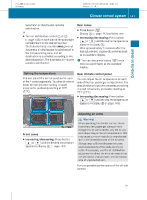
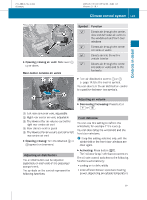
219_AKB; 4; 54, en-US d2ureepe, 2009-05-11T16:21:02+02:00 - Seite 147 Version: 2.11.8.1 Climate control system automatic air distribution remains switched on. or X 147 Rear zones X i You can also press button ° once more to switch back to the standard display. Rear climate control panel You can adjust the air temperature on each side of the rear passenger compartment. You should raise or lower the temperature setting in small increments, preferably starting at 72‡ (22†). X Increasing/decreasing: Press button 9 or : until the desired temperature appears in display P (Y page 143). Setting the temperature You can adjust the air temperature for each of the 4 zones separately. You should raise or lower the temperature setting in small increments, preferably starting at 72‡ (22†). Adjusting air vents G Warning! When operating the climate control, the air that enters the passenger compartment through the air vents can be very hot or very cold (depending on the set temperature). This may cause burns or frostbite to unprotected skin in the immediate area of the air vents. Always keep sufficient distance between unprotected parts of the body and the air vents. If necessary, use the air distribution adjustment to direct the air to air vents in the vehicle interior that are not in the immediate area of unprotected skin. Front zones X Increasing/decreasing: Press button 9 or : until the desired temperature appears in display ? (Y page 143). For best possible performance of the climate control: Z Controls in detail Turn air distribution control : or C (Y page 143) on each side of the passenger compartment to the desired symbol. The indicator lamp in button à goes out. Automatic air distribution is switched off in the corresponding zone, and air distribution is controlled according to the desired position. The automatic air volume remains switched on. Press button °. Display ? (Y page 143) switches over. X Increasing/decreasing: Press button 9 or : until the desired temperature appears in display ?. After approximately 5 seconds after the last adjustment, display ? switches back to its standard display.
-
 1
1 -
2
-
3
-
4
-
5
-
6
-
7
-
8
-
9
-
10
-
11
-
12
-
13
-
14
-
15
-
16
-
17
-
18
-
19
-
20
-
21
-
22
-
23
-
24
-
25
-
26
-
27
-
28
-
29
-
30
-
31
-
32
-
33
-
34
-
35
-
36
-
37
-
38
-
39
-
40
-
41
-
42
-
43
-
44
-
45
-
46
-
47
-
48
-
49
-
50
-
51
-
52
-
53
-
54
-
55
-
56
-
57
-
58
-
59
-
60
-
61
-
62
-
63
-
64
-
65
-
66
-
67
-
68
-
69
-
70
-
71
-
72
-
73
-
74
-
75
-
76
-
77
-
78
-
79
-
80
-
81
-
82
-
83
-
84
-
85
-
86
-
87
-
88
-
89
-
90
-
91
-
92
-
93
-
94
-
95
-
96
-
97
-
98
-
99
-
100
-
101
-
102
-
103
-
104
-
105
-
106
-
107
-
108
-
109
-
110
-
111
-
112
-
113
-
114
-
115
-
116
-
117
-
118
-
119
-
120
-
121
-
122
-
123
-
124
-
125
-
126
-
127
-
128
-
129
-
130
-
131
-
132
-
133
-
134
-
135
-
136
-
137
-
138
-
139
-
140
-
141
-
142
-
143
-
 144
144 -
 145
145 -
 146
146 -
 147
147 -
 148
148 -
 149
149 -
 150
150 -
 151
151 -
 152
152 -
 153
153 -
 154
154 -
155
-
156
-
157
-
158
-
159
-
160
-
161
-
162
-
163
-
164
-
165
-
166
-
167
-
168
-
169
-
170
-
171
-
172
-
173
-
174
-
175
-
176
-
177
-
178
-
179
-
180
-
181
-
182
-
183
-
184
-
185
-
186
-
187
-
188
-
189
-
190
-
191
-
192
-
193
-
194
-
195
-
196
-
197
-
198
-
199
-
200
-
201
-
202
-
203
-
204
-
205
-
206
-
207
-
208
-
209
-
210
-
211
-
212
-
213
-
214
-
215
-
216
-
217
-
218
-
219
-
220
-
221
-
222
-
223
-
224
-
225
-
226
-
227
-
228
-
229
-
230
-
231
-
232
-
233
-
234
-
235
-
236
-
237
-
238
-
239
-
240
-
241
-
242
-
243
-
244
-
245
-
246
-
247
-
248
-
249
-
250
-
251
-
252
-
253
-
254
-
255
-
256
-
257
-
258
-
259
-
260
-
261
-
262
-
263
-
264
-
265
-
266
-
267
-
268
-
269
-
270
-
271
-
272
-
273
-
274
-
275
-
276
-
277
-
278
-
279
-
280
-
281
-
282
-
283
-
284
-
285
-
286
-
287
-
288
-
289
-
290
-
291
-
292
-
293
-
294
-
295
-
296
-
297
-
298
-
299
-
300
-
301
-
302
-
303
-
304
-
305
-
306
-
307
-
308
 |
 |